Instagram stories have become an integral part of our social media routine, allowing us to share snippets of our lives with our followers. One way to make your stories more engaging and fun is by adding music. Here’s a step-by-step guide to help you jazz up your Instagram stories with your favorite tunes:
Step 1: Start Your Story
Open Instagram: Tap on your profile picture or swipe right from the home feed to start creating a story.
Choose Your Content: You can either take a new photo or video by holding down the capture button or upload a pre-existing one from your gallery by tapping the gallery icon on the bottom left.
Step 2: Add Music
Music Icon: Once you’ve selected your content, you’ll see a series of icons on the top of the screen. Tap on the music note icon.
Search or Browse: Instagram provides a library of songs you can choose from. Use the search bar to find a specific track or browse by mood, genre, or what’s popular.
Preview and Select: Tap on a song to hear a preview. Once you find the track you like, tap on it. You’ll then have the ability to choose which part of the song you want to feature in your story.
Step 3: Finalize Your Story
Adjustment: After selecting a snippet of the song, you can adjust your photo or video’s placement and length to match the music.
Lyrics for Captions: For many songs, Instagram will display the lyrics on screen. You can customize the style and placement of these lyrics or turn them off entirely.
Additional Features: You can still use all the other story features, such as stickers, text, or filters, after adding music.
Step 4: Share Your Story
Once you’re satisfied with how your musical story looks and sounds, tap the “Your Story” button to share it with your followers.
Points to Consider
Regional Restrictions: Due to licensing agreements, the music feature might not be available in all countries or for all accounts.
Duration: If you’re adding music to a photo, the story will last as long as the music snippet you’ve chosen, up to 15 seconds. For videos, the music will play over whatever portion of the video you select.
Copyright Issues: Even though Instagram provides a library of songs for use, sharing copyrighted music that’s not in their library can lead to your story being muted or removed.
Adding music is a fantastic way to enhance the emotional impact of your stories, whether you’re sharing moments of joy, nostalgia, motivation, or any other emotion. Experiment with different tracks to find the perfect accompaniment for your visuals!
Explore more related articles for insightful tips on maximizing your Instagram experience, from crafting compelling captions to mastering advanced story features:
The digital frontier of Canadian gambling is a vibrant tapestry of innovation, thrill, and tradition. Amidst this dynamic domain, certain online casino platforms rise above the rest, setting benchmarks in quality, entertainment, and trustworthiness. These sites not only encapsulate the essence of the quintessential gaming experience but also redefine it. As we spotlight the top ten online casino sanctuaries in Canada, prepare to discover a realm where cutting-edge technology meets classic gaming charm, where each click can lead to exhilarating highs and unforgettable memories. Dive in to uncover Canada’s best online casino sites.
List of the 12 Best Online Casinos in Canada:
Jackpot City – A long-standing casino with a vast game selection.
888 Casino – Known for its user-friendly interface and varied game choices.
Yukon Gold Casino – Offers great bonuses and a comprehensive loyalty program.
Zodiac Casino – Astrology-themed casino with a strong reputation.
Spin Casino – Features a wide variety of slots and table games.
Betway – Sports betting options with traditional casino games.
777 Casino – Vintage-themed casino with classic and new games.
OLG Casino – The official casino of the Ontario Lottery & Gaming Corporation.
MGM Casino – The online version of the world-renowned brand.
Luxury Casino – High-end experience with VIP benefits.
Ruby Fortune – This seems to be mentioned twice, so I’ll assume a mistake and skip it.
Bet365 – A global leader in online gambling, renowned for diverse games and top-notch services.
Jackpot City – A long-standing casino with a vast game selection
Established in 1998, Jackpot City is one of the earliest online casinos. It boasts an impressive collection of over 500 games, primarily powered by Microgaming.
Pros:
User-friendly;
Reliable payouts.
Established reputation with over two decades in the industry.
Regularly updated game library with the latest titles.
Cons:
Fewer modern games.
Navigation on the website can be a tad complex for first-time users.
Support: 24/7 live chat, email, and phone support.
License: Malta Gaming Authority.
Trustworthiness: High. 20+ years in the industry.
Bonuses: Up to C$1600 for new players.
Mobile: Fully optimized mobile website and apps.
Security: 128-bit SSL encryption.
Withdrawal Time: 1-5 days depending on the method.
Languages: English, French, Spanish, German.
Games: Slots, blackjack, roulette, and more.
Live Casino: Available with several games and dealers.
888 Casino – Known for its user-friendly interface and varied game choices
888 Casino is a pillar in the online casino industry, originating in 1997. Known for its diverse games and cutting-edge software, it has managed to keep players engaged for decades.
Pros:
Multiple software providers.
Great live casino.
Exceptional proprietary games not found on other platforms.
Regular tournaments with lucrative prize pools.
Cons:
Slower withdrawal times.
Limited game variety compared to other leading casinos.
Support: 24/7 live chat, email, and an extensive FAQ.
License: Gibraltar Regulatory Authority, UK Gambling Commission.
Trustworthiness: Established reputation over the years.
Bonuses: 100% up to C$140 welcome bonus.
Mobile: Mobile-friendly site and dedicated app.
Security: Advanced encryption technologies.
Withdrawal Time: 2-7 days.
Languages: English, French, Spanish, among others.
Games: Slots, poker, live games, jackpots.
Live Casino: Wide selection with real-time streaming.
Yukon Gold Casino – Offers great bonuses and a comprehensive loyalty program
Established in 2004, Yukon Gold offers a Wild West experience. Partnering with Microgaming, it presents a vast array of high-quality games.
Pros:
Attractive theme.
Excellent game selection.
Provides a unique theme, enhancing user experience.
Loyalty points system is generous and rewarding.
Cons:
No live chat support.
The site design can feel a bit dated to some users.
Features:
Payment Methods: Visa, Mastercard, Skrill, Bank Transfer.
Support: 24/7 customer service through chat and email.
License: Kahnawake Gaming Commission.
Trustworthiness: Solid reputation among players.
Bonuses: 125 chances to win massive jackpots for just C$10.
Mobile: Optimized mobile website.
Security: 128-bit SSL encryption.
Withdrawal Time: 2-5 days.
Languages: English, French, German.
Games: Over 550 games including progressive jackpots.
Live Casino: Features a selection of live dealer games.
Zodiac Casino – Astrology-themed casino with a strong reputation
Based on the astrological theme, Zodiac Casino became renowned for offering players 80 chances to become a millionaire for just C$1. With a unique concept and rich graphics, it provides an unforgettable gaming experience.
Pros:
Unique theme.
Lucrative welcome offer.
Offers unique horoscope-themed promotions and insights.
Support: Live chat available 24/7 and responsive email support.
License: Kahnawake Gaming Commission, UK Gambling Commission.
Trustworthiness: High ratings from players and reviewers.
Bonuses: 80 spins for C$1, plus additional deposit bonuses.
Mobile: Compatible with mobile browsers; no dedicated app.
Security: Secure SSL encryption technology.
Withdrawal Time: 1-3 days.
Languages: English, German, French.
Games: 500+ games with progressive jackpots.
Live Casino: Diverse range of games and live dealers.
Spin Casino – Features a wide variety of slots and table games.
Spin Casino, with its user-friendly platform, is a paradise for slot lovers. Established in 2001, it offers a mix of classic and modern games to cater to players of all tastes.
Pros:
Extensive slots collection.
Reliable software.
Live sports betting enhances the gaming variety.
User interface is modern and easy to navigate.
Cons:
Few promotions.
The welcome bonus might have challenging wagering requirements for some players.
Features:
Payment Methods: Credit cards, Neteller, Skrill, Bank Transfer.
Support: 24/7 live chat, email.
License: Malta Gaming Authority.
Trustworthiness: Good standing in the online casino community.
Bonuses: Up to C$1,000 welcome bonus split over three deposits.
Mobile: Optimized mobile website and apps available.
Security: End-to-end encryption.
Withdrawal Time: 1-5 days.
Languages: English, French, Spanish, and more.
Games: Over 600 games, including slots and table games.
Live Casino: Wide variety, especially roulette and blackjack tables.
Betway – Sports betting options with traditional casino games
Besides its rich casino game gallery, Betway stands out for its sports betting section. Having started in 2006, it merges the thrill of casino gaming with sports betting.
Pros:
Seamless integration of casino and sports betting.
Offers esports betting, catering to a growing audience.
Extensive live casino section with varied game choices.
Cons:
Bonus wagering requirements can be high.
Withdrawal times can vary widely based on the method chosen.
Games: 500+ games, including slots, blackjack, roulette.
Live Casino: Robust offerings including poker and game shows.
777 Casino – Vintage-themed casino with classic and new games
777 Casino offers players a trip down memory lane with its retro Vegas theme. Established in 2015, it combines the charm of old-school gaming with modern technology.
Pros:
Unique vintage theme.
Diverse game providers.
Vintage Vegas theme offers a nostalgic experience.
Daily delights provide bonuses every day of the week.
Cons:
Limited table games.
Limited number of game providers compared to competitors.
License: Gibraltar Regulatory Authority, UK Gambling Commission.
Trustworthiness: Operated by the well-respected 888 Holdings.
Bonuses: 100% up to C$200 welcome bonus.
Mobile: Mobile-friendly site; no dedicated app.
Security: SSL encryption.
Withdrawal Time: 2-7 days.
Languages: English, Finnish, German.
Games: 200+ slots, progressive jackpots.
Live Casino: Limited but high-quality offerings.
OLG Casino – The official casino of the Ontario Lottery & Gaming Corporation.
OLG Casino, backed by the Ontario government, offers a trusted platform for lottery and casino games. Being government-run, it ensures top-notch security and fair play.
Pros:
Highly secure.
Supports local projects with revenue.
Directly managed by the provincial government, ensuring trustworthiness.
Reinvests profits into the local community.
Cons:
Fewer game selections compared to international platforms.
Limited to players from certain provinces.
Features:
Payment Methods: Credit cards, Bank Transfer.
Support: Email, phone, and FAQ section.
License: Government-regulated.
Trustworthiness: Extremely reliable due to government oversight.
Bonuses: Regular promotions for lottery and games.
Mobile: Mobile-responsive site.
Security: Government-standard security protocols.
Withdrawal Time: 3-5 days.
Languages: English, French.
Games: Selection of popular slots, table games, and lottery.
Live Casino: Not available.
MGM Casino – The online version of the world-renowned brand
As the digital arm of the MGM brand, MGM Casino offers a virtual experience that mirrors the luxury and quality of its land-based establishments.
Partnerships with top game developers guarantee a diverse game library.
Cons:
Limited promotions.
The site’s heavy graphics can lead to slower loading times on some devices.
Features:
Payment Methods: Credit cards, e-wallets, bank transfers.
Support: 24/7 live chat, email, phone.
License: Various licenses depending on the region.
Trustworthiness: High, given its global brand presence.
Bonuses: Match bonuses and free spins on initial deposits.
Mobile: Apps available for Android and iOS.
Security: Advanced encryption and security measures.
Withdrawal Time: 2-5 days.
Languages: English, Spanish, Chinese, and more.
Games: 600+ games including branded slots and table games.
Live Casino: Comprehensive offerings with diverse tables.
Luxury Casino – High-end experience with VIP benefits
Living up to its name, Luxury Casino promises a lavish online gaming experience. Established in 2011, it offers a blend of traditional and modern games.
Pros:
Sophisticated interface.
High-quality games.
Offers a VIP feel with its elite theme and promotions.
Tiered loyalty program enhances player benefits the more they play.
Cons:
High minimum withdrawal limit.
Mobile experience is not as refined as the desktop version.
Features:
Payment Methods: Visa, Mastercard, e-wallets.
Support: 24/7 live chat, email.
License: Malta Gaming Authority, UK Gambling Commission.
Trustworthiness: Established reputation with positive player reviews.
Bonuses: Up to C$1,000 spread over the first five deposits.
Mobile: Optimized mobile website.
Security: 128-bit SSL encryption.
Withdrawal Time: 3-7 days.
Languages: English, German, French.
Games: Over 550 games from Microgaming.
Live Casino: Diverse range of live games.
Ruby Fortune: This seems to be mentioned twice, so I’ll assume a mistake and skip it
Established in the early 2000s, Ruby Fortune has earned its place as one of Canada’s most reputable online casinos. The site, bathed in a majestic shade of magenta, evokes luxury and quality — a promise it delivers through its vast array of games and sterling customer service. Boasting an impressive collection of slots, table games, and live dealer offerings, Ruby Fortune combines traditional casino charm with state-of-the-art gaming experiences. Its user-friendly interface, mobile optimization, and dedication to fair play have endeared it to both newcomers and seasoned gamblers.
Pros:
Extensive game collection.
Mobile-friendly platform.
Proven fair by third-party audits.
Consistent promotional offers throughout the year.
Interface design is clean and clutter-free.
Cons:
Limited promotions for existing players.
Withdrawal times can be slightly longer for certain methods.
Features:
Payment Methods: Ruby Fortune offers a plethora of payment options, including credit/debit cards like Visa and MasterCard, e-wallets like Skrill and Neteller, and bank transfers.
Support: Available 24/7, their support team can be reached via live chat, email, or phone, ensuring players always have a helping hand when needed.
License: Ruby Fortune is licensed and regulated by the Malta Gaming Authority, a well-respected entity in the online gaming world.
Trustworthiness: With its license from a reputable regulator and eCOGRA certification, Ruby Fortune is recognized as a trustworthy and reliable online casino platform.
Bonuses: New players can avail of a generous welcome bonus spread across their initial deposits, in addition to occasional promotions and free spins.
Mobile: Ruby Fortune’s mobile casino is sleek and responsive, allowing players to indulge in their favorite games on-the-go without any hitches.
Security: The platform employs state-of-the-art SSL encryption technology to ensure player data and financial transactions are kept confidential and secure.
Withdrawal Time: E-wallet withdrawals are processed within 24-48 hours, while card payments and bank transfers may take up to 5 days.
Languages: Available in multiple languages including English, French, German, and Spanish, catering to a diverse clientele.
Games: From popular slots like Mega Moolah to classic table games like roulette and blackjack, Ruby Fortune’s game library is both extensive and diverse.
Live Casino: Players can indulge in an immersive experience with live dealers in games like blackjack, roulette, and baccarat, simulating the ambiance of a real-world casino.
Bet365 Casino – A global leader in online gambling, renowned for diverse games and top-notch services.
One of the most recognizable names in the online gambling industry, Bet365 has successfully extended its offerings from sports betting to a full-fledged online casino. Established in the UK, the casino has attracted a significant number of Canadian players due to its extensive game library, competitive bonuses, and commitment to player safety. Powered by top-tier software providers, players can immerse themselves in a wide range of slots, table games, and live dealer rooms. Bet365’s longevity in the market is a testament to its quality and trustworthiness.
Pros:
Reliable and established brand.
Wide variety of games.
Seamless live dealer experience.
Cons:
The website layout may seem overwhelming to some users.
Payment Methods: Credit/Debit Cards, e-Wallets (such as Skrill, Neteller, PayPal), Bank Transfers.
Support: 24/7 Live Chat, Email, Telephone.
License: UK Gambling Commission and Malta Gaming Authority.
Trustworthiness: High, with years of positive reputation in the industry.
Bonuses: Regular promotions, welcome bonuses, and loyalty points.
Mobile: Responsive mobile website and a dedicated app for both Android and iOS.
Security: Advanced SSL encryption and strict privacy policies.
Withdrawal Time: Varies between 2-5 days based on the method used.
Languages: English, French, Spanish, German, and many more.
Games: Slots, Table Games, Video Poker, Live Dealer Games.
Live Casino: Available, featuring games like Live Blackjack, Roulette, Baccarat, and more.
Canada’s Online Gambling Laws and the Best Online Casinos
Canada has a complex relationship with online gambling. Although it’s not illegal to play at an online casino, running one without a license within the country’s borders is. However, Canadian players have the liberty to play at any offshore online casino.
How Do We Review and Choose Online Casinos?
Navigating the vast ocean of online casinos can be overwhelming, but our approach is meticulous and aimed at ensuring you get the best gaming experience. To review and choose the cream of the online casino crop, we consider multiple vital aspects:
License & Security
At the core of a reputable online casino lies its licensing and regulatory framework. We ensure that the casino is licensed by a renowned authority and emphasizes the highest standards of player security.
Bonuses
A generous bonus can enhance your gaming experience. We delve into the casino’s bonus structure, ensuring transparency, fairness, and achievable wagering requirements.
Software Providers
Quality gaming hinges on top-notch software. We examine the range and reputation of the software providers the casino collaborates with.
Games Variety
A diverse game library ensures that every player’s palate is catered to. We scrutinize the range of games available, from slots to table games.
Live Dealer Casino
For many, a live dealer experience is paramount. We evaluate the quality, variety, and user experience of the live dealer section.
Layout
A user-friendly layout ensures easy navigation and a pleasant gaming experience. We assess the casino’s website design and user interface.
Mobile Compatibility
In today’s digital age, a seamless mobile experience is non-negotiable. We test the casino’s mobile platform for compatibility, responsiveness, and game availability.
Support Efficiency
Prompt and helpful support can make or break a player’s experience. We gauge the efficiency, availability, and responsiveness of the casino’s support channels.
Cashier
Flexible and secure deposit and withdrawal options are crucial. We assess the range of payment methods available and the security measures in place.
VIP & Loyalty Program
For frequent players, VIP and loyalty programs can offer added value. We examine the structure, benefits, and accessibility of these programs to ensure they offer genuine perks to loyal players.
Incorporating these elements into our review process guarantees that when we recommend an online casino, it meets the highest standards in the industry.
Most Popular Online Casino Games in Canada
Canada’s vibrant online casino scene is home to a plethora of games that cater to every type of player. From the nostalgic gambler who enjoys classic slots to the strategic player who thrives on table games, there’s something for everyone. Here’s a breakdown of the most popular online casino games among Canadians:
Slots
Undoubtedly, slots remain the most popular choice. With countless themes, features, and jackpot opportunities, Canadian players are particularly drawn to titles like Mega Moolah, Thunderstruck II, and Immortal Romance.
Blackjack
The game of 21 has its roots deep in casino history and remains a favorite. The mix of skill and luck, along with various versions like Classic, European, and Live Blackjack, keeps players coming back.
Roulette
The thrill of watching the ball settle on a spinning wheel keeps Roulette in high demand. Varieties like American, European, and French Roulette each have their fan base.
Poker
Whether it’s Texas Hold’em, Omaha, or Video Poker, Canadians have showcased a consistent love for this strategic card game.
Baccarat
A game often associated with high rollers, Baccarat has seen an increase in popularity online due to its straightforward rules and quick gameplay.
Live Dealer Games
Live casino games bridge the gap between land-based and online casinos. Players can interact with real dealers and other players in real-time using sophisticated streaming technology. Popular live casino games include live blackjack, roulette, baccarat, and game show adaptations. The immersive experience is as close to a physical casino visit as one can get.
Craps
Craps stands out as a high-energy dice game deeply rooted in casino traditions. Its communal excitement, combined with bets on the outcome of dice rolls, draws a loyal following. Though it might appear complex with its array of bets, online platforms have streamlined the learning curve. In Canada, the digital adaptation of Craps continues to captivate players, combining thrill and strategy in a unique gaming experience.
Progressive Jackpots
The lure of winning life-changing sums of money has made progressive jackpot games like Mega Moolah and Major Millions immensely popular.
Specialty Games
Beyond the traditional offerings, games like Keno, Bingo, and Scratch Cards provide a fun diversion and have their dedicated fanbase.
The wide variety of options ensures that every Canadian player can find a game that matches their preference, enhancing their online casino experience.
Online Sports Betting in Canada
Many online casinos now offer sports betting platforms, allowing players to wager on their favorite sports, from football to hockey to tennis. Players can place pre-match bets or engage in live betting as the action unfolds. With detailed odds and extensive markets, sports betting adds another dimension to online gambling.
Types of Promotions and Bonuses You Can Get At Online Casino
Online casinos entice players with various promotions and bonuses. From welcome bonuses that match a player’s initial deposit to free spins on popular slots, these incentives enhance the player experience. Regular tournaments, cashback offers, and seasonal promotions keep players engaged and offer more opportunities to win.
VIP and Loyalty Programs
For regular players, VIP and loyalty programs offer additional benefits. These might include higher withdrawal limits, exclusive games, personal account managers, and special gifts. Accumulating points by playing can elevate players through different VIP levels, each with its unique perks.
Mobile Casino Apps
As the digital age propels forward, the transition from desktop gaming to mobile is unmistakable. Mobile casino apps have surged in popularity, offering unparalleled convenience to players. These apps encapsulate the full-fledged casino experience into the palm of your hand, allowing for on-the-go gaming anytime, anywhere. Enhanced graphics, intuitive user interfaces, and quick load times make modern casino apps a preferred choice for many Canadian players. Furthermore, secure payment gateways and tailored promotions for mobile users add to the appeal. Ensuring a seamless gaming journey, these apps have revolutionized the online casino landscape, making it more accessible and immersive.
Online Casino Games Software Providers
Behind every great online casino game is a software provider. Companies like Microgaming, NetEnt, and Playtech develop the graphics-rich and feature-loaded games players love. They ensure fairness, innovation, and reliability, often pushing boundaries to elevate the gaming experience.
Popular Payment Methods in Canada
Canadian players have numerous payment options, including credit cards, e-wallets like PayPal and Skrill, bank transfers, and prepaid cards. Each offers different advantages concerning speed, fees, and convenience.
Bitcoin Casinos
With the rise of cryptocurrencies, many online casinos now accept Bitcoin for deposits and withdrawals. Bitcoin offers fast transactions, enhanced security, and anonymity. These casinos often provide special bonuses for Bitcoin users, making it an attractive option for the modern gambler.
Winning Real Money at Online Casinos
The allure of online casinos is the potential to win real money. With a mix of luck and strategy, players can secure significant wins, especially with progressive jackpots. Responsible gambling and understanding odds can enhance the winning potential.
Playing for Free
Many online casinos offer demo versions of their games. This allows players to familiarize themselves with game mechanics without risking real money. It’s a perfect way for newcomers to learn and for seasoned players to practice strategies.
Play at the Best Canadian Online Casinos
Playing at the best Canadian online casinos ensures a combination of entertainment, safety, and the thrill of potential wins. With our curated list, Canadian players can enjoy a premium gambling experience with peace of mind.
Which online casino pays the quickest?
Payout speeds vary, but casinos like Betway and 888 Casino are known for quick withdrawals.
How to win at an online casino?
Winning involves a combination of luck, strategy, and game knowledge. It’s crucial to understand game rules, use bankroll management, and play responsibly
What online casino accepts prepaid MasterCard?
Many online casinos accept prepaid MasterCards. It’s best to check the casino’s payment section or consult customer support.
How to beat online casino?
No foolproof strategy guarantees beating online casinos since games largely depend on chance. However, understanding game strategies, especially for games like blackjack or poker, can increase winning odds.
Which online casino has the best payouts?
Payout rates, also known as RTP (Return to Player), vary. Casinos with games from reputed providers like NetEnt or Microgaming often offer high RTPs.
What is the best real money online casino?
This is subjective and depends on player preferences, but casinos like Jackpot City and Yukon Gold are popular choices.
What is the best online casino to play in Canada?
While personal preferences play a role, Jackpot City and 888 Casino are among the top choices for many Canadian players.
How to use an online casino bonus?
Typically, players need to meet wagering requirements before withdrawing winnings from a bonus. Always read the bonus terms and conditions.
What is the most legit online casino?
Legitimacy is determined by licenses, third-party audits, and user reviews. Casinos like Spin Casino and Zodiac Casino are often considered reputable.
What online casino accepts Paysafecard?
Many online casinos, including Betway and Spin Casino, accept Paysafecard as a payment method.
What are the best online casino games to play?
Player preference dictates this. However, slots, blackjack, and roulette are universally popular.
Where can I play free online casino games without downloading?
Most online casinos offer instant play options where games can be played directly in the browser without downloading.
How to delete an online casino account?
Contact the casino’s customer support or check their FAQ section for detailed steps.
What online casino has the fastest payouts?
Payout speeds depend on the chosen withdrawal method and casino processing times. E-wallets like Skrill and Neteller often result in faster payouts.
How to complain about an online casino?
If there’s an issue, first contact the casino’s support. If unresolved, escalate to their licensing body or a third-party dispute resolution service.
What is playthrough in an online casino?
Playthrough, or wagering requirements, is the number of times a player must wager bonus funds before they can be withdrawn. It’s crucial to check these requirements when accepting bonuses.
Is online gambling legal in Canada?
While the specific laws can be complex, it’s generally legal for Canadians to play at online casinos, especially if the casino is located offshore.
Do online casinos in Canada pay taxes on winnings?
In most cases, Canadians don’t have to pay taxes on online casino winnings unless they are considered professional gamblers who make a living from their winnings.
What are the most popular casino games among Canadians?
Slots remain immensely popular, but Canadians also enjoy table games like blackjack, roulette, and poker.
How do I know if a casino game is fair?
Look for games and casinos that are certified by reputable third-party testing agencies like eCOGRA. They ensure the game’s Random Number Generator (RNG) is unbiased.
Are live dealer games available at Canadian online casinos?
Yes, many Canadian online casinos offer live dealer games, providing an immersive experience that bridges the gap between online and offline gambling.
How do I set a gambling budget?
Determine a monthly or weekly amount you’re comfortable losing. Only use these funds for gambling, and avoid chasing losses.
What are wagering requirements?
They dictate how many times you need to wager your bonus money before it can be withdrawn. Always check the specifics in the bonus terms and conditions.
Can I play at online casinos using Canadian dollars (CAD)?
Many online casinos catering to Canadian players allow transactions in CAD, simplifying deposits and withdrawals.
What is a progressive jackpot slot?
It’s a slot game where the jackpot increases every time the game is played, and the jackpot isn’t won. Some of the most famous progressive slots have made players multimillionaires.
Is my personal information safe with online casinos?
Reputable online casinos use advanced SSL encryption to protect your data. Always choose casinos with strong security measures.
Do Canadian online casinos offer a responsible gambling feature?
Yes, most reputable online casinos provide tools and resources to promote responsible gambling, such as setting deposit limits or self-exclusion options.
How do online casino bonuses work?
Bonuses can come in various forms, from welcome bonuses to free spins. However, they often come with wagering requirements, meaning you’ll need to bet a specific amount before withdrawing the bonus funds.
Can I play online casino games on my mobile?
Absolutely! Most modern online casinos are mobile-friendly, allowing you to play directly through your browser or via dedicated apps.
What’s the difference between an online casino and a land-based casino?
While the games might be similar, online casinos offer convenience as they can be accessed from anywhere. They also often provide a broader range of games and promotions.
How can I recognise a scam casino?
Look out for red flags like too-good-to-be-true bonuses, lack of licensing information, negative reviews, and poor customer support.
How do deposit and withdrawal limits work?
Casinos often set minimum and maximum amounts for deposits and withdrawals. These limits can depend on the payment method and your account status.
Can I practice casino games without betting real money?
Yes, many online casinos offer demo or “free play” versions of their games, allowing you to play without making a real-money wager.
Responsible Gambling in Canada
Responsible gambling stands as a cornerstone in the Canadian gaming industry, ensuring that fun and entertainment do not transition into unhealthy habits. Both online and land-based casinos in Canada are committed to promoting responsible gaming, and numerous measures have been put in place. Players are provided tools like self-exclusion options, betting limits, and reality checks.
Moreover, various organizations actively work to assist those facing gambling-related issues. One prominent agency in this regard is the Canadian Centre on Substance Use and Addiction (CCSA). They provide extensive resources, guidance, and support to individuals experiencing gambling addiction.
If you or someone you know might be facing challenges with gambling, seek immediate assistance. Visit the Canadian Centre on Substance Use and Addiction for guidance and support. It’s crucial to remember that gambling should always be a source of entertainment, not stress or financial dependency.
These related articles may interest you, why don’t you go check them out?
The world of online gambling has never been more accessible, thanks to the rise of mobile casinos. In the Philippines, where the love for gaming runs deep, mobile casinos offer a convenient and thrilling way to enjoy a variety of games from the palm of your hand. Whether you’re into slots, poker, or live dealer games, there’s a mobile casino for you. To help you navigate this exciting world, we’ve curated a list of the top 5 mobile casinos in the Philippines. These casinos stand out for their game selection, user-friendly apps, enticing bonuses, and more. So, without further ado, let’s explore the best mobile casinos for Filipino gamers!
Our Top 5 Picks for The Best Mobile Casinos
King Billy Casino Philippines: Exceptional games, generous bonuses. King of mobile gaming in the Philippines.
Megapari Casino Philippines: Thrilling games, epic promotions. Leading mobile casino experience in the Philippines.
Betway Casino Philippines: Where variety meets mobility and includes a sportsbook.
JackpotCity Casino Philippines: Massive jackpots and diverse games for mobile gaming enthusiasts.
Royal Panda Philippines: Enjoy a royal mobile experience with a user-friendly app.
King Billy Mobile Casino : The King of Mobile Casino
King Billy Mobile Casino reigns supreme as one of the premier destinations for mobile gaming enthusiasts in the Philippines. With a vast array of games at your fingertips, this casino offers an unparalleled mobile gaming experience.
King Billy Mobile App
The King Billy Mobile App is designed for seamless navigation and a user-friendly interface. It ensures that both newcomers and experienced players can easily explore a diverse selection of games. The app is compatible with Android and iOS devices, catering to the preferences of most mobile users. Its exceptional user-friendliness stands out, ensuring an enjoyable gaming adventure for all.
Bonuses and Promotions
King Billy is renowned for its generous bonuses and promotions, adding excitement to every gaming session. From enticing welcome bonuses that enhance your initial deposit to ongoing promotions that keep the gaming thrill alive, KingBilly is committed to rewarding its players. Their customer support is top-notch, providing assistance around the clock and ensuring that you’re never left in the lurch. Whether you’re seeking to extend your gaming time or increase your winning potential, King Billy’s bonuses and promotions offer an extra edge. So, join KingBilly Mobile Casino and elevate your mobile gaming experience to regal heights in the Philippines.
Mobile App
Available on App Store and Google Play
Welcome Bonus
Up to ₱137,500 Welcome Bonus
Game Variety
Slots, Table Games, Live Casino
Special Features
Intuitive app design for seamless navigation and exceptional user-friendliness.
Megapari Philippines: A World of Gaming at Your Fingertips
Megapari Mobile Casino offers Filipino players an exceptional gaming experience right at their fingertips. The Mobile App is designed for seamless navigation and compatibility with both Android and iOS devices, ensuring accessibility for a wide range of players.
Megapari Mobile App
The Mobile App boasts a user-friendly interface, making it easy to explore the extensive game variety, which includes slots, table games, and live casino options. Players can enjoy the thrill of real-time gaming with live dealers, enhancing the overall casino experience. Moreover, Megapari Mobile Casino offers in-play betting options, making it an all-in-one platform for those who enjoy sports betting alongside casino gaming.
Megapari Casino Sportsbook
Megapari not only excels in providing an exceptional casino experience but also offers an impressive sportsbook section. For Filipino players who have a passion for sports betting, Megapari Casino Sportsbook is a one-stop destination. With a wide range of sports and events to choose from, including football, basketball, tennis, and more, it caters to sports enthusiasts of all kinds. The sportsbook offers competitive odds, live in-play betting, and a user-friendly interface that allows you to seamlessly transition between casino games and sports wagering. Whether you’re cheering for your favorite team or looking to capitalize on live betting opportunities, Megapari Sportsbook adds an extra layer of excitement to your online gaming adventure.
Bonuses and Promotions
Megapari believes in rewarding its players generously. Filipino gamers can benefit from a variety of bonuses and promotions, including lucrative welcome bonuses to kickstart their gaming journey. Frequent promotions, such as deposit bonuses and free spins, keep the excitement alive and provide ample opportunities to boost winnings. For players who appreciate sports betting, Megapari offers extensive sports options with unique promotions, catering to a diverse range of preferences. Megapari Mobile Casino ensures that players in the Philippines have access to a world of gaming excitement and winning possibilities.
Mobile App
Available on App Store and Google Play
Welcome Bonus
Up to ₱22,977 Welcome Bonus
Game Variety
Slots, Table Games, Live Casino, Sportsbook
Special Features
Award-winning mobile casino experience
Betway Casino Philippines: Where Variety Meets Mobility
Betway is a global gambling giant, and Filipino players can enjoy their mobile casino as well. What sets Betway apart is the stability of its mobile app and the lightning-fast loading times of its games. In a world where time is money, Betway ensures you don’t waste a second waiting for your favorite games to load.
Betway Casino Mobile App
Betway’s game selection is diverse, covering a wide range of casino games, including slots, roulette, blackjack, and more. The app’s live casino section offers an immersive experience with real dealers, making you feel like you’re at a physical casino without leaving your home. The variety of games ensures that every player can find something that suits their tastes.
Betway Casino Sportsbook
But what truly makes Betway unique is its sportsbook integration. With this feature, players can easily switch between casino games and sports betting without leaving the app. This convenience is especially appealing to sports enthusiasts who enjoy betting on their favorite teams or events. Whether you’re into casino games or sports betting, Betway’s mobile app caters to both worlds, making it an all-in-one platform for Filipino gamers.
Bonuses and Promotions
In addition, at Betway Casino, players are welcomed with a wealth of bonuses and promotions. From generous deposit bonuses to exciting free spin offers, Betway ensures that Filipino gamers have ample opportunities to boost their winnings and enhance their gaming experience. With a variety of rewards, Betway keeps the excitement alive for every player.
Mobile App
Available on App Store and Google Play
Welcome Bonus
Up to ₱18,000 Welcome Bonus
Game Variety
Slots, Table Games, Sportsbook
Special Features
In-play betting and extensive sports options
JackpotCity Casino Philippines: Jackpots Galore
JackpotCity doesn’t disappoint. You’ll find a vast selection of slots, table games, and video poker. The slot games range from classic three-reel slots to modern, feature-packed video slots. If table games are your preference, you can enjoy classics like blackjack, roulette, and baccarat. Video poker enthusiasts can also test their skills with various poker variants. No matter your gaming taste, JackpotCity is sure to have something that tickles your fancy.
JackpotCity Casino Mobile App
The casino offers a mobile app that’s perfect for players who enjoy a diverse gaming library. With over 500 games to choose from, boredom is simply not an option.
One of the standout features of JackpotCity is its user interface, designed to be intuitive and user-friendly. You won’t have to spend precious minutes figuring out how to navigate the app. Instead, you can dive straight into your favorite games. The hassle-free experience ensures that you can maximize your gaming time, which is especially important when you’re on the move.
Bonuses and Promotions
Moreover, JackpotCity Casino is your ticket to incredible bonuses and promotions. With frequent jackpots and massive prizes up for grabs, Filipino players have the chance to turn their dreams into reality. The casino’s generous rewards add thrill to every gaming session, making it an exciting destination for those who seek big wins.
JackpotCity casino truly lives up to its name with a plethora of progressive jackpots, offering you the tantalizing opportunity to win life-changing sums of money. Whether you’re chasing after that one massive win or prefer consistent smaller victories, JackpotCity caters to every type of player.
Mobile App
Available on App Store and Google Play
Welcome Bonus
Up to ₱40,000 Welcome Bonus
Game Variety
Slots, Table Games, Live Casino
Special Features
Progressive jackpots and frequent promotions
Royal Panda Philippines: A Royal Mobile Experience
When it comes to game selection, Royal Panda offers a wide range of choices. From classic and modern slots to table games like roulette, blackjack, and baccarat, there’s something for everyone. They also boast an impressive live casino section where you can enjoy the thrill of real-time games with live dealers. Whether you’re a slot enthusiast or a table game connoisseur, Royal Panda delivers.
Royal Panda Mobile App
Royal Panda is a rising star in the online casino world, and their mobile app has gained popularity among Filipino players. The moment you launch the app, you’ll notice its clean design and intuitive layout. Everything is within easy reach, allowing you to explore a variety of games seamlessly. Royal Panda truly understands that simplicity and functionality are key to an enjoyable gaming experience.
Royal Panda is also known for its excellent customer support. If you ever have a question or encounter an issue while gaming, their support team is just a message or call away. This level of responsiveness ensures that you can get back to enjoying your gaming experience without unnecessary delays or frustrations.
Bonuses and Promotions
At Royal Panda Casino Philippines, players are treated like royalty with a fantastic array of bonuses and promotions. From welcome offers that boost your bankroll to ongoing promotions that keep the excitement flowing, Filipino gamers can enjoy an extra edge as they spin the reels and chase those big wins. Additionally, Royal Panda provides straightforward payment options, making it easy to deposit and withdraw funds. This convenience extends to their regular promotions.
With its user-friendly mobile experience, game variety, attentive customer support, and attractive promotions, Royal Panda is indeed an excellent choice for Filipino mobile gamers.
Mobile App
Available on App Store and Google Play
Welcome Bonus
Up to ₱20,000 Welcome Bonus
Game Variety
Slots, Table Games, Live Casino
Special Features
Easy navigation and friendly user interface
Choosing the Right Mobile Casino: Key Considerations
Selecting the perfect mobile casino is an essential step for an enjoyable and secure gaming experience. Here are vital factors to consider when making your choice:
Licensing and Regulation: Start by checking if the mobile casino holds a valid license from a reputable authority. This ensures they adhere to strict standards of fairness and security.
Game Selection: Assess the variety of games offered. Look for your favorite slots, table games, and live dealer options. A diverse game library ensures you’ll never get bored.
Mobile Compatibility: Ensure the casino’s mobile app or website is compatible with your device’s operating system. Whether you’re on iOS, Android, or another platform, seamless compatibility is crucial.
Bonuses and Promotions: Explore the bonuses and promotions available. Generous welcome bonuses and ongoing rewards can significantly boost your bankroll.
Payment Options: Check for multiple and secure payment methods. Quick and hassle-free deposits and withdrawals are essential.
Security Measures: Verify the casino’s security protocols, including encryption and data protection, to safeguard your information.
Customer Support: Responsive and helpful customer support is crucial in case you encounter any issues.
By considering these factors, you can confidently select a mobile casino that aligns with your gaming preferences and ensures a safe and enjoyable experience.
Unlocking Mobile Casino Bonuses and Promotions
Mobile casinos are known for offering enticing bonuses and promotions that add excitement and value to your gaming experience. Here’s a breakdown of what you can expect:
Welcome Bonuses
These are the mobile casino’s warm embrace for new players. They often consist of a percentage-based match bonus on your initial deposit, such as a 100% match up to a certain amount. Some packages also include free spins on popular slots. While these bonuses can be enticing, be sure to check the wagering requirements and time limits attached to them.
No Deposit Bonuses
No deposit bonuses are a fantastic way to test the waters without dipping into your own funds. They’re usually small sums of bonus cash or free spins awarded upon registration. Keep in mind that winnings from no deposit bonuses might be subject to stricter wagering requirements.
Free Spins
Free spins are a player favorite. They offer chances to spin the reels without spending your own money, potentially leading to substantial wins. Some casinos even offer no-wager free spins, meaning what you win is yours to keep.
Reload Bonuses
After the initial welcome bonus, mobile casinos often extend their generosity with reload bonuses. These work similarly to welcome bonuses but apply to subsequent deposits. They help maintain your bankroll and extend your gaming time.
Loyalty Programs
Loyalty programs reward your dedication. As you play, you accumulate loyalty points. These points can later be converted into cash, bonuses, or access to exclusive tournaments. Climbing loyalty tiers might also bring additional perks like faster withdrawals and dedicated account managers.
Tournaments and Challenges
Mobile casinos often host tournaments and challenges that allow you to compete against other players. These events can come with substantial cash prizes, turning your gaming sessions into thrilling competitions.
Special Promotions
Look out for themed promotions tied to holidays, seasons, or major events. These often include unique bonuses, giveaways, or even special game modes that add extra layers of entertainment to your mobile casino experience.
Remember, while bonuses and promotions can significantly enhance your gaming experience, they come with terms and conditions. Always read the fine print, especially regarding wagering requirements, game eligibility, and withdrawal limits. With careful consideration, you can make the most of these offers and turn them into rewarding gaming adventures.
Mobile Banking at Your Fingertips with Casino Apps
In today’s fast-paced world, convenience is key, even when it comes to online casinos. Casino mobile apps now offer a seamless and secure banking experience, right from the palm of your hand. Whether you’re depositing funds to enjoy your favorite slots or cashing out your winnings, these apps provide a range of banking options. From credit card payments to e-wallets and even cryptocurrencies, you can choose the method that suits you best. Moreover, these apps prioritize security, utilizing encryption technology to safeguard your financial transactions. With mobile banking integrated into casino apps, managing your gaming finances has never been easier or more efficient, allowing you to focus on what matters most – the thrill of playing and winning.
Ensuring Your Safety: Mobile Casino Security and Licensing
Security is the most important thing when it comes to mobile casinos. Reputable mobile casinos prioritize your safety by adhering to strict licensing regulations. Before you place a bet, ensure your chosen casino holds a valid license from a recognized authority. These licenses guarantee fair play, secure transactions, and the protection of your personal information.
Additionally, mobile casinos employ cutting-edge encryption technology to safeguard your data. With secure connections and robust firewalls, your gaming experience remains worry-free.
Regular audits by independent agencies verify the fairness of games and the integrity of the casino. With licensing and security measures in place, you can enjoy mobile casino gaming with peace of mind, knowing that your experience is not only entertaining but also trustworthy and secure.
Conclusion
Mobile casinos have revolutionized the way Filipinos experience online gambling, offering a world of entertainment at their fingertips. These top 5 mobile casinos in the Philippines, namely King Billy Casino, Megapari, Betway, JackpotCity, and Royal Panda, stand out for their exceptional game selection, mobile app quality, enticing bonuses, and exceptional customer support. Whether you’re a casual player or a seasoned gambler, these mobile casinos provide an immersive and enjoyable gaming experience. So, grab your mobile device, download your favorite casino app, and get ready for thrilling gameplay and the chance to win big! With these top choices, you’re in for an unforgettable mobile casino adventure.
If you are interested in more of our top picks, you might want to check out this article too:
Is it legal to play at mobile casinos in the Philippines?
Yes, it’s legal to play at mobile casinos in the Philippines. However, it’s essential to choose licensed and regulated casinos to ensure a safe and secure gaming experience.
Are mobile casinos compatible with both Android and iOS devices?
Yes, most mobile casinos offer apps compatible with both Android and iOS devices. Additionally, many provide mobile-responsive websites that work on various mobile platforms.
What should I consider when selecting a mobile casino?
When choosing a mobile casino, consider factors like licensing, game variety, bonuses, payment options, and customer support. Ensure the casino aligns with your gaming preferences and offers a secure environment.
How can I deposit and withdraw funds at a mobile casino?
Mobile casinos offer various banking options, including credit cards, e-wallets, bank transfers, and even cryptocurrencies. Choose the method that suits you best, and follow the casino’s instructions for depositing and withdrawing funds.
What are wagering requirements for casino bonuses?
Wagering requirements are conditions you must meet before withdrawing bonus winnings. They typically involve betting the bonus amount a specified number of times. Always check the bonus terms and conditions for these requirements.
Are mobile casino games fair?
Reputable mobile casinos undergo regular audits by independent agencies to ensure the fairness and integrity of their games. Look for casinos with recognized licenses and certifications to play at trusted platforms.
WhatsApp, boasting over two billion active monthly users, ranks among the most prominent messaging platforms globally. Yet, as we communicate with friends and family through this versatile app, safeguarding our privacy becomes paramount. WhatsApp offers a plethora of privacy settings that allow users to manage who can access their information and engage with them. In this guide, we will show you how to customize privacy settings on WhatsApp and delve into the intricate process together to guarantee a secure and private messaging experience.
Locating Your Privacy Settings
Customizing privacy settings on WhatsApp begins with accessing them. Follow these steps to get started:
Launch WhatsApp: Open the WhatsApp application on your mobile device.
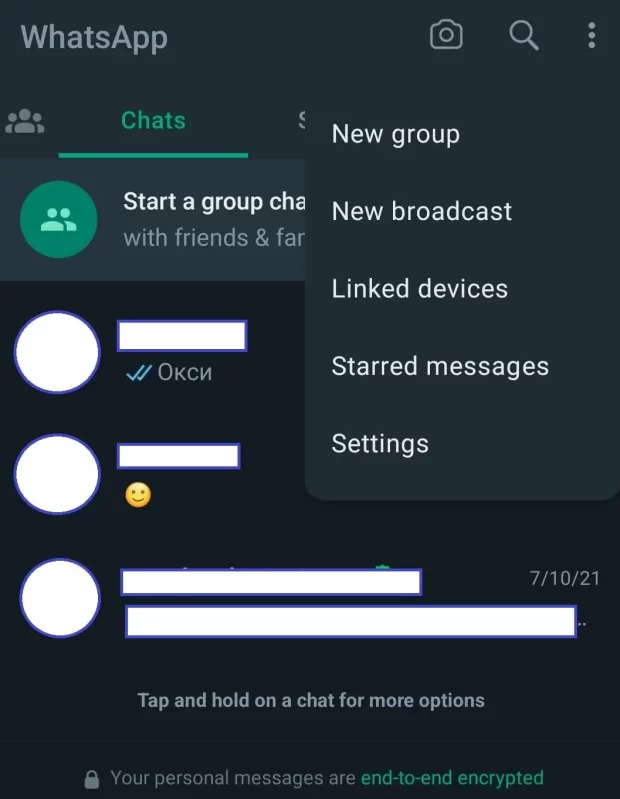
Access Settings: Find and tap the three dots in the top-right corner of the screen to access the app’s menu. From there, select “Settings.”
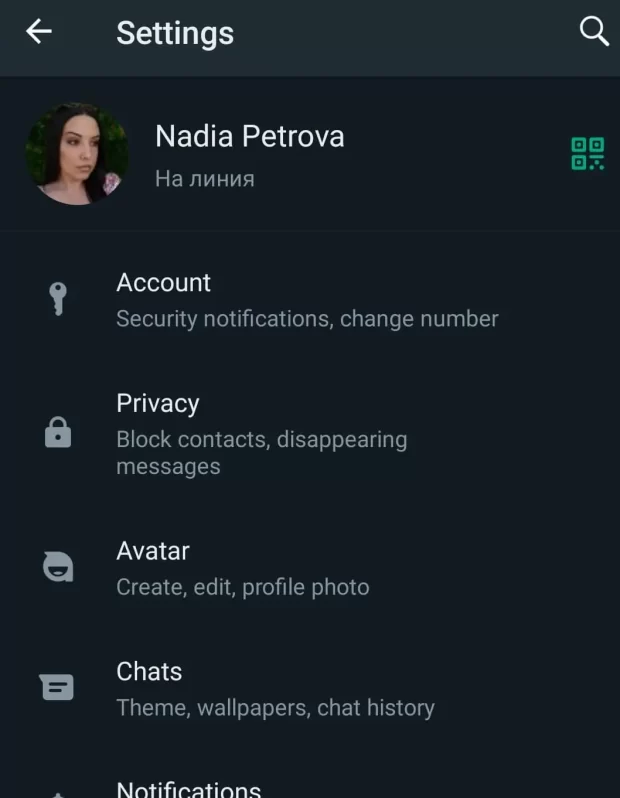
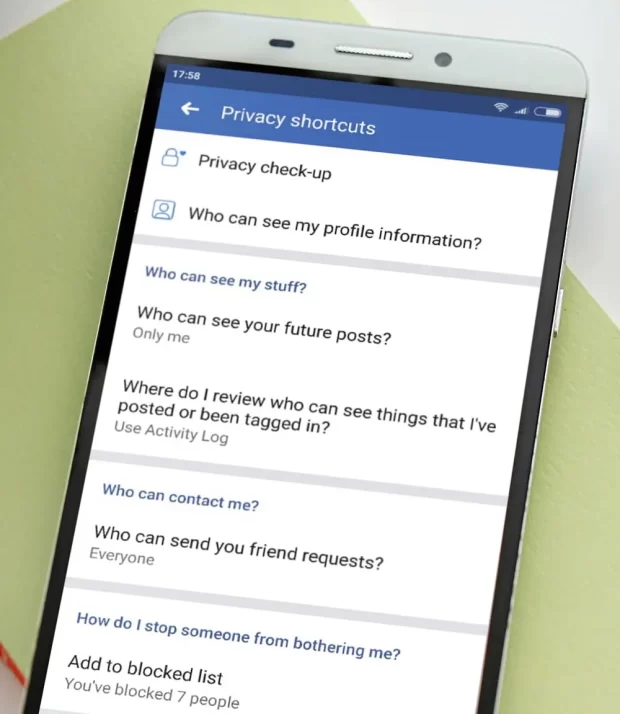
Enter Privacy Settings: Within the settings menu, find and tap “Privacy.” This section houses all the privacy-related options you’ll need to tailor your WhatsApp experience.
Let’s Customize Privacy Settings on WhatsApp
Now, that we are in the Privacy section of the menu let’s take a look at the different options:
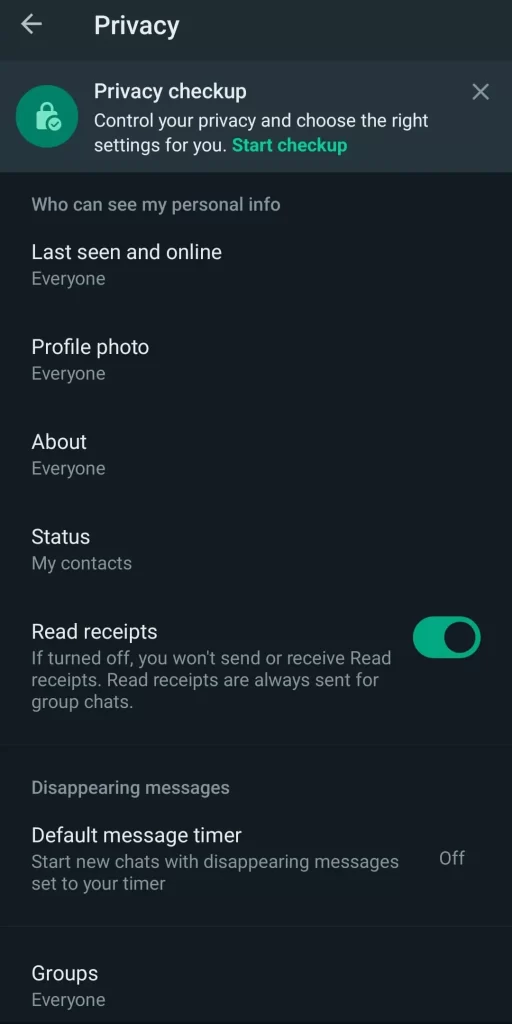
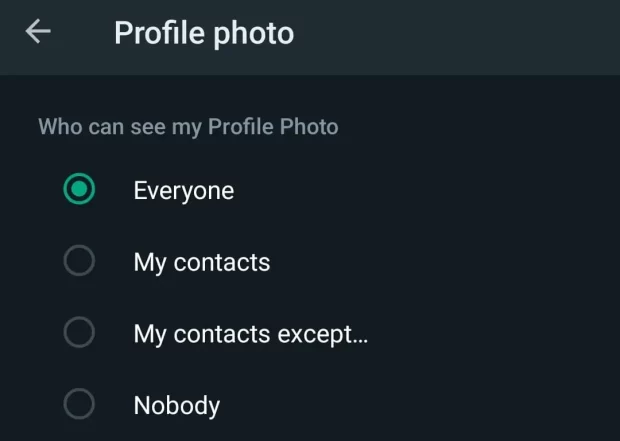
Profile Photo and About Section
Your profile photo and about status can inadvertently reveal a lot about you. To exercise control over who can view this information:
Profile Photo: WhatsApp permits you to determine who gets to see your profile photo, offering options like “Everyone,” “My Contacts,” or “Nobody.” Choose the one that best aligns with your preferences.
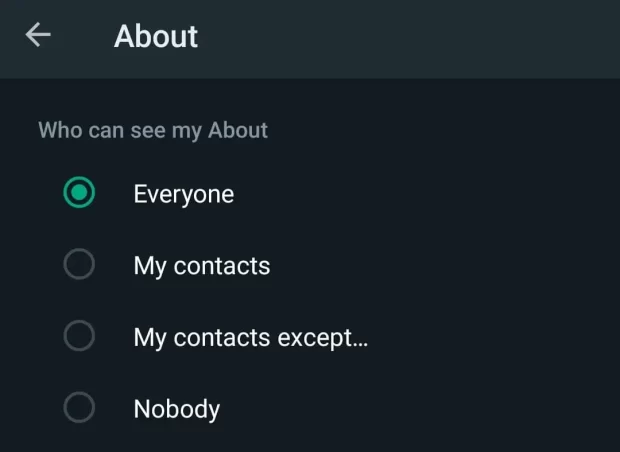
About Section: Similar to the profile photo, you can specify who has access to your about status. The available choices include “Everyone,” “My Contacts,” and “Nobody.”
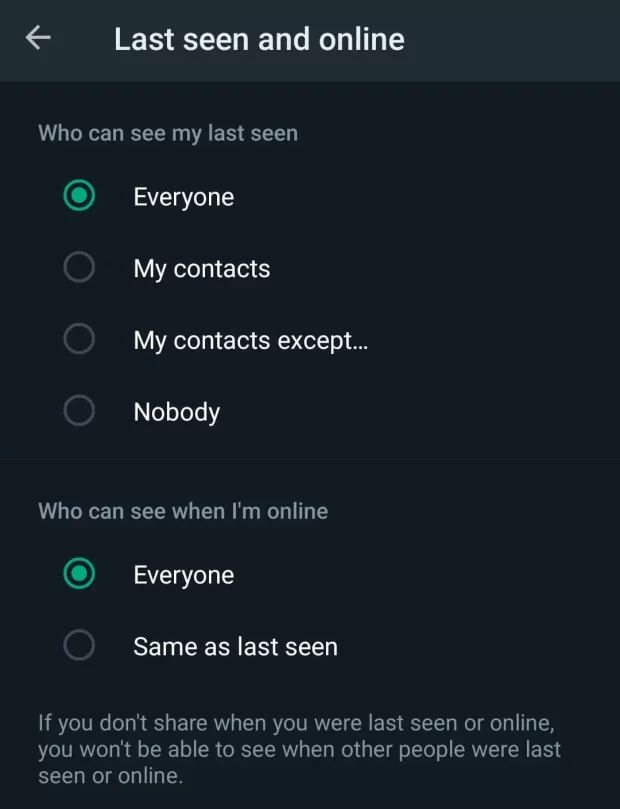
Last Seen Status
WhatsApp discloses your last seen status, revealing when you were last active on the app. To regulate who can view this information:
You can dictate the visibility of your last seen status by selecting from “Everyone,” “My Contacts,” or “Nobody.”
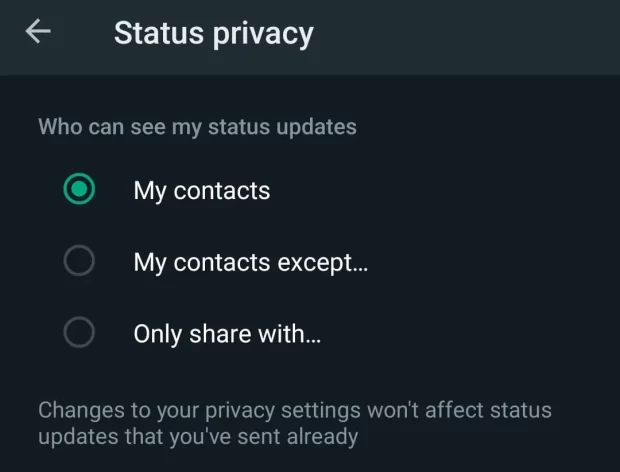
Status Updates
The status feature on WhatsApp allows you to share images, videos, and text updates with your contacts. To manage the audience for your status updates:
Status: Tailor your status privacy to suit your preferences. Options encompass “My Contacts,” “My Contacts Except…,” or “Only Share With…” These options offer the flexibility to handpick who has access to your status updates.
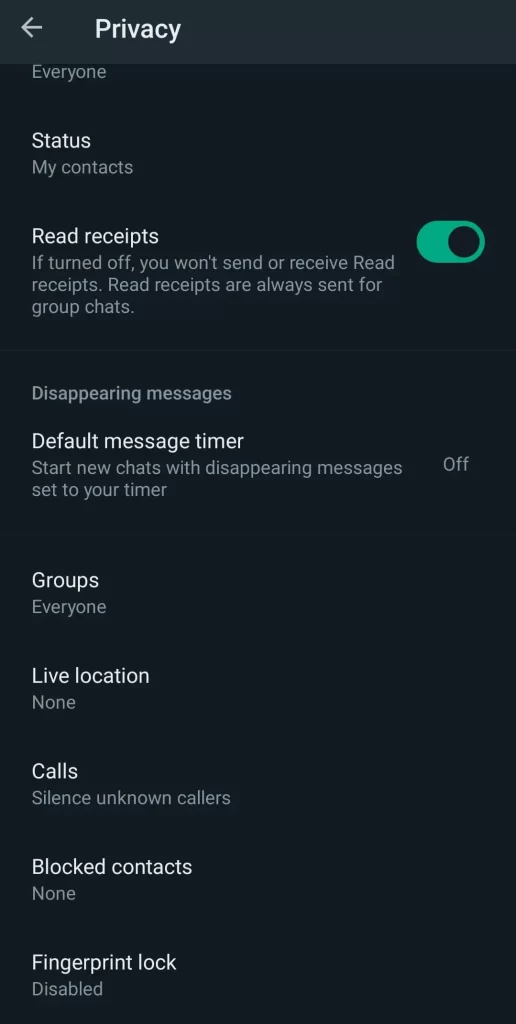
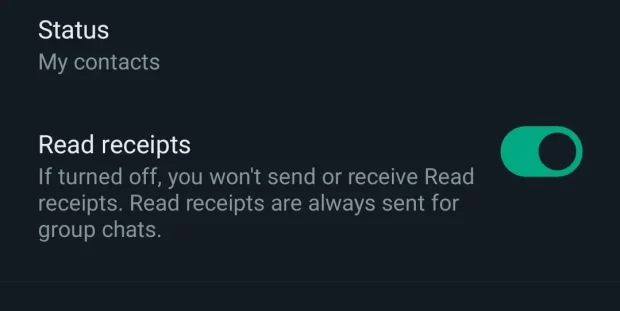
Read Receipts
Read receipts notify senders when you’ve read their messages. If you prefer to keep this information private:
Within Privacy settings, you can activate or deactivate “Read Receipts.” Turning it off ensures that others won’t see when you’ve read their messages, but it also means you won’t have visibility into their reading status.
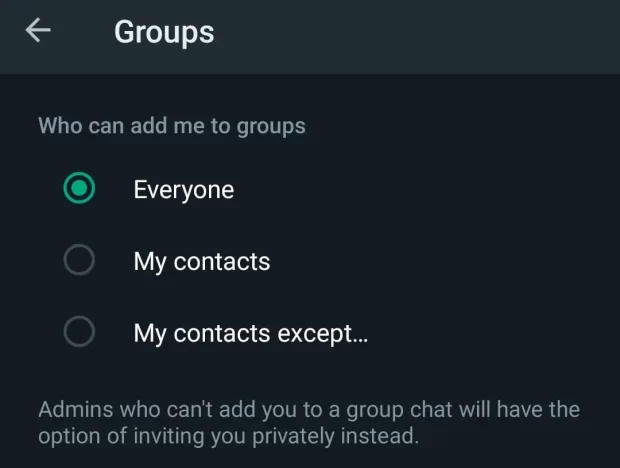
Group Permissions
WhatsApp groups can sometimes become overwhelming. To manage who can add you to groups:
Under Privacy settings, select “Groups.” Here, you can designate who has the authority to add you to groups: “Everyone,” “My Contacts,” or “My Contacts Except…” Pick the option that aligns with your preferences.
Blocked Contacts
For those instances when you need to block a contact, effectively preventing them from sending you messages and accessing your online status:
In Privacy settings, you can peruse and manage your blocked contacts. Tap “Blocked Contacts” to add or unblock individuals as needed.
Enhanced Security Measures
To bolster your account’s security, WhatsApp offers features such as fingerprint lock and two-step verification:
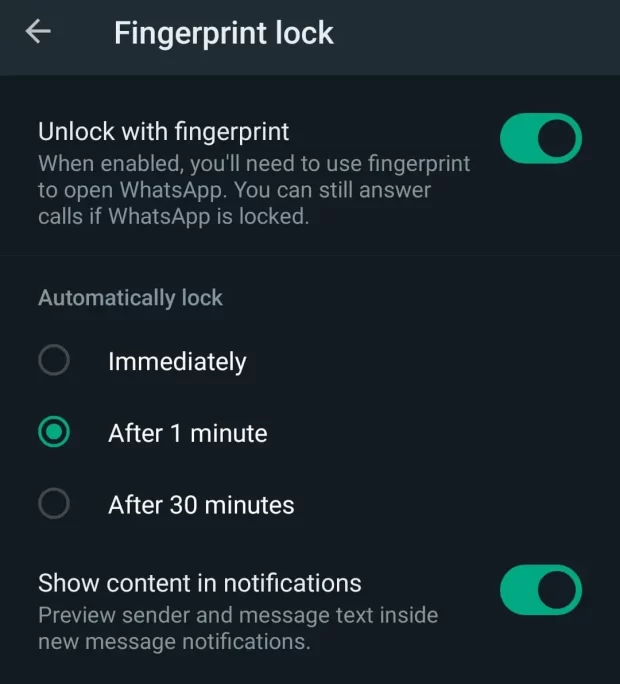
Fingerprint Lock
Visit “Account” > “Privacy” > “Fingerprint Lock” to enable this feature. You can specify the time duration before WhatsApp requires your fingerprint for unlocking the app.
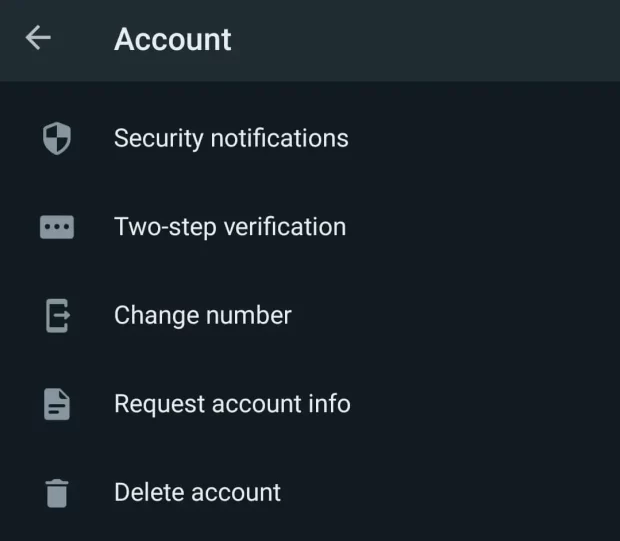
Two-Step Verification
Within “Account“, you can establish two-step verification, adding an extra layer of security. This involves creating a unique six-digit PIN that you’ll be prompted to enter if you try to open WhatsApp on another device.
What makes WhatsApp a Preferred Messaging App
WhatsApp is a preferred messaging application for numerous reasons. Its end-to-end encryption ensures that your messages and calls remain private and secure. It offers seamless cross-platform communication, allowing users to chat with friends and family regardless of their device or location.
WhatsApp’s user-friendly interface, frequent updates, and vast user base make it a reliable choice. Plus, its extensive customization options, including privacy settings, empower users to tailor their experience to their preferences, ensuring a smooth and personalized messaging journey.
Now you know how to customize the privacy setting on WhatsApp
Personalizing your privacy settings on WhatsApp empowers you to safeguard your personal information and maintain a secure messaging environment. By following the step-by-step guide outlined in this article, you gain control over who can access your profile data, when your last seen status is visible, and how others can engage with you on the platform. These settings ensure that WhatsApp aligns seamlessly with your privacy preferences, enabling you to enjoy a worry-free messaging experience.
If you want to learn some other cool tricks on WhatsApp, check out this article:
FAQ on How to Customize Privacy Settings on WhatsApp
Is there a way to conceal my online status on WhatsApp?
Yes, you can hide your online status by visiting WhatsApp’s Settings, then Privacy, and selecting the “Last Seen” option. From there, choose “Nobody” to prevent others from viewing your recent activity.
How can I prevent specific people from accessing my profile photo and about status on WhatsApp?
To safeguard your profile photo and about status, navigate to WhatsApp Settings, then Privacy, and delve into the “Profile Photo” and “About” sections. Opt for “My Contacts” or “Nobody” to limit visibility.
What advantages come with enabling Two-Step Verification on WhatsApp?
Activating Two-Step Verification enhances the security of your WhatsApp account. This feature necessitates the input of a unique PIN at intervals, ensuring that unauthorized individuals can’t gain access, even if they possess your phone number.
Is it possible to halt unwanted additions to WhatsApp groups?
You have the means to govern group additions by going to WhatsApp Settings, Privacy, and selecting “Groups.” Here, you can specify “My Contacts” or “My Contacts Except…” to control who can include you in groups.
Can I individually tailor privacy settings for specific contacts on WhatsApp?
While WhatsApp offers general privacy settings, it does not allow for customization on a per-contact basis. Nevertheless, you can still exert control by blocking or unblocking specific contacts and utilizing the “My Contacts Except…” option to manage group interactions.
Like I always say in my posts related to WhatsApp, WhatsApp has certain features embedded in the App that makes the whole chatting experience much fun. Today, however, will be centered on one particular feature in WhatsApp that lets you share a file from WhatsApp to Facebook or Instagram.
WhatsApp, the world-renowned messaging platform, continues its streak of innovative features to enhance user privacy and experience. One of the most awaited features that users have been looking forward to is the ability to lock individual chats, adding an extra layer of security. This article will guide you through the process of locking a chat using this new feature.
Why Lock a Chat in Whatsapp?
With an increasing need for privacy and security, there may be certain conversations on WhatsApp that you’d prefer to keep confidential. While the app has previously offered end-to-end encryption for messages, locking individual chats gives users more control over who can view specific conversations, even if someone has access to your phone.
Steps to Lock a Chat
Update Your WhatsApp: Before you can use the chat lock feature, ensure that your app is updated to the latest version. Check your device’s app store to ensure you’re running the most recent version of WhatsApp.
Open the Chat: Navigate to the specific conversation you wish to lock.
Tap on the Chat Name or Contact Name: This will open the chat’s details.
Scroll Down: You will find a new option titled ‘Chat Lock’.
Enable the Lock: Toggle on the ‘Chat Lock’ option. Upon selection, you will be prompted to set a password or use your device’s biometric verification (if available).
Verification: Choose your preferred method of verification. If you opt for a password, ensure it’s something you’ll remember but isn’t easily guessable.
Confirm Your Selection: Once you’ve confirmed your password or biometric input, your chat will now be locked.
Accessing a Locked Chat: To access the conversation in the future, you’ll need to provide the password or use biometric verification, depending on your earlier selection.
Additional New Features
Auto-Lock Timer: WhatsApp allows you to set a timer, determining how long the app waits before automatically locking the chat after you’ve viewed it. This can range from immediately after you exit to intervals like 1 minute, 15 minutes, or an hour.
Recovery Options: In case you forget your password, WhatsApp provides recovery options linked to your email or phone number.
Things to Note
Always remember your password. While there are recovery options, it’s best to avoid the hassle of going through them.
If your device supports biometric authentication, using it can be quicker and more convenient than typing a password.
Be cautious about the auto-lock timer. If you set it to a longer duration, ensure your device itself has strong security measures in place.
Viewing Your Locked Chats:
Accessing a locked chat on WhatsApp is a straightforward process:
Navigate to the Chat: Scroll through your chat list and find the locked chat. It will typically have a small lock icon next to the chat name or profile picture to indicate that it’s locked.
Tap on the Chat: Upon tapping, instead of immediately showing you the messages, WhatsApp will present you with a password or biometric prompt (depending on what you’ve set up).
Enter Password or Use Biometric Verification: If you’ve set a password, type it in. If you’ve opted for biometric verification, authenticate using your fingerprint or facial recognition.
Access Granted: Once verified, you’ll be able to view your chat as usual.
Turning Off Chat Lock:
If you decide you no longer need a specific chat to be locked, or if you’ve locked a chat accidentally, you can easily turn off the chat lock:
Go to the Locked Chat: Scroll through your chat list and find the chat you wish to unlock.
Tap on the Chat Name or Contact Name: This will open the chat’s details.
Scroll Down to ‘Chat Lock’: The option will be toggled on, indicating that the chat is currently locked.
Toggle Off the Lock: Upon tapping, you’ll be prompted to enter your password or use biometric verification for one last time to confirm you’re authorized to make this change.
Chat Unlocked: After verification, the chat lock will be disabled, and you can access the chat without any added security prompts.
Conclusion
WhatsApp’s new chat lock feature is a welcome addition for many users seeking enhanced privacy. By offering the ability to lock individual chats, WhatsApp continues to prioritize user data security and personal confidentiality. As always, while these features offer added protection, always practice general safety measures and be mindful of who has access to your device.
For a more comprehensive guide on the chat lock feature and other functionalities of WhatsApp, we recommend checking the official Whatsapp website. They offer detailed walkthroughs, FAQs, and support to ensure you make the most of their platform.
Bet365 is a popular online betting platform known for its extensive sports betting options, live betting features, and a wide range of casino games. However, if you’re in the Philippines, you may encounter restrictions accessing the website due to regional limitations. In this guide, we’ll show you how to unblock Bet365 in the Philippines, explore its pros and cons, highlight its key features, discuss the bonuses it offers, provide a step-by-step account creation guide, offer reviews on various aspects of Bet365, address common FAQs, and conclude with a summary of our insights.
Start Winning Today
Make Your First Deposit andGet 100 Free Spins for the Casino
Wide Range of Sports: Bet365 offers a diverse selection of sports, including football, basketball, tennis, and more, catering to sports enthusiasts worldwide.
Live Betting: Their live betting feature allows you to place wagers on ongoing matches, enhancing the excitement and engagement of sports betting.
Esports Betting: Bet365 covers a variety of esports events, making it a top choice for esports enthusiasts.
24/7 Customer Support: Their responsive customer support is available around the clock to assist with queries and issues.
Bet365 Cons
Regional Restrictions: Access may be restricted in some countries, including the Philippines, which can be frustrating for potential users.
Complex Bonus Terms:While they offer bonuses, the terms and conditions can be complex and may require careful reading.
Key Features of Bet365 Philippines
Types of Sports: Bet365 covers an extensive range of sports, from popular ones like football and tennis to niche sports like snooker and darts.
Live Betting: Their live betting platform lets you bet in real-time, with constantly updating odds and markets.
Esports: Bet365 offers esports betting, including games like League of Legends, Counter-Strike, and Dota
Customer Support: They provide 24/7 customer support through live chat, email, and phone.
Odds: Bet365 is known for competitive odds, making it appealing to serious bettors.
License: The platform is licensed and regulated by reputable authorities, ensuring fair play.
Languages: Bet365 is available in multiple languages to cater to a global audience.
Trustworthiness: With a strong reputation and years of experience, Bet365 is considered a trustworthy betting platform.
Bonuses:They offer various types of bonuses, including welcome bonuses, cashback offers, and promotions.
Mobile App: Bet365 has a user-friendly mobile app for betting on the go.
Security: The platform employs robust security measures to protect user data and financial transactions.
Payment Methods: Bet365 supports a variety of payment methods for deposits and withdrawals.
Withdrawal Time: Withdrawal processing times vary depending on the chosen method but are generally efficient.
Support Contacts: You can contact Bet365 support via email, live chat, or phone.
Bet365 Philippines Bonuses and Promotions
Bet365 is renowned not only for its wide array of betting options but also for its generous and enticing bonuses that enhance the overall gaming experience for its users. Whether you’re a seasoned bettor or just dipping your toes into the world of online gambling, Bet365 has a bonus that suits your preferences and boosts your bankroll.
Welcome Bonus: For newcomers, Bet365 offers a lucrative welcome bonus that provides an excellent start to your betting journey. This bonus typically matches your initial deposit, giving you extra funds to explore the platform’s diverse betting options. The welcome bonus varies depending on your location, so be sure to check the terms and conditions specific to your region.
Cashback Offers: Bet365 frequently runs cashback promotions that give players a second chance to win. These offers typically apply to specific sports events or casino games. If luck isn’t on your side, Bet365 will provide a portion of your losses back to your account, allowing you to continue playing without depleting your funds entirely.
Ongoing Promotions: Beyond the initial welcome bonus, Bet365 keeps its existing users engaged with a variety of ongoing promotions and special offers. These can include free bets, enhanced odds, and unique promotions tied to major sporting events. Be sure to visit the promotions section regularly to take advantage of these exciting opportunities.
VIP Program: Bet365 values its loyal customers and rewards them through a VIP program. As you continue to bet and play, you accumulate loyalty points that can be exchanged for various rewards, including cash bonuses, free bets, and exclusive access to events and offers. The more you wager, the higher your VIP status, unlocking even greater benefits.
Casino Bonuses: If you’re more inclined toward casino gaming, Bet365’s casino section offers its own set of bonuses and promotions. These can include free spins, match bonuses, and exclusive casino tournaments with substantial prize pools.
Bet365’s commitment to providing a diverse range of bonuses ensures that there’s something for every type of player. Whether you’re interested in sports betting, casino games, or both, these bonuses enhance your gaming experience and provide additional opportunities to win. It’s important to review the terms and conditions for each bonus to understand wagering requirements and eligibility criteria, ensuring that you make the most of the rewards on offer. With Bet365’s bonuses, you can enjoy a thrilling and potentially profitable gaming adventure.
How to Create an Account on Bet365 from the Philippines
Creating an account on Bet365 is straightforward:
1. Visit the Bet365 website or app.
2. Click on the “Join” or “Sign Up” button.
3. Fill in the registration form with your personal details.
4. Choose a unique username and password.
5. Verify your identity through the provided options.
6. Make a deposit to fund your account.
7. Start betting on your favorite sports or playing casino games.
Bet365 Sports Betting Review
Bet365 is renowned for its comprehensive sports betting offerings, making it a go-to platform for sports enthusiasts. They cover an extensive range of sports, from globally popular ones like football and basketball to niche sports like snooker and darts. What sets Bet365 apart is its competitive odds, ensuring that bettors receive good value for their wagers. The platform provides an intuitive interface for browsing and selecting sports events. Additionally, the live betting feature keeps users engaged with constantly updated odds, allowing them to place bets as the action unfolds. With a user-friendly mobile app, you can conveniently bet on your favorite sports from anywhere. Bet365’s commitment to fairness and transparency is further underscored by its licensing and regulation. The platform is licensed by reputable authorities, assuring users of a secure and fair gaming environment.
Casino Review
In addition to sports betting, Bet365 offers a diverse and entertaining casino experience. The casino section boasts an impressive array of games, including a variety of slots, table games, and live dealer options. Whether you’re a fan of classic casino games or prefer the thrill of live dealer interactions, Bet365’s casino has something for everyone. The platform collaborates with top-notch game providers to offer a wide selection of titles, ensuring that players have access to the latest and most popular casino games. The live casino, in particular, provides an immersive gaming experience with real-time dealers and high-quality video streaming. Bet365’s casino is known for its user-friendly interface, making it easy for players to navigate and enjoy their favorite games. With competitive bonuses and promotions, players can enhance their casino experience while having the chance to win big.
Live Casino
Bet365’s live casino is a standout feature that brings the excitement of a real casino directly to your screen. With professional dealers and high-quality video streaming, it offers an immersive gaming experience that rivals brick-and-mortar casinos. Players can enjoy a variety of classic casino games in real-time, including blackjack, roulette, baccarat, and poker. The live dealer interactions add a social element to the gameplay, making it feel like you’re sitting at a physical casino table. Bet365’s live casino is accessible through both their website and mobile app, ensuring that you can enjoy the thrill of live gaming wherever you are. The user-friendly interface makes it easy to browse different tables and select your preferred stakes. The live casino also often features special promotions and bonuses, giving players the opportunity to boost their winnings and extend their gaming sessions. Whether you’re a seasoned casino player or new to live dealer games, Bet365’s live casino offers a top-notch gaming experience.
Bet365 Philippines Payment Methods
Bet365 understands the importance of providing convenient and secure payment methods for its users. They offer a variety of options for both deposits and withdrawals, ensuring that users can transact in a way that suits their preferences. Deposits can be made using credit and debit cards, e-wallets like PayPal and Skrill, bank transfers, and prepaid cards. These methods are known for their speed and reliability, allowing users to fund their accounts quickly. When it comes to withdrawals, Bet365 strives to process requests promptly. The withdrawal times may vary depending on the chosen method, with e-wallets typically offering the fastest processing times. Bet365’s commitment to security extends to its payment processes, with advanced encryption technology safeguarding financial transactions and user data. This ensures that users can enjoy a worry-free betting and gaming experience, knowing that their financial information is well-protected.
Security
Security is a paramount concern for Bet365, and the platform spares no effort in ensuring the safety of its users’ data and financial transactions. Bet365 employs state-of-the-art security measures to create a secure betting environment. One of the key security features is encryption technology that safeguards all communication between the user’s device and Bet365’s servers. This encryption ensures that sensitive information, such as personal details and financial data, remains confidential and cannot be accessed by unauthorized parties. Furthermore, Bet365’s commitment to fair play is reflected in its licensing and regulation. The platform holds licenses from reputable authorities, and it adheres to strict regulations and standards. Regular audits and checks are conducted to ensure that all games are fair and that the platform operates transparently. Bet365 also promotes responsible gambling by providing tools for users to set limits on their betting and gaming activities. These features help users stay in control of their spending and gambling habits.
Best 3 VPNs to Unblock Bet365 in the Philippines
Online betting enthusiasts in the Philippines often seek ways to access popular betting platforms like Bet365, which may be geographically restricted in the country. Using a VPN (Virtual Private Network) can be a reliable solution to bypass these restrictions while maintaining online privacy. We’ve curated a list of the top 3 VPNs that effectively unblock Bet365 in the Philippines.
ExpressVPN
Speed & Reliability: ExpressVPN stands out due to its blazing-fast servers and consistent performance. Speed is essential when live betting, and this VPN ensures there’s minimum lag.
Security: ExpressVPN uses AES 256-bit encryption – a top-tier standard. With its strict no-logs policy and kill switch feature, users can be confident that their data remains private.
Ease of Use: With apps for nearly every device, including smartphones and computers, it’s straightforward to get connected.
NordVPN
Diverse Server Locations: With over 5,000 servers worldwide, users have an array of options to connect and unblock Bet365. The Philippines, in particular, benefits from nearby servers in the Asia-Pacific region.
Advanced Security Features: NordVPN’s Double VPN routes your connection through two servers for an extra layer of encryption. Plus, its CyberSec feature blocks malicious websites and ads.
No-logs Policy: Nord ensures that user activity is never tracked or shared.
CyberGhost
Specialized Servers: CyberGhost offers servers optimized for streaming and betting, ensuring smooth access to platforms like Bet365.
Robust Encryption: Like its peers, CyberGhost uses AES 256-bit encryption to keep data safe. It also has an automatic kill switch for unexpected disconnections.
User-friendly Interface: Ideal for VPN beginners, its interface is intuitive and easy to navigate.
In conclusion, while there are many VPNs available in the market, these three have consistently proven to be reliable for unblocking Bet365 in the Philippines. They offer the perfect blend of speed, security, and usability. Always remember to use VPNs responsibly and ensure that you’re complying with local regulations and terms of service of platforms you access.
Frequently Asked Questions (FAQs)
Is Bet365 available in the Philippines?
Bet365 may be restricted in some regions, including the Philippines. However, you can use a VPN to access it.
What sports can I bet on with Bet365?
Bet365 covers a wide range of sports, including football, basketball, tennis, and esports.
How long does it take to withdraw winnings from Bet365?
Withdrawal times vary based on your chosen payment method, but they are generally efficient.
Is Bet365 safe and trustworthy?
Yes, Bet365 is a reputable and licensed betting platform with a strong track record.
What bonuses does Bet365 offer?
Bet365 offers a welcome bonus, cashback promotions, and ongoing special offers.
Can I bet on esports with Bet365?
Yes, Bet365 offers esports betting on popular games like League of Legends and CS:GO.
How can I contact Bet365 support?
Bet365 provides customer support through live chat, email, and phone.
Conclusion
Bet365 is a leading online betting platform with a wide range of sports, live betting options, and casino games. While it may be restricted in some regions like the Philippines, you can unblock it using a VPN. With its pros, such as diverse sports coverage and 24/7 customer support, and cons like regional restrictions, Bet365 offers an exciting betting experience. Its bonuses, user-friendly mobile app, and commitment to security make it a top choice for bettors worldwide.
The realm of eSports betting has undergone a remarkable transformation over the years, tracing its origins to the late 1990s when competitive gaming, particularly in South Korea, began to capture the imaginations of gamers worldwide.
Initially, eSports betting was an informal pastime, where ardent fans would engage in friendly wagers among themselves, driven by their unwavering passion for the games they loved. However, as the popularity of eSports surged and gained global recognition, the landscape of betting around it evolved into a multi-billion-dollar industry.
In the Philippines, the eSports betting scene has experienced substantial growth, primarily fueled by the nation’s fervent gaming community. Filipino gamers have not only left their mark but have also excelled on the international eSports stage, contributing significantly to the surge in interest in both eSports and eSports betting.
Interesting Facts about the World of eSports Betting
Projections indicate that the eSports betting market is poised to surpass an astonishing $20 billion in annual wagers globally by 2023. This staggering figure underscores the immense appeal and untapped potential of this burgeoning industry.
The Philippines boasts a thriving eSports ecosystem, complete with dedicated players and passionate fans. Notably, Filipino Dota 2 players have gained international recognition, further bolstering the country’s position on the global eSports map.
Iconic eSports tournaments such as The International for Dota 2 and the League of Legends World Championship consistently offer mind-boggling prize pools, often exceeding tens of millions of dollars. These prestigious events not only attract professional gamers from across the globe but also beckon bettors to participate in the excitement.
Top 7 Highly Recommended eSports Betting Platforms
1xbet:A top eSports betting site with extensive markets and live-streaming options for gaming enthusiasts.
22Bet:Known for competitive odds and user-friendly interface, it’s a choice platform for eSports betting.
GGBet:A specialist in eSports betting, offering exclusive bonuses and live streaming for dedicated eSports fans.
MelBet:Diverse eSports markets, competitive odds, and live streaming make it a reliable choice for eSports enthusiasts.
PNXBet: A user-friendly platform focusing on eSports betting, with enticing bonuses and live streaming features.
MegaPari: An emerging eSports site with diverse markets and competitive odds, gaining popularity among Filipino players.
BetOnline: A well-established platform with extensive eSports coverage and reliable services for Filipino eSports bettors.
All you need to know about the Best eSports Betting Platforms
When it comes to eSports betting, choosing the right platform is crucial for an immersive and rewarding experience. Our top seven highly recommended eSports betting platforms have been carefully selected to cater to a diverse range of gaming enthusiasts
1xbet – Where eSports Betting Thrives and Champions Emerge
Why We Love It: 1xbet is a powerhouse in the eSports betting world, celebrated for its extensive coverage of eSports markets. Its user-friendly interface and competitive odds appeal to both beginners and seasoned bettors alike.
Bonuses and Promotions: 1xbet generously offers various bonuses and promotions to its users, including a welcoming bonus that adds extra value to initial deposits, setting the stage for an exciting betting journey.
Live Streaming Options: What sets 1xbet apart is its commitment to enhancing the user experience. It offers live streaming for eSports matches, allowing bettors to immerse themselves in the action while placing their wagers in real-time.
Tournaments: 1xbet is a go-to platform for eSports enthusiasts as it provides comprehensive coverage of eSports tournaments. From major events like The International to niche competitions, users have ample betting opportunities.
Payment Methods: 1xbet understands the importance of convenience in transactions. It offers multiple payment options, including e-wallets and even cryptocurrencies, streamlining the process of depositing and withdrawing funds.
22Bet – Your Gateway to eSports Betting Excellence
Why We Love It: 22Bet earns acclaim for its user-friendly betting interface and competitive odds, making it an ideal choice for both newcomers and seasoned bettors seeking an intuitive platform.
Bonuses and Promotions: Bettors on 22Bet can enjoy a range of bonuses and promotions, including a welcoming bonus that provides an extra financial incentive for initial deposits, giving users a head start in their eSports betting endeavors.
Live Streaming Options: A standout feature of 22Bet is its provision of live streaming for eSports matches. This immersive experience allows users to closely follow the action as they place bets on their preferred teams or players.
Tournaments: 22Bet is dedicated to offering extensive coverage of eSports tournaments, ensuring that fans of diverse gaming titles have ample opportunities to bet on their favorite events, whether they are major championships or lesser-known competitions.
Payment Methods: Recognizing the importance of accessible banking, 22Bet offers a variety of payment options, including e-wallets. This diversity simplifies the process of depositing and withdrawing funds, catering to users’ preferences.
GGBet – Elevate Your eSports Betting Game to Pro Level
Why We Love It: GGBet stands out as a specialist in eSports betting, making it the go-to choice for ardent eSports enthusiasts. Its focus on eSports ensures a tailored experience for this niche.
Bonuses and Promotions: GGBet goes the extra mile by offering exclusive bonuses and promotions specifically designed for eSports bettors. These incentives elevate the betting journey, providing added value to users.
Live Streaming Options: To provide an immersive experience, GGBet offers live streaming of eSports events. This feature allows users to watch matches in real time, enhancing their understanding and engagement with the games they bet on.
Tournaments: GGBet takes pride in its extensive coverage of eSports tournaments, spanning popular titles and lesser-known games to cater to diverse preferences within the eSports community.
Payment Methods: Ensuring secure and convenient transactions, GGBet offers a variety of payment options to accommodate its global user base. Users can choose from various methods, aligning with their preferences and location.
MelBet – Where Competitive Odds Meet eSports Excitement
Why We Love It: MelBet earns its reputation through a diverse range of eSports markets and competitive odds, making it a dependable choice for eSports enthusiasts looking for a comprehensive betting experience.
Bonuses and Promotions: MelBet offers users enticing bonuses, including a welcoming bonus that boosts their initial deposits. This added value enhances the overall betting journey on the platform.
Live Streaming Options: A key feature that enhances the user experience on MelBet is its provision of live streaming for eSports events. This allows users to watch matches in real-time as they place their bets, increasing engagement.
Tournaments: MelBet covers a wide spectrum of eSports tournaments, ensuring that bettors have access to a broad array of events, from major championships to niche competitions.
Payment Methods: Recognizing the importance of flexibility, MelBet supports seamless transactions through various payment options, including support for cryptocurrencies, catering to users with different preferences.
PNXBet – Your eSports Betting Destination for Winning Big
Why We Love It: PNXBet stands out for its user-friendly platform and dedicated focus on eSports betting, aligning perfectly with the preferences of eSports enthusiasts.
Bonuses and Promotions: PNXBet caters to both casino and sportsbook enthusiasts with a range of bonuses. Users can choose promotions that align with their interests, enhancing their overall betting experience.
Live Streaming Options: To offer a fulfilling betting experience, PNXBet provides live streaming for eSports events, allowing users to follow the action as they place their bets in real time, enhancing their engagement.
Tournaments: PNXBet ensures that users have access to prominent eSports tournaments, allowing them to bet on their favorite gaming titles and events, further elevating the excitement of eSports betting.
Payment Methods: PNXBet supports a variety of payment methods, including cryptocurrencies, ensuring convenience for users worldwide in managing their accounts and transactions.
MegaPari – Unleash the Power of eSports Betting
Why We Love It: MegaPari has rapidly gained popularity among eSports betting enthusiasts due to its diverse eSports market coverage and user-friendly interface. It caters to a wide range of preferences, making it an ideal choice for both newcomers and experienced bettors.
Bonuses and Promotions: MegaPari offers a selection of enticing bonuses and promotions, enhancing the overall betting experience. These include welcome bonuses and ongoing promotions that provide additional value to users.
Live Streaming Options: MegaPari elevates user engagement by providing live streaming options for eSports events. This feature allows bettors to watch matches in real time, making the betting experience more immersive and enjoyable.
Tournaments: MegaPari covers a broad spectrum of eSports tournaments, ensuring that users have access to a wide array of events. Whether it’s major championships or lesser-known competitions, there are ample betting opportunities.
Payment Methods: Recognizing the importance of convenience in financial transactions, MegaPari supports a variety of payment methods. Users can choose from multiple options, including traditional methods and cryptocurrencies, for depositing and withdrawing funds.
BetOnline – Your Trusted Partner in eSports Betting
Why We Love it: BetOnline has established itself as a reputable platform with extensive eSports coverage and reliable services. Its commitment to the eSports betting community has made it a trusted choice for Filipino eSports bettors.
Bonuses and Promotions: BetOnline offers various bonuses and promotions designed to enhance the betting journey. These bonuses may include welcome offers and ongoing promotions that provide extra value to users.
Live Streaming Options: BetOnline enhances user engagement by offering live streaming for eSports events. This feature allows bettors to watch matches in real-time, providing valuable insights into their betting decisions.
Tournaments: BetOnline ensures comprehensive coverage of eSports tournaments, encompassing popular gaming titles and events. This ensures that users have a wide range of options when it comes to placing their bets.
Payment Methods: BetOnline prioritizes user convenience by offering multiple payment methods. Users can choose from various options, including traditional payment methods and cryptocurrencies, making it easy to manage their accounts and transactions.
How to Place Bets on eSports Online
Placing bets on eSports online is a streamlined process:
Select a Reputable eSports Betting Site: Choose from the recommended eSports betting platforms mentioned earlier or opt for another licensed and dependable option.
Create an Account: Register on your chosen betting site, providing the necessary information and completing any required verification steps.
Deposit Funds: Fund your betting account using the available payment methods, ensuring you have a bankroll to place bets.
Choose an eSports Event: Navigate to the eSports section of the betting site and select the event or match you wish to bet on, taking into account the available options.
Place Your Bet: Pick your preferred bet type, set your stake, and confirm your bet. Be sure to double-check your selections before finalizing the bet.
Enjoy the Action: If the betting site offers live streaming, you can watch the eSports match live and monitor your bets in real-time, enhancing the overall experience.
Exploring the Best Types of eSports Wagers to Make
When it comes to eSports betting, understanding the various wager types can significantly enhance your betting strategy. Here’s a closer look at some of the best types of eSports wagers to consider:
Match Winner
How It Works: Betting on the match winner is straightforward; you select the team or player you believe will emerge victorious in a specific eSports match.
Why It’s Popular: This is one of the most common and straightforward bets in eSports betting. It allows bettors to support their favorite teams or players and enjoy a simple yet thrilling betting experience.
Correct Score
How It Works: Correct score betting involves predicting the precise score of a match or series, providing higher odds for accurate predictions.
Why It’s Popular: Correct score betting offers attractive odds and adds an extra layer of excitement to eSports betting. It’s favored by those who have in-depth knowledge of the game and can make precise score predictions.
Outright Betting
How It Works: Outright betting entails wagering on the overall winner of a tournament. For example, you might forecast the champion of a Dota 2 major tournament.
Why It’s Popular: Outright betting allows bettors to engage with the entire tournament rather than individual matches. It’s perfect for those who want to support their favorite team throughout the event.
Over/Under Bets
How It Works: Over/under bets revolve around predicting whether a particular statistic, such as the total number of kills in a game, will exceed or fall below a set value.
Why It’s Popular: Over/under bets offer a diverse range of options, making them suitable for both beginners and experienced bettors. It adds a strategic element to eSports betting, as you analyze game statistics.
Live Betting Section for eSports
How It Works: Engaging in real-time betting as matches unfold allows you to adjust your bets based on the current game dynamics. This adds excitement to your betting experience, as odds and situations change during the match.
Why It’s Popular: Live betting is dynamic and engaging, allowing you to react to in-game developments. It’s favored by those who enjoy the thrill of making decisions on the fly and capitalizing on momentum shifts in matches.
Incorporating these different wager types into your eSports betting strategy allows you to diversify your bets and tailor your approach to various gaming scenarios. Whether you prefer the simplicity of match-winner bets or the complexity of correct score predictions, understanding these options can lead to a more rewarding eSports betting experience.
The Most Popular Tournaments for eSports Betting
In the world of eSports betting, understanding the most popular tournaments is essential. These events not only showcase top-tier gameplay but also offer enticing opportunities for bettors. Here’s a deeper dive into some of the most popular eSports tournaments to consider when placing your bets:
Dota 2: The International
Overview: The International is the crown jewel of Dota 2 tournaments. It is renowned for its record-breaking prize pools, often exceeding tens of millions of dollars. The tournament features the world’s top Dota 2 teams competing for glory and a massive cash prize.
Why It’s Popular for Betting: The International’s prestige and colossal prize pool make it a focal point for eSports bettors. With high stakes and elite competition, it offers a thrilling betting landscape.
League of Legends: World Championship
Overview: The League of Legends World Championship is an annual event that showcases the best League of Legends teams from around the globe. Teams vie for the coveted title of world champion, and the tournament attracts a massive global audience.
Why It’s Popular for Betting: The League of Legends World Championship offers extensive coverage and a wide range of betting opportunities. With its immense fan base, it provides a vibrant eSports betting ecosystem.
Counter-Strike: Global Offensive (CS:GO) Majors
Overview: CS:GO Majors are prestigious tournaments in the Counter-Strike competitive scene. These events draw top teams from around the world and offer substantial prize money. Major tournaments feature high-level gameplay and intense competition.
Why It’s Popular for Betting: CS:GO Majors are a focal point for eSports bettors due to the level of competition and the high stakes involved. These events often provide a platform for making strategic and well-informed bets.
Overwatch League
Overview: The Overwatch League is a professional eSports league featuring teams representing various cities. It focuses on the popular first-person shooter game Overwatch and delivers intense competition across its matches.
Why It’s Popular for Betting: The Overwatch League offers an exciting betting landscape with a structured league format. It provides consistent opportunities for bettors to engage with their favorite teams throughout the season.
Call of Duty League
Overview: The Call of Duty League brings together elite teams from the popular Call of Duty franchise. These teams represent various cities and compete in high-stakes tournaments, making it a thrilling eSports betting experience.
Why It’s Popular for Betting: The Call of Duty League caters to fans of first-person shooter games, offering a dynamic and action-packed betting environment. It’s an ideal choice for eSports betting enthusiasts who appreciate intense gameplay.
Understanding these popular eSports tournaments allows bettors to make informed decisions and capitalize on the excitement and competition they offer. Whether you’re a fan of MOBAs like Dota 2 or first-person shooters like Call of Duty, these tournaments provide a diverse range of betting opportunities in the eSports world.
Expert Tips and Strategies for Successful eSports Betting
Always Compare Bookmakers for Optimal eSports Odds: It’s important to note that different bookmakers may offer slightly varying odds for the same eSports match. Therefore, it’s prudent to compare odds and select the bookmaker that provides the best value for your bet.
Understanding Bookmaker Margin for Prominent eSports Leagues: A key aspect of successful wagering is grasping the concept of the bookmaker’s margin. This margin represents the built-in profit for the bookmaker. Opting for bookmakers with lower margins means you’ll receive a higher payout if your bet proves successful.
Exploring Specific eSports Betting Bonuses: Certain betting sites offer bonuses and promotions tailored exclusively for eSports betting. Keeping an eye out for these specialized offers can amplify the value of your bets.
Evaluating eSports Live Streaming Availability: Betting platforms that offer live streaming of eSports events present an advantage. This feature allows you to watch the matches in real-time, which can significantly influence your in-play betting decisions.
Selecting the Optimal Game for eSports Betting: The choice of the game you decide to bet on should align with your familiarity and understanding of the game’s dynamics. Popular eSports titles for wagering include Dota 2, League of Legends, CS:GO, and Overwatch, primarily due to their extensive competitive scenes and large fan bases.
Local Teams and eSports Companies in the Philippines
The Philippines has embraced the world of eSports with open arms, boasting a thriving community of local teams and organizations that have left their mark on the global stage. Teams such as Bren Esports and Execration have not only achieved recognition domestically but have also garnered international acclaim.
Several eSports companies and organizations in the Philippines play a pivotal role in nurturing the growth of the industry. They organize local tournaments, provide support and opportunities for aspiring gamers, and champion the legitimacy and vitality of eSports as an integral part of the nation’s entertainment and sports landscape.
Promoting Responsible Betting Practices
While eSports betting offers excitement and the potential for profit, it’s paramount to approach it responsibly:
Establish a Betting Budget: Determine the amount you are willing to allocate for eSports betting and adhere to this budget strictly.
Avoid Chasing Losses: If you go on a losing streak, repress the impulse to rashly raise your stakes in an attempt to make up lost ground. Gambling ought to be entertaining and within your means.
View Betting as Entertainment: It’s essential to regard eSports betting as a form of entertainment rather than a guaranteed source of income. Always bear in mind that the outcomes of eSports matches can be unpredictable.
In Conclusion – Exploring the Finest eSports Betting Opportunities in the Philippines!
The Philippines has borne witness to the ascendance of professional gaming, with eSports betting playing an integral role in this journey. Armed with a passionate gaming community and top-tier betting platforms, Filipino eSports enthusiasts are granted access to an exhilarating world of competitive gaming. The key is to bet responsibly and savor the thrill that eSports wager has to offer, all while contributing to the continued growth of eSports in the Philippines.
FAQ
What is eSports betting?
eSports betting involves placing wagers on the outcomes of competitive video game matches. It allows fans to engage with their favorite games and teams while potentially winning money.
Why is eSports betting popular in the Philippines?
The Philippines has a fervent gaming community, and Filipino gamers have excelled on the international eSports stage, contributing to the surge in interest in both eSports and eSports betting in the country.
What are some interesting facts about eSports betting?
The eSports betting market is projected to exceed $20 billion in annual wagers globally by 2023. Filipino Dota 2 players have gained international recognition, boosting the country’s position in the global eSports scene.
Iconic eSports tournaments, like The International and League of Legends World Championship, often feature prize pools exceeding tens of millions of dollars.
Which eSports platforms are recommended for Filipino players?
Some of the top eSports betting platforms for Filipino players include 1xbet, 22Bet, GGBet, MelBet, PNXBet, MegaPari, and BetOnline.
What are the key factors to consider when choosing an eSports platform?
Factors to consider include the platform’s range of eSports markets, competitive odds, bonuses and promotions, live streaming options, tournament coverage, and available payment methods.
What types of eSports wagers can I make?
Common eSports wagers include betting on the match winner, predicting the correct score, placing outright bets on tournament winners, making over/under bets, and engaging in live betting during matches.
Which are the most popular eSports tournaments for betting?
Popular eSports tournaments for betting include Dota 2: The International, League of Legends: World Championship, CS:GO Majors, Overwatch League, and Call of Duty League, among others.
Are there any tips for successful eSports betting?
Tips include comparing bookmakers for optimal odds, understanding bookmaker margins, exploring eSports-specific bonuses, evaluating live streaming availability, and selecting games you’re familiar with.
How can I bet responsibly on eSports?
To bet responsibly, establish a betting budget, avoid chasing losses, view betting as entertainment, and recognize that outcomes in eSports matches can be unpredictable.
The online casino scene in the Philippines has been rapidly growing, and for poker enthusiasts, this means an abundance of options to enjoy the game from the comfort of their own homes. In this article, we will introduce you to six exceptional online live poker casinos in the Philippines, each offering its unique set of features. From the dynamic PNXbet to the icy-themed Ice Casino, and the versatile 1xBet to the esports-focused GGBet, there’s a poker platform to cater to every player’s preferences.
Our Favorite Online Live Poker Casinos in the Philippines
PNXbet: A dynamic casino offering diverse gaming options, live poker, enticing bonuses, and secure payment methods for an all-encompassing gaming experience.
Ice Casino: A uniquely themed casino with live poker, attractive bonuses, and secure payments, providing a refreshing twist to your gaming.
1xBet: A versatile global casino featuring comprehensive live poker options, generous bonuses, and a variety of secure payment methods.
GGBet: A specialized esports-centric casino with live poker, esports bonuses, and secure payments for gaming enthusiasts.
Jiliko: A rising star known for transparency, offering various live poker options, enticing bonuses, and secure payment methods.
Melbet: A diverse casino with live poker, competitive bonuses, and multiple secure payment methods, catering to a wide range of players.
Best Live Poker Casinos In Depth
PNXbet
Why We Love It:
PNXbet is a standout online casino due to its diverse gaming options. It caters not only to casino enthusiasts but also to sports bettors. PNXbet’s appeal lies in its user-friendly interface, secure payment methods, and enticing bonuses that have made it a popular choice among players seeking a comprehensive gaming experience.
Live Poker Options:
PNXbet offers an exhilarating live poker experience, featuring various poker variants and real-time gameplay with live dealers. Whether you’re a novice or an experienced player, you’ll find tables that match your skill level.
Texas Hold’em Poker
Three Card Poker
Caribbean Stud Poker
Bonuses and Promotions:
PNXbet rewards its players with attractive bonuses and promotions, including deposit bonuses and cashback offers. This surely enhancies your experience and increases your chances of winning. In example, you can benefit from up to 250% Welcome bonus; referral bonuses and a lot more!
Payment Methods:
The casino provides a variety of secure payment methods, ranging from e-wallets to credit cards and cryptocurrencies, thus, ensuring seamless and convenient transactions.
Ice Casino
Why We Love It:
Ice Casino brings a refreshing theme to the online casino world with its cool graphics and enticing games. Its unique and frosty atmosphere sets it apart from the competition, making it a refreshing choice for those looking for something different.
Live Poker Options:
While Ice Casino primarily focuses on slots and traditional casino games, it also offers live poker options, ensuring that poker enthusiasts have an opportunity to enjoy their favorite game in a distinct setting.
Live poker
Casino Stud Poker
Casino Hold’em
A lot of other options.
Bonuses and Promotions:
Ice Casino offers enticing bonuses and promotions, including welcome bonuses and free spins on popular slots, adding an extra layer of excitement to your gaming sessions – an exciting Welcome bonus – up to €1,500; Up to 90% cash bonus each week and a ton more.
Payment Methods:
The casino provides secure and convenient payment methods, making it easy for players to make deposits and withdrawals – credit/debit cards, WebMoney, Neteller and others.
1xBet
Why We Love It:
1xBet is a versatile online casino that caters to players from around the world, offering an extensive selection of casino games, sports betting, and esports options. Its user-friendly design, secure payment methods, and attractive promotions have made it a top choice for many players.
Live Poker Options:
1xBet offers a comprehensive live poker experience, with various poker variants and live dealer games available. Whether you prefer Texas Hold’em or Omaha, you’ll find tables that suit your preferences.
Hold’em Poker
Teen Patti
Teen Patti Face Off
Bonuses and Promotions:
1xBet rewards its players with generous bonuses and promotions, including deposit bonuses and cashback offers, enhancing your chances of winning substantial prizes – 25% cashback, Welcome Package Up To 15000 TRY + 150 free spins and so many more!
Payment Methods:
The casino provides a wide range of secure payment methods, ensuring hassle-free transactions for players in the Philippines – e-wallets (PayCo, MoneyGo), payment systems (PayKwik), bank transfers, Cryptocurrency (TRON, Bitcoin, Monero)
GGBet
Why We Love It:
GGBet is a specialized online casino that caters to esports enthusiasts, focusing on esports betting and gaming. It stands out as a go-to platform for esports fans.
Live Poker Options:
While GGBet primarily emphasizes esports, it also features a selection of traditional casino games, including live poker options. This allows players to enjoy the best of both worlds.
Double Hand Casino Holdem Poker
6+ Poker
Jokerbet
Bonuses and Promotions:
GGBet offers a variety of bonuses and promotions, making it an enticing choice for those interested in betting on competitive gaming events. In example, player will benefit from a great welcome bonus – 1500 EUR+ 500 free spins; and furthermore, there are different weekly and weekend bonuses and promotions to spice up your experience.
Payment Methods:
The casino provides secure payment methods, allowing players to fund their accounts and withdraw their winnings conveniently – credit/debit cards (Visa, Mastercard), Skrill, Interac e-transfer and so many more.
Jiliko
Why We Love It:
Jiliko is a rising star in the online casino industry, known for its commitment to fairness and transparency. Its sleek design and user-friendly interface enhance the overall gaming experience, making it an excellent choice for players seeking reliability.
Live Poker Options:
Jiliko offers a wide range of live poker options, ensuring that poker enthusiasts can enjoy real-time gameplay with live dealers. The casino caters to players of all skill levels.
Triple Card Poker
Texas Hold’em Poker
Teen Patti
and others
Bonuses and Promotions:
Jiliko provides enticing bonuses and promotions, including welcome bonuses and cashback offers, enhancing the gaming experience and providing opportunities for substantial winnings. You will also find weekly and monthly challenges and promotions, as well as a referral program.
Payment Methods:
Melbet
Why We Love It:
Melbet is a versatile online casino known for its extensive gaming options, ranging from slots to live casino offerings. It caters to a diverse range of players, making it a top choice for those seeking variety in their gaming experiences.
Live Poker Options:
Melbet offers a variety of live poker options, ensuring that players can enjoy real-time poker gameplay with live dealers. The casino ensures a dynamic and engaging poker experience.
2 Hand Casino Hold’em
Three Card Poker
Russian Poker
A lot of other interesting options.
Bonuses and Promotions:
Melbet rewards its players with competitive bonuses and promotions, including deposit bonuses and free spins on popular slots, enhancing the gaming journey. You will find so many good offers like a First Deposit Bonus – 100% BONUS, ON THE FIRST DEPOSIT UP TO 6000 PHP; Casino VIP Cashback and so many more.
Payment Methods:
The casino provides a range of secure payment methods, enabling players to conduct transactions with ease – e-wallets (Skrill, Webmoney), e-vouchers (JetonCash, Premium Vouchers), game items (Pay by Steam), Cryptocurrency (Bitcoin, Litecoin) and bank transfers.
How Did Live Poker Become So Popular
The popularity of live poker can be attributed to a combination of factors. First and foremost, it has a rich history dating back to the early 19th century, making it one of the oldest and most enduring card games. Additionally, the allure of face-to-face competition and the psychological aspects of reading opponents’ expressions and body language add a captivating dimension to the game.
The growth of televised poker tournaments, such as the World Series of Poker (WSOP), brought the game into the living rooms of millions, making poker stars out of players like Doyle Brunson and Phil Hellmuth. Furthermore, the advent of online poker platforms in the late 20th century made the game accessible to a global audience, further fueling its popularity. Today, live poker continues to thrive in both physical and online casinos, attracting players of all skill levels who seek the excitement and challenge that only poker can offer.
Types of Poker Games
Poker has a lot of variations, each of them fun and exciting. Let’s take a look:
Texas Hold’em: Known for its strategic depth and community cards.
Omaha: Features four hole cards for each player, adding complexity.
Seven Card Stud: Players receive seven cards, a mix of face-down and face-up.
Five Card Draw: A classic game where players build the best hand from five cards.
Razz: A lowball variant where the lowest hand wins, using seven cards.
Badugi: A draw poker variant where players aim for the lowest hand with unique suits.
Pineapple Poker: A fun twist on Texas Hold’em with three hole cards, and you discard one after the flop.
These diverse poker variants ensure there’s a game for every player, each with its own set of rules and strategies.
Popular Poker Hands Ranking You Should Know
Poker is a game of skill, strategy, and a bit of luck. Central to mastering this game is understanding the ranking of poker hands. These hand rankings determine the strength of your cards and play a pivotal role in your decisions at the poker table. Here, we’ll introduce you to the essential poker hands you should be familiar with, from the unbeatable Royal Flush to the basic High Card, each with its own significance in the world of poker.
Royal Flush
The highest-ranking hand, featuring Ace, King, Queen, Jack, and Ten of the same suit, unbeatable in poker.
Straight Flush
Comprising five consecutive cards of the same suit, this hand is a strong contender in any poker game.
Four of a Kind
Consisting of four cards of the same rank, it’s a powerful hand that can lead to big wins.
Full House
A combination of Three of a Kind and a Pair, offering a balanced mix of strength and versatility.
Flush
Five non-consecutive cards of the same suit, a flush is a solid hand that can often win rounds.
Straight
Five consecutive cards of different suits form a straight, a hand with decent potential.
Three of a Kind
Featuring three cards of the same rank, it’s a strong hand in most poker variants.
Two Pair
This hand consists of two sets of pairs, offering a decent chance of winning.
One Pair
A pair of cards of the same rank, a common hand in many poker games.
High Card
When no cards form a pair, straight, or flush, the highest-ranking card in your hand determines its value.
How to Win When Playing Poker
When looking for the best live poker casinos to play in, you may stop and wonder “What can I do to ensure I win?”. Let’s look at some important tips:
Learn the Basics
Begin by mastering the essentials of poker, including rules, hand rankings, and the various poker variants. A solid foundation is crucial for consistent success.
Exercise Patience
One of the golden rules of poker is patience. Resist the urge to play every hand; instead, wait for strong starting cards while folding weaker ones.
Read Your Oponents
Observing and analyzing opponents’ playing styles and tendencies is key. Identify whether they lean towards aggressiveness, conservatism, or unpredictability and adapt your strategy accordingly.
Positional Advantage
Your seating position at the poker table matters. Late positions provide more information about others’ actions, enabling better-informed decisions.
Bankroll Management
Establish a clear budget for your poker sessions and adhere to it rigorously. Avoid chasing losses, as it can lead to impulsive decisions and further financial setbacks.
Strategic Bluffing
Bluffing is a vital poker skill, but timing is crucial. Employ this tactic judiciously and in line with your table image.
Cultivate a Table Image
Develop a table image that can be used to your advantage. If you’ve been playing conservatively, a well-timed bluff can confound opponents.
Betting Proportions
Align your bets with the strength of your hand and your perception of your opponents’ strategies. Maintain consistent betting patterns to avoid revealing your intentions.
Stay Informed
Stay tuned into poker strategy updates, trends, and emerging insights. Resources like books, online materials, and studying professional players can enhance your skills over time.
Embrace Variability
Acknowledge that poker contains an element of chance. Even seasoned players encounter losses. Maintain emotional resilience and adhere to your strategy through both winning and losing streaks.
Continuous Growth
Understand that poker is a lifelong learning journey. Review your gameplay, learn from mistakes, and adapt to changing circumstances to evolve into a more formidable poker player.
Bet responsibly
We can’t stress this enough! Have fun, enjoy the game but do not get lost in it.
The Best Live Poker Casinos in the Philippines Are Waiting For You!
The Philippines is a vibrant hub for online live poker casinos, offering an exciting array of options for players with diverse preferences. Whether you’re drawn to the comprehensive offerings of PNXbet, the unique theme of Ice Casino, the versatility of 1xBet, the esports focus of GGBet, the transparency of Jiliko, or the extensive gaming library of Melbet, you’ll discover an online poker casino tailored to your style.
Remember to gamble responsibly, and always verify the licensing and regulations applicable in your jurisdiction to ensure a safe and enjoyable gaming experience. Happy poker gaming!
For live casinos enthusiasts – you can also check these articles:
The Philippines is buzzing with excitement as tablet casinos take center stage in the world of online gaming. With the gaming industry evolving at breakneck speed, it’s no surprise that more players are reaching for their tablets to get a slice of the action. But in this whirlwind of options, choosing the right tablet casino becomes paramount. In this comprehensive guide, we’ll explore the top 4 tablet casinos for this year in the Philippines, ensuring that your journey is not only thrilling but also rewarding.
Our Picks for The Top 4 Tablet Casinos in the Philippines
22Bet Tablet Casino – Kick off your gaming adventure with 22Bet, a top-tier casino in the Philippines. Offering a vast array of games and lucrative bonuses, 22Bet promises an unparalleled gaming experience for its tablet users.
BK8 Tablet Casino – For table game enthusiasts, BK8 is a paradise. Dive into blackjack, poker, roulette, and more. With user-friendly navigation and enticing bonuses, it’s a top choice for Filipino players.
1xBet Tablet Casino – If you’re a fan of table games, look no further than 1xBet. With a plethora of options and a user-friendly interface, it’s perfect for those seeking an immersive gaming experience.
20Bet Tablet Casino – 20Bet is your go-to destination for diverse games and attractive promotions. From slots to table games, it offers it all. Discover its exceptional game variety and secure platform.
What to Look for in a Tablet Casino
Choosing the right tablet casino is crucial for a rewarding gaming experience. With numerous options available, it’s essential to know what factors to consider when making your selection. Here are the key aspects to look for in a tablet casino:
Game Variety
The first and foremost factor to consider is the diversity of games offered by the tablet casino. A rich and varied library of games ensures that you’ll never run out of gaming options. Look for casinos that provide a wide selection of games, including slots, table games like blackjack and roulette, card games like poker, and live dealer options. The broader the game variety, the more exciting your gaming journey will be.
Security and Licensing
Security should be a top priority when selecting a tablet casino. Tablet casinos employ state-of-the-art encryption technology to safeguard your data. They use SSL (Secure Sockets Layer) or TLS (Transport Layer Security) encryption protocols to ensure that all information transmitted between your tablet and their servers remains confidential. This means that your login credentials, banking details, and other sensitive information are virtually unreadable to anyone attempting unauthorized access. Ensure that the casino you choose to play at is securely encrypted to safeguard your personal and financial information.
Additionally, check for valid gambling licenses. Licensing is not only a mark of trustworthiness but also a guarantee that the casino operates within legal boundaries and adheres to strict regulations. Reputable licensing authorities include the Malta Gaming Authority (MGA), the United Kingdom Gambling Commission (UKGC), the Philippine Amusement and Gaming Corporation (PAGCOR), and the Curacao eGaming Authority, among others. These licenses ensure fair play, regular audits of random number generators (RNGs), and an overall safe gaming environment.
Bonuses and Promotions
Bonuses and promotions are integral to the online casino experience, and tablet casinos are no exception. Look for tablet casinos that offer enticing bonuses and promotions. Familiarize yourself with the types of bonuses they provide and their associated terms and conditions. Bonuses can significantly boost your bankroll and extend your gaming sessions. Common types of bonuses include welcome bonuses, free spins, reload bonuses, cashback offers, and loyalty programs. Understanding the bonus terms is crucial to making the most of these promotions.
Payment Methods
Providing convenient and secure payment methods is a crucial part of a good online casino. Check if the tablet casino supports a variety of payment options, including credit/debit cards, e-wallets like PayPal and Skrill, and even cryptocurrency. Having multiple payment choices ensures that you can deposit and withdraw funds using your preferred method with ease.
Customer Support
Responsive customer support is essential in case you encounter any issues or have questions while gaming. Check if the tablet casino offers reliable customer support through channels like live chat, email, or phone. Read reviews and testimonials to gauge the responsiveness and effectiveness of their customer service. Prompt and helpful customer support can make your gaming experience much more enjoyable.
22Bet Tablet Casino Philippines
22Bet Casino stands as one of the leading online gaming platforms in the Philippines, offering an exceptional gaming experience tailor-made for tablet users. Let’s delve deeper into this exciting casino:
Game Selection
22Bet Casino in the Philippines boasts an extensive library of games that caters to a wide range of preferences. Here are examples of the most popular games at the casino:
Starburst: This classic slot game from NetEnt is known for its vibrant colors, simple gameplay, and frequent wins. It’s a favorite among slot enthusiasts for its expanding wilds and re-spins feature.
Mega Moolah: A progressive jackpot slot from Microgaming, Mega Moolah, is immensely popular due to its life-changing jackpot prizes. Filipino players try their luck at winning millions with each spin of the reels.
European Roulette: Roulette enthusiasts flock to this game for its straightforward rules and exciting betting options. The European version, with its single zero, provides better odds for players.
Blackjack Classic: Blackjack remains a top choice among card game aficionados. 22Bet Casino’s classic blackjack game offers a realistic and immersive experience with smooth gameplay.
Live Baccarat: For those who crave the authentic casino experience, live baccarat is a favorite. Interact with live dealers in real-time as you place your bets and aim for a winning hand.
Standout Features
What sets 22Bet apart are its unique features. For instance, the casino offers an extensive sportsbook, allowing players to switch seamlessly between casino games and sports betting. This versatility is a significant advantage for those who enjoy both forms of gambling.
Bonuses and Promotions
22Bet Casino is known for its generous bonuses and promotions. New players are greeted with a warm welcome bonus of up to 18,000 PHP.
Regular players can also benefit from ongoing promotions such as reload bonuses and cashback offers. These promotions not only add excitement to the gaming experience but also provide more opportunities to win.
Payment Methods
The casino supports various payment methods, making it convenient for players to deposit and withdraw funds. These methods include:
Credit and Debit Cards
E-wallets like Skrill and Neteller
Bank Transfers
Cryptocurrency
Security Measures
The casino employs advanced encryption technology, including SSL, to protect data transfers. Additionally, 22Bet is licensed and regulated by the Curacao eGaming Authority, ensuring that it operates under strict security and fairness standards.
Customer Support
In case you encounter any issues or have questions, 22Bet provides customer support via:
Live Chat
Email
22Bet has emerged as a top choice for players in the Philippines looking for a diverse gaming experience on their tablets. With its extensive game library, generous promotions, and commitment to security, it’s no wonder that 22Bet has garnered a strong following among tablet gamers in the country. Whether you’re a seasoned player or new to online gaming, 22Bet offers an inviting platform for exciting gameplay and a chance to win big.
BK8 Tablet Casino Philippines
BK8 Casino has earned its reputation as the go-to destination for table game enthusiasts in the Philippines. Let’s explore what makes this casino a standout choice for tablet gaming:
Game Variety
BK8 boasts an impressive selection of classic card and table games. A few examples are:
Book of Ra: This Egyptian-themed slot by Novomatic is beloved for its engaging storyline and potential for big wins, particularly during the free spins round with expanding symbols.
Lightning Roulette: A popular variant of traditional roulette, Lightning Roulette adds electrifying multipliers to certain numbers, offering the potential for significant payouts.
Mega Fortune: Known for its massive progressive jackpot, Mega Fortune by NetEnt attracts players looking for a chance at life-changing wealth. The game’s luxurious theme adds to its appeal.
Dragon Tiger: This simplified card game is a hit among Asian players. It’s fast-paced and straightforward, making it accessible to both beginners and experienced gamblers.
Gonzo’s Quest: A NetEnt classic, Gonzo’s Quest is admired for its unique Avalanche feature, which can lead to consecutive wins with increasing multipliers.
Standout Features
One of BK8’s notable strengths is its user-friendly interface. Navigating the casino is a breeze, making it accessible for both novice and experienced players. The intuitive design ensures that you can quickly find your favorite table games and features.
Promotions and Bonuses
BK8 Casino doesn’t disappoint when it comes to bonuses and promotions. New players are welcomed with a generous welcome bonus package of up to 15,000 PHP.
In addition, all regular players have the opportunity to take advantage of reload bonuses, cashback offers, and free spins. These promotions can add even more fun to your gaming.
Payment Methods
The casino supports various payment methods. You can make deposits and withdrawals using:
Credit and Debit Cards
E-wallets
Bank Transfers
Security Measures
Security is a top priority at BK8. The casino uses encryption technology to protect its player’s personal information and financial transactions. Additionally, BK8 is licensed by the government of Curacao, which means it operates under strict regulations, ensuring fairness and player protection.
Customer Support
Should you encounter any issues or have questions, BK8 provides customer support services, including:
Live Chat
Email
Phone Support
BK8 Casino is the ideal destination for those who relish strategic gameplay and a diverse selection of table games. With its user-friendly interface, generous promotions, and commitment to security, BK8 has become a trusted choice for tablet gamers in the Philippines. Whether you’re a seasoned table game enthusiast or looking to explore this genre, BK8 offers an immersive and rewarding gaming experience that keeps players coming back for more.
1xBet Tablet Casino Philippines
1xBet is a prominent player in the online gambling industry, offering an extensive range of casino games and a user-friendly platform. In the Philippines, it has gained recognition for providing a diverse and immersive gaming experience. Here’s a closer look at what 1xBet Casino in the Philippines has to offer:
Game Variety
1xBet boasts a remarkable game library that caters to all types of players. Whether you’re a fan of slots, table games, live dealer titles, or specialty games, you’ll find an array of options to choose from:
Book of Ra Deluxe: This Egyptian-themed slot game is a favorite among players who appreciate immersive storytelling and free spins with expanding symbols. It offers a thrilling journey through ancient Egypt in search of hidden treasures.
Lightning Roulette: Lightning Roulette takes traditional roulette to the next level with electrifying multipliers. This live dealer game adds excitement to the classic casino experience, with the chance for massive wins when lightning strikes lucky numbers.
Blackjack Classic: Blackjack enthusiasts often flock to Blackjack Classic for its sleek graphics, user-friendly interface, and realistic gameplay. It offers various betting options and strategies, making it a top choice for card game aficionados.
European Roulette: European Roulette is a classic casino game that attracts players with its simplicity and favorable odds. It’s a great choice for those looking to test their luck on the iconic roulette wheel.
Dream Catcher: Dream Catcher is a live money wheel game that combines elements of chance and entertainment. Hosted by a charismatic presenter, players can enjoy the thrill of spinning the wheel and winning prizes.
Standout Features
One of the standout features of 1xBet Casino is its remarkable game variety, diversity for all preferences, and regular game updates. The casino excels at offering tailored betting options. It allows players to choose from various betting limits, ensuring that both beginners and high-rollers can find games that suit their budgets. This flexibility makes it an inclusive platform where everyone can enjoy gaming at their own pace.
Bonuses and Promotions
1xBet is renowned for its generous bonuses and promotions. In the Philippines, players are greeted with a substantial welcome bonus package that often includes bonus funds and free spins. Additionally, regular players can benefit from ongoing promotions like reload bonuses and cashback offers.
Payment Methods
1xBet understands the importance of convenient banking options. Players in the Philippines can choose from a variety of payment methods:
Credit/Debit cards
E-wallets
Cryptocurrency
Security Measures
Security is a top priority at 1xBet Casino. The platform is encrypted to safeguard player data and financial transactions. Additionally, the casino operates under a reputable license, ensuring fairness and player protection.
Customer Support
1xBet offers reliable customer support services, including:
Live Chat
Email
Phone Support
1xBet in the Philippines stands out for its comprehensive game selection, user-friendly interface, and commitment to player security. Whether you’re a fan of slots, table games, or live dealer experiences, this casino offers a well-rounded gaming environment that caters to your preferences. Filipino players looking for a diverse and rewarding casino experience often find it at 1xBet Tablet Casino.
20Bet Tablet Casino Philippines
20Bet Casino is one of the rising stars in the world of online gambling in the Philippines, particularly for tablet users. This casino offers a compelling combination of exciting games, attractive bonuses, secure transactions, and mobile optimization. Here’s what sets 20Bet apart:
Game Variety
20Bet boasts an extensive library of games, catering to a wide range of player preferences:
Book of Dead: This popular slot game takes players on an adventure with Rich Wilde in search of ancient treasures. Free spins and expanding symbols are among the features that make it an enticing choice.
Wolf Gold: With its stunning wildlife theme, Wolf Gold offers exciting gameplay and the chance to win big. Features like Money Respin and free spins add to the thrill.
Live Blackjack: If you enjoy the classic card game, 20Bet’s live blackjack tables provide an immersive experience with real dealers. Interact with the dealer and other players while trying to beat the house.
Live Roulette: Experience the excitement of the roulette wheel in real-time with 20Bet’s live roulette games. Place your bets and watch the action unfold via live stream.
Table Games: In addition to live dealer games, 20Bet offers a variety of classic table games such as roulette, blackjack, baccarat, and poker. These digital versions provide a different gaming experience and allow you to hone your skills.
Standout Features
One of the casino’s standout features is the extremely wide array of payment methods – 43 different payment options. You can choose from traditional options like credit/debit cards and bank transfers or opt for all kinds of modern e-wallets and even a few cryptocurrency types.
Bonuses and Promotions
20Bet welcomes new players with a generous welcome bonus package designed to boost your bankroll from the start, up to 7,000 PHP.
Additionally, regular players can benefit from ongoing promotions, weekly reload bonuses, and loyalty rewards. These promotions add extra excitement to your gaming journey.
Payment Methods
When it comes to making deposits and withdrawals, 20Bet Casino offers a variety of payment options:
Credit/Debit cards
E-wallets
Bank Transfers
Cryptocurrency
Security Measures
Security is a top priority at 20Bet. The casino employs state-of-the-art encryption technology to safeguard your personal and financial information. Additionally, it holds relevant licenses, ensuring fair play and a safe gaming environment, from Curaçao and the Kahnawake Gaming Commission.
Customer Support
20Bet values customer satisfaction and provides responsive customer support services. Whether you have questions about games, payments, or any other aspect of your gaming experience, you can reach out to the support team for assistance:
Live Chat
Email
20Bet Casino in the Philippines offers a diverse gaming portfolio, appealing bonuses, secure transactions, and mobile optimization. Whether you’re a slot enthusiast, a table game aficionado, or someone who enjoys live dealer experiences, 20Bet has something to offer.
Why Tablet Casinos are Trending
Tablet casinos are carving out a niche in the gaming world, and their meteoric rise can be attributed to several compelling reasons. Let’s delve deeper into why tablet casinos are becoming the preferred choice for Filipino gamers.
Convenience and Portability
One of the primary reasons for the surge in tablet casino popularity is the sheer convenience and portability they offer. Unlike traditional casinos or even desktop gaming, tablets allow players to access their favorite casino games from virtually anywhere. Whether you’re lounging on the couch, commuting on a train, or relaxing by the pool, your tablet can transform into a casino at your fingertips. This level of convenience resonates with modern players who lead busy lives but still crave the excitement of gaming.
Enhanced Graphics and Gameplay
Tablets come equipped with vibrant, high-resolution screens and powerful processors. This means that the graphics and gameplay experience at tablet casinos are nothing short of breathtaking. From crystal-clear visuals to smooth animations, tablet casinos immerse players in a world of stunning entertainment. Every spin of the slot machine, roll of the dice, or flip of the card becomes a visually captivating experience. This level of immersion is something that traditional brick-and-mortar casinos can’t replicate.
Exclusive Tablet Bonuses
Tablet casinos often roll out exclusive bonuses and promotions to entice players to join the mobile gaming revolution. Examples of such bonuses are: free spins, deposit matches, special tournaments, etc. By targeting tablet users specifically, casinos aim to reward players for choosing this platform. These exclusive incentives not only enhance the gaming experience but also boost your chances of winning big.
Responsible Gaming on Tablet Casinos
Tablet casinos in the Philippines offer an exhilarating gaming experience, bringing the excitement of the casino directly to your fingertips. While the thrill of winning is enticing, it’s essential to prioritize responsible gaming practices to ensure your enjoyment remains safe and sustainable. Here’s how to help yourself make responsible choices when gaming on your tablet:
Setting Betting Limits
Before you start playing on your tablet, establish clear limits for yourself. Determine how much time and money you’re willing to spend on gaming. Stick to these limits to prevent excessive play and overspending.
Know the Games
Learn the rules and what the odds are for each of the games you’re playing. Understanding the games reduces the risk of impulsive decisions and enhances your overall gaming experience.
Monitor Your Spending
Keep track of your gaming expenses. Most tablet casinos provide tools to help you monitor your deposits, losses, and winnings. Regularly reviewing your financial activity can prevent overspending.
Don’t Chase Losses
It’s normal to experience losses in casino gaming. Avoid the temptation to chase these losses by increasing your bets or playing longer than planned. Accept losses as part of the gaming experience and move on.
Recognizing Problem Gambling
Problem gambling can affect individuals from all walks of life, and recognizing its signs is the first step towards seeking help. Whether it’s online or at a physical casino, here are some common indicators that may suggest a gambling problem:
Increased Preoccupation
Loss of Control
Chasing Losses
Neglecting Responsibilities
Borrowing or Stealing
Mood Swings
Lying and Secrecy
Failed Attempts to Quit
Chasing the “Big Win”
Escapism
Access to Support and Helplines
If you’re concerned about your gaming habits or believe you might have a gambling problem, don’t hesitate to seek support. Numerous organizations and helplines in the Philippines provide assistance to individuals facing gambling-related issues.
Conclusion
In the dynamic world of tablet casinos, the Philippines shines as a hub of excitement and potential wins. As you explore the top tablet casinos, remember to do so responsibly. These casinos offer not just entertainment but also the chance to win big. So, grab your tablet and embark on an adventure filled with thrilling gameplay and enticing bonuses. Your fortune awaits in the world of tablet casinos!
What factors should I consider when choosing a tablet casino?
When selecting a tablet casino, consider factors such as: Game variety, Security and licensing, Bonuses and promotions, Payment Methods, and Customer Support.
How can I ensure the security of my personal and financial information while playing at tablet casinos?
Tablet casinos typically use advanced encryption technology like SSL or TLS to protect data transfers. Additionally, look for casinos with valid gambling licenses, as they adhere to strict security and fairness standards
What types of bonuses and promotions can I expect at tablet casinos?
Tablet casinos often offer various bonuses, including welcome bonuses, free spins, reload bonuses, and cashback offers. The specific types and terms of bonuses may vary between casinos
What payment methods are commonly supported by tablet casinos in the Philippines?
Tablet casinos usually support a range of payment methods, including credit/debit cards, e-wallets like PayPal and Skrill, bank transfers, and sometimes even cryptocurrency.
What should I do if I believe I have a gambling issue?
If you believe you have a gambling problem or are exhibiting signs of problem gambling, seek support from organizations and helplines in the Philippines dedicated to assisting individuals facing gambling-related issues. The first step to getting help is realizing the issue.
In the age of visual storytelling, Instagram has emerged as one of the most powerful platforms for connecting with audiences worldwide. While striking visuals are essential, crafting compelling Instagram captions is equally important.
These captions serve as the voice behind your imagery, providing context, personality, and a bridge to deeper engagement. In this comprehensive handbook, we’ll delve into the art and science of creating Instagram captions that captivate, engage, and drive results.
The Importance of Effective Instagram Captions
In a cluttered digital landscape, where attention spans are fleeting, effective Instagram captions can make all the difference. They’re not just an afterthought but a strategic tool for boosting engagement, conveying messages, and nurturing your brand’s identity. A well-crafted caption can humanize your brand, tell a story, or inspire action. It’s the secret sauce that transforms a passive scroller into an engaged follower.
A Step-by-Step Guide: Crafting Exceptional Instagram Captions
Understand Your Audience
Start by understanding who your target audience is. Consider their interests, preferences, and the challenges they might be facing. When you grasp what makes them tick, you can tailor your captions to strike a chord with their emotions and aspirations. This personalized approach ensures that your content resonates deeply, fostering a stronger bond between you and your audience.
Context is Key
Every picture or video has a story behind it, and your audience is eager to know more. Providing context is like inviting them into your world. Explain the significance of the moment, the location, or the emotions you’re experiencing. By adding this layer of context, you not only make your content more relatable but also create an opportunity for your audience to engage with your narrative on a deeper level, sparking meaningful conversations and connections.
To unlock the full potential of your Instagram captions, follow these tried-and-true tips
Instagram Captions Tip #1: Crafting an Attention-Grabbing Opening
Begin your caption with a hook—a compelling statement, a question, or a short story. This entices readers to continue reading. Your opening sentence should be concise, intriguing, and relevant to your content.
The beginning of your Instagram caption sets the tone for the entire post. It should aim to grab the reader’s attention immediately. Consider using a question to engage the audience’s curiosity or a compelling quote that relates to the image. Teasers work well too, offering a glimpse of what’s to come in the caption.
Instagram Captions Tip #2: Encourage User Engagement and Use Call-to-Action (CTAs)
Interaction is key on Instagram. Prompt engagement by asking questions, seeking opinions, or inviting followers to share their thoughts in the comments.
Engaging with your audience is crucial for building a strong community on Instagram. To encourage user engagement, include clear and inviting call-to-actions in your captions.
These CTAs can be as simple as asking followers to like the post if they agree with the message or to comment with their thoughts. You can also prompt them to share the post if it resonates with them, expanding your reach to their followers.
Boosting Engagement with Call-to-Actions
Explicitly guide your audience on the desired actions. For instance, you can ask them to “double-tap if you agree” or “share this with someone who needs to see it.” These direct CTAs make it easier for your followers to engage with your content.
Channeling Traffic to Your Website through Call-to-Actions
If your goal is to drive traffic to your website, include a link in your caption. This is particularly effective when you’re promoting a specific product, blog post, or landing page. Ensure the link is relevant to the content of your post to increase click-through rates.
Insta captions
Making Your Call-to-Actions Truly Stand Out
Use emojis and bold formatting to make your CTAs eye-catching. Emojis can convey emotion or enthusiasm, while bold text draws attention to the action you want users to take. For example, invite people to “???? Join the conversation!” or “???? Check out our latest blog post!”
Ask a Question
Questions are a powerful tool to spark engagement. They invite followers to share their thoughts or experiences in the comments, fostering a sense of community around your content. Make sure the questions are relevant to your post and encourage meaningful responses.
Send visitors to a link in your bio
Make it easy for followers to access your content by directing them to your bio link. When you can’t include a clickable link in your caption, directing users to the link in your bio is a common workaround. Ensure that the link in your bio corresponds to the content you’re promoting in the caption, and update it as needed.
Invite people to tag their friends
Leverage the power of social networks by encouraging users to tag friends who would find your content interesting. Tagging friends can amplify your reach as it introduces your content to new potential followers. Encourage users to tag friends who share similar interests or who would benefit from the information or entertainment you’re providing.
Invite people to enter a contest
Create excitement and user-generated content by hosting contests or giveaways through your captions. Make sure the rules and entry instructions are clear in your caption and consider using a unique hashtag for the contest to track entries.
Instagram Captions Tip #3: Enhance Readability with Line Breaks for Long Captions
Long captions can be daunting to read. Use line breaks and paragraph spacing to make your captions more reader-friendly and digestible. When you have a lot to say in your caption, it’s important to break it up into smaller, easily digestible chunks.
Use line breaks or paragraph spacing to create a visual separation between sections of your caption. This not only improves readability but also makes the content less overwhelming for your audience.
Instagram Captions Tip #4: Maintain a Consistent Brand Voice
Your captions should reflect your brand’s personality consistently. Whether it’s witty, informative, or inspirational, maintain that voice across all your posts. Consistency in your brand’s voice is key to building a recognizable and authentic brand identity on Instagram.
Determine the tone and style that best represents your brand, whether it’s casual and friendly, professional and informative, or witty and humorous. Then, ensure that every caption aligns with this chosen voice, reinforcing your brand’s image in the minds of your followers.
Instagram Captions Tip #5: Select 2-3 Key Themes
Focus on 2-3 key themes that resonate with your audience and rotate them in your captions. This helps create a cohesive narrative for your brand. By focusing on a few key themes in your captions, you provide consistency and structure to your Instagram content strategy.
These themes should align with your brand’s values and resonate with your target audience. Over time, this thematic approach creates a coherent and memorable narrative that followers can relate to.
Instagram Captions Tip #6: Incorporate Eye-Catching Emojis
Emojis add personality and playfulness to your captions. Use them judiciously to convey emotions, amplify your message, or simply make your captions more visually appealing. Emojis are a universal language of emotions and expressions on social media. When used thoughtfully, they can enhance the tone and impact of your captions.
Consider using emojis that complement the message you’re conveying. For example, a heart emoji can signify love or appreciation, while a fire emoji can convey enthusiasm or excitement.
Instagram Captions Tip #7: Proper Disclosure for Sponsored Posts
Transparency is essential in influencer marketing. Clearly disclose sponsored content using #ad or #sponsored to comply with FTC guidelines. If you’re partnering with brands or promoting products and services for compensation, it’s crucial to disclose this information transparently.
The Federal Trade Commission (FTC) requires such disclosures to maintain trust and authenticity on the platform. Use #ad or #sponsored at the beginning or end of your caption to make it clear to your audience that the post is a paid partnership.
Instagram Captions Tip #8: Efficient Batch Caption Writing
Save time by writing captions in batches. Prepare captions for upcoming posts in advance to maintain consistency and creativity. Writing captions in batches is a smart time-saving strategy for busy social media managers and content creators.
Set aside time specifically to come up with ideas and create captions for several postings at once. This approach ensures that your captions remain consistent in style and messaging while freeing up time for other important tasks, such as engaging with your audience or creating new content.
Instagram Captions Tip #9: Harness the Power of Hashtags for Visibility
Hashtags can expand your reach and increase discoverability. To make your content more visible, do some research and add pertinent hashtags. For maximum reach, combine trending and specialized hashtags. Use them strategically:
The Role of Hashtags in Instagram Captions
Hashtags are vital for visibility. They are essentially keywords or phrases preceded by the “#” symbol. They serve as a way for users to categorize and search for content on Instagram. By including relevant hashtags in your captions, you make your content discoverable to a wider audience interested in those topics or themes.
Strategic Use of Hashtags for Optimal Impact
Research and choose relevant hashtags that resonate with your content and target audience. The effectiveness of hashtags depends on their relevance to your content and your target audience.
Research popular and niche hashtags related to your industry, products, or services. Strive for a mix of broad and specific hashtags to maximize your content’s discoverability while reaching a highly engaged audience.
Insta hashtag icon
Use Branded Hashtags in Your Instagram Captions
Create and promote branded hashtags to foster community engagement and brand loyalty. Branded hashtags are unique to your brand and can help create a sense of community among your followers.
Encourage your audience to use these hashtags when they share content related to your brand. This not only strengthens brand loyalty but also increases the visibility of user-generated content.
Instagram Captions Tip #10: Keeping Instagram Captions Brief, Neat, and Tidy
Respect your followers’ time by keeping captions concise and to the point. Avoid unnecessary verbosity. In the fast-paced world of social media, brevity is often appreciated.
While it’s important to convey your message effectively, it’s equally crucial to do so succinctly. Avoid rambling or using overly long sentences in your captions. Get to the point and make every word count to capture and retain your audience’s attention.
Instagram Captions Tip #11: Tailoring Captions for Instagram Stories
Customize your captions for Stories, considering their temporary nature and the need for quick engagement. Instagram Stories offer a different format and user experience compared to regular feed posts. When crafting captions for Stories, consider that the text may be superimposed on images or videos. Keep your captions concise and avoid cluttering the screen. You can use features like stickers and gifs to add text or engage with your audience in a more dynamic way.
Instagram Captions Tip #12: Optimizing IGTV Captioning
IGTV captions are crucial for accessibility and engagement. They ensure that your content is accessible to a wider audience, including those with hearing impairments. When posting on IGTV, make sure to add accurate and synchronized captions to enhance the viewing experience and maximize engagement.
Instagram Captions Tip #13: Cross-promote your other social channels.
Encourage your Instagram audience to explore your other social media platforms or websites for a broader online presence. Don’t limit your Instagram captions to just Instagram.
Use them as an opportunity to cross-promote your other social media channels, such as Twitter, Facebook, or YouTube. Encourage your Instagram followers to follow you on these platforms to stay updated with your content across the board.
Instagram Captions Tip #14: Learn from awesome examples of great captions
One of the best ways to improve your caption game is by studying exceptional examples. Analyze captions from successful Instagram accounts within your niche or industry. What makes their captions stand out? Is it their storytelling ability, humor, or relatability? Learn from these examples and adapt their techniques to your own captions.
Instagram Captions Tip #15: Tracking and Refining Instagram Caption Strategies
Effective Instagram captioning isn’t a one-size-fits-all approach. It requires continuous evaluation and adjustment. Monitor the performance of your captions through Instagram Insights or third-party analytics tools.
Pay attention to metrics like engagement rate, comments, and shares. By concentrating on what resonates with your audience the most, use this data to gradually improve your captioning tactics.
Manage, Schedule, and Automate Your Social Media Posts with different Tools
To streamline your Instagram captioning process, consider using social media management tools like Later. These platforms allow you to schedule posts in advance, ensuring that your captions are well thought out and aligned with your content calendar. Automation can save you time and help maintain consistency in your Instagram strategy.
In conclusion, crafting compelling Instagram captions is both an art and a science. It’s a skill that can significantly impact your engagement, brand identity and overall success on the platform. By following these tips and continuously refining your captioning strategies, you’ll be well on your way to mastering the art of Instagram captions and building a loyal and engaged following.
Instagram captions provide context, personality, and engagement opportunities for your posts. They can boost your brand’s identity and transform passive followers into engaged ones.
How can I grab attention with my captions?
Craft an attention-grabbing opening by using questions, quotes, or teasers to pique curiosity.
What are some effective call-to-actions for Instagram captions?
You can ask questions, direct people to your bio link, encourage tagging friends, or invite participation in contests, among other strategies.
What are some effective call-to-actions for Instagram captions?
You can ask questions, direct people to your bio link, encourage tagging friends, or invite participation in contests, among other strategies.
Why is it important to use hashtags strategically?
The strategic use of hashtags expands your reach and visibility. Research relevant hashtags and create branded ones to engage your audience.
Why is it important to use hashtags strategically?
The strategic use of hashtags expands your reach and visibility. Research relevant hashtags and create branded ones to engage your audience.
How can I optimize captions for Instagram Stories and IGTV?
Adapt your captions to the format, keeping them concise for Stories and adding captions for accessibility on IGTV.
How can I track and improve my caption strategies?
Monitor metrics like engagement rate and comments, and use data to refine your captioning techniques over time.
Can social media management tools help with Instagram captions?
Yes, tools like Later can streamline your captioning process and ensure consistency in your content calendar.
Facebook has become an integral part of our lives, connecting us with friends, family, and acquaintances from around the globe. However, as your friends list grows, so does the need for effective management. In this comprehensive guide, we’ll explore the importance of maintaining your Facebook friends list and provide you with practical steps on how to do it.
Evaluating Your Current Facebook Friends List
First and foremost, it’s crucial to know who’s on your Facebook friends list. To do this, you can simply access your friends list by clicking on your profile. Within your friends list, you’ll want to review your current friends for relevance. Are these people you still want to be connected with? Additionally, take the time to identify friends you may not know well. Sometimes, in the whirlwind of social media, we accept friend requests without really knowing who the person is.
Adjusting Privacy Settings
Privacy settings play a vital role in controlling who can see your Facebook friends list. Customizing the visibility of your friends list is essential to protect your privacy. You can adjust settings to hide your friends list from non-friends and control who can send you friend requests. This way, you can rest assured that your personal information is only available to trusted people. Follow these steps to adjust your privacy settings on Facebook:
1. Access Your Privacy Settings
In the upper-right corner of the Facebook interface, you’ll find a small downward-pointing arrow. Click on it to open a drop-down menu. From there, pick “Settings & Privacy,” and after that open “Settings”.
2. Navigate to Privacy Settings
On the left-hand side of the Settings page, you’ll see a menu with various options. Click on “Privacy” to access your privacy settings.
3. Edit Your Facebook Friends List Privacy
Who can see your friends list?: Click on the “Edit” link next to this option.
Choose Who Can See Your Friends List: A pop-up window will appear with multiple choices:
Public: If you choose to make your friends list public, anyone can see the full list of your Facebook friends, even if they’re not your friends on the platform. This option is often selected by individuals who want to network widely or promote a public figure persona.
Friends: Setting your friends list to “Friends” means that only your accepted friends can see your complete list of friends. This is a common choice for those who want to maintain a degree of privacy while still allowing their friends to see their connections.
Friends except: You can choose specific friends who won’t see your Facebook friends list.
Specific Friends: You can select individual friends who are allowed to see your friends list.
Only Me: If you opt for “Only Me,” your friends list becomes entirely private, visible to no one except you. This choice is suitable for those who value the utmost privacy and do not wish to share their connections with others.
Select Your Preferred Option: Choose the option that best suits your privacy preferences. For enhanced privacy, “Friends” or “Only Me” is recommended.
4. Confirm Your Selection
After selecting your preferred option, click “Save Changes” to confirm. Facebook will then update your friends list privacy settings accordingly.
5. Review Other Privacy Settings
While you’re in the Privacy Settings section, consider reviewing and adjusting other privacy settings such as who can see your future posts, who can send you friend requests, and who can look you up using the email address or phone number associated with your account. Customize these settings to align with your privacy needs.
6. Regularly Review and Update
Facebook’s privacy settings can be adjusted at any time. It’s a good practice to periodically revisit and update your settings as your preferences or circumstances change.
By following these steps, you can take control of who can see your friends list and other aspects of your Facebook profile, ensuring that your online presence aligns with your desired level of privacy.
Unfriending and Removing Friends
Unfriending someone on Facebook can be a sensitive issue, but it’s essential to know when it’s appropriate. If you find that you’re no longer in touch with a person or if their posts are causing you discomfort, it might be time to unfriend them. To do this, visit their profile, and click on the “Friends” button below their cover photo. A dropdown menu will appear. Click “Unfriend.” Confirm your decision by clicking “Remove”. After you’ve confirmed the unfriending and removal, Facebook will process your request, and that person will be removed from your friends list. They won’t be notified about this action.
You can also remove friends from specific lists without unfriending them. Another option is unfollowing friends, which allows you to remain friends but stop seeing their posts.
Managing Friend Requests
Friend requests are a part of Facebook’s social experience, but not all requests are genuine. When accepting or rejecting incoming friend requests, exercise caution. Review your pending friend requests regularly and be vigilant about spotting and avoiding fake friend requests. Also, consider how you manage friend requests from acquaintances. It’s okay to be selective about who you allow into your digital circle. Below is a detailed guide on how to effectively manage friend requests:
1. Review Friend Requests
Among your notifications, you may see friend requests. Click on “See All” to view all pending friend requests.
2. Accept or Reject Friend Requests
Accepting Friend Requests: If you know the person and want to accept their request, click the “Confirm” button next to their name. They will be added to your Facebook friends list, and you’ll be added to theirs. You can also send them a personal message to say hello.
Rejecting Friend Requests: If you don’t know the person or don’t want to accept their request, click the “Delete Request” button next to their name. This action will decline the request, and they will not be added to your Facebook friends list. They won’t be notified about your decision.
3. Respond to Requests from the “Friends” Tab
Alternatively, you can also manage friend requests from your profile page. Click on your profile picture in the top left corner to go to your profile. Below your cover photo, click on the “Friends” tab. Here, you’ll see any pending friend requests. You can accept or reject requests from this tab as well.
4. Manage Friend Requests from the Mobile App
If you’re using the Facebook mobile app, you can access friend requests by tapping the three horizontal lines in the bottom right corner, and then selecting “Friends.” Here, you can view and respond to pending requests.
5. Reviewing Pending Requests
It’s a good practice to periodically review pending friend requests. Some may be from people you know, while others could be from acquaintances or even people you don’t recognize. Take your time to assess whether you want to accept or decline these requests based on your comfort level.
6. Spotting Fake Friend Requests
Be cautious of friend requests from profiles with limited information, no mutual friends, or suspicious-looking profiles. These could be fake accounts. If you receive such requests, it’s safer to decline them.
7. Consider Privacy Settings
Remember that accepting a friend request grants the person access to your posts and information depending on your privacy settings. Review and readjust your privacy settings to control what your friends can see on your profile.
8. Stay Connected
Building a meaningful network on Facebook involves more than just accepting or rejecting friend requests. Engage with your friends by liking, commenting on, and sharing their posts. Use the platform to stay connected with people who matter to you.
Organizing Your Facebook Friends List
Creating custom friend lists is an excellent way to organize your friends. You can categorize them into groups such as “Family,” “Close Friends,” or “Work Colleagues.” Adding friends to specific lists makes it easier to control who sees your posts. It also allows you to share specific content with the right audience. The advantages of friend lists extend beyond organization; they are valuable tools for content sharing and privacy management. Here’s a step-by-step guide on how to organize your Facebook friends list effectively:
1. Access Your Friends List
After logging in to your Facebook account, click on your profile picture in the top left corner to go to your profile. Below your cover photo, you’ll see the “Friends” tab. Click on it to access your friends list.
2. Create Custom Friend Lists
Click on “Friends”: On your friends list page, you’ll see a list of all your Facebook friends.
Create a New List: To create a custom friend list, click on the “Create List” button. A window will pop up where you can name your list, such as “Family,” “Close Friends,” “Work Colleagues,” or any category you prefer.
Add Friends to the List: Start typing the names of friends you want to include in this list. Facebook will suggest friends as you type. Click on their names to add them to the list. You can also add or remove friends from a list later.
3. Utilize Existing Lists
Facebook provides some default lists like “Close Friends” and “Acquaintances.” You can use these lists or create your own. To use an existing list, click on it, and you’ll see the friends included in that category. You can still add or remove friends from these lists.
4. Add Friends to Custom Lists
To add friends to custom lists you’ve created, go to your friends list, and click on the friend you want to categorize. Next to their name, you’ll see an option that says “Friends.” Click on it, and a dropdown menu will appear. From the dropdown menu, select the list you want to add them to.
5. Share Posts with Specific Lists
When you create a post, you can choose to share it with specific friend lists. Click on the privacy setting dropdown (it usually says “Friends” by default), and you can select the custom friend list you want to share the post with. This allows you to control who sees your posts.
6. Customize Privacy Settings for Lists
To customize further your Facebook friends list. Go to “Settings” on Facebook and select “Privacy.” Under “How People Can Find and Contact You,” click on “Edit” next to “Who can see your friends list?” There, you will be able to pick the people who can sеe yоur friеnds list. Furthermore you can customize by selecting different things for each friend list you’ve created.
7. Use Lists to Filter Your News Feed
When you want to see updates from a specific group of friends, you can use your custom friend lists to filter your News Feed. Click on “News Feed” on the left sidebar and select a custom friend list to see posts only from those friends.
8. Maintain and Update Your Lists
Periodically review and update your custom friend lists. People’s circumstances change, and you may want to move friends to different categories or create new lists as your network grows.
Blocking and Restricting Friends
Unfortunately, not all Facebook interactions are positive. If you encounter unwanted interactions, it’s crucial to know how to handle them. You can block someone on Facebook, which means they won’t be able to see your profile or interact with you. On the other hand, you can restrict friends’ access to your content. This option allows you to remain friends while limiting what they can see on your profile. Managing blocked and restricted friends ensures a safer online experience. Here’s a step-by-step guide on how to block and restrict friends:
Blocking Friends:
1. Access Your Facebook Friends List: Click on your profile picture in the top left corner to go to your profile. Below your cover photo, choose the “Friends” tab, that way you will access your friends list.
2. Choose the Friend to Block: Scroll through your Facebook friends list and select the friend you want to block. Click on their name to go to their profile.
3. Open the Friend’s Profile: On your friend’s profile page, look for the three horizontal dots (…) located next to the “Message” button beneath their cover photo. When you click on them, a dropdown menu will open.
4. Select “Block”: In the dropdown menu, click on “Block.” A confirmation dialog box will appear.
5. Confirm the Block: To proceed with blocking your friend, click on “Confirm” in the confirmation dialog box. This action will block the friend, and they will no longer be able to interact with you on Facebook.6. Review Blocked Friends: To review or manage your blocked friends, go to “Settings” on Facebook. Under “Privacy,” select “Blocking.” Here, you can see a list of people and apps you’ve blocked.
Restricting Friends:
1. Access Your Friend’s Profile: To restrict a friend’s access to your content, visit their profile by clicking on their name from your friends list or a post they’ve shared.
2. Open the Friend’s Profile: On your friend’s profile page, locate the “Friends” button below their cover photo. Click on it to open a dropdown menu.
3. Select “Edit Friend Lists”: This option will appear in the dropdown menu, click on it to proceed.
4. Choose “Restricted”: You’ll see a list of friend lists you’ve created. Select “Restricted” to restrict this friend’s access to your posts.
5. Confirm the Restriction: Once you’ve added the friend to the “Restricted” list, they will only see your public posts by default. They won’t see posts shared with friends or specific custom lists.
6. Review Restricted Friends: To manage or review your restricted friends, go to “Settings” on Facebook. Under “Privacy,” select “Blocking.” There, you’ll find an option to manage your restricted list.7. Adjust Post Privacy for Restricted Friends: When you create a post, you can customize its privacy settings. To share a post with your restricted friends, choose “Friends” in the privacy settings of your post.
Blocking and restricting friends on Facebook can be a valuable tool for managing your online connections and controlling who can interact with you and see your content. Use these options as needed to enhance your privacy and minimize unwanted interactions.
Maintaining Your Friends List Over Time
Facebook is dynamic, and so should be your friends list. Periodic maintenance is essential. Set a schedule for reviewing your friends, updating your lists, and adjusting privacy settings. Reflect on the positive impact of a well-managed friends list; it can lead to a more enjoyable and secure Facebook experience. Also, avoid common mistakes in friend list management, such as being too hasty in unfriending or ignoring privacy settings.
Conclusion
In conclusion, managing your Facebook friends list is a crucial aspect of your online experience. Regularly evaluating, adjusting privacy settings, unfriending or removing friends when necessary, handling friend requests carefully, organizing your list, and dealing with unwanted interactions all contribute to a safer and more enjoyable Facebook experience. By taking these steps, you can maintain a well-organized and relevant friends list, ensuring that your time on Facebook remains positive and fulfilling.
FAQ
Is it important to regularly manage my Facebook friends list?
Yes, it’s crucial to manage your Facebook friends list periodically. As your list grows, it’s essential to ensure it remains relevant and aligned with your preferences. Regular maintenance helps maintain your privacy and keeps your Facebook experience enjoyable.
How can I review my current friends for relevance?
To review your current friends, access your friends list through your profile. Go through your list and consider if you still want to be connected with each person. Remove friends who are no longer relevant to your life.
What should I do if I receive a friend request from someone I don’t know well?
Exercise caution when accepting friend requests from people you don’t know well. You can choose to decline the request or, if you’re unsure, you can accept it and adjust privacy settings to limit what they can see on your profile.
How do I block or restrict someone on Facebook?
To block someone, visit their profile, click on the three dots (…) below their cover photo, and select “Block.” To restrict someone, visit their profile, click on the “Friends” button, then select “Edit Friend Lists” and choose “Restricted”.
Why should I create custom friend lists on Facebook?
Custom friend lists are valuable for organizing your friends and controlling who sees your posts. You can categorize friends into groups like “Family” or “Work Colleagues,” making it easier to share content with specific audiences and enhancing your privacy management.