
Facebook has become an integral part of our lives, connecting us with friends, family, and acquaintances from around the globe. However, as your friends list grows, so does the need for effective management. In this comprehensive guide, we’ll explore the importance of maintaining your Facebook friends list and provide you with practical steps on how to do it.
Evaluating Your Current Facebook Friends List
First and foremost, it’s crucial to know who’s on your Facebook friends list. To do this, you can simply access your friends list by clicking on your profile. Within your friends list, you’ll want to review your current friends for relevance. Are these people you still want to be connected with? Additionally, take the time to identify friends you may not know well. Sometimes, in the whirlwind of social media, we accept friend requests without really knowing who the person is.
Adjusting Privacy Settings
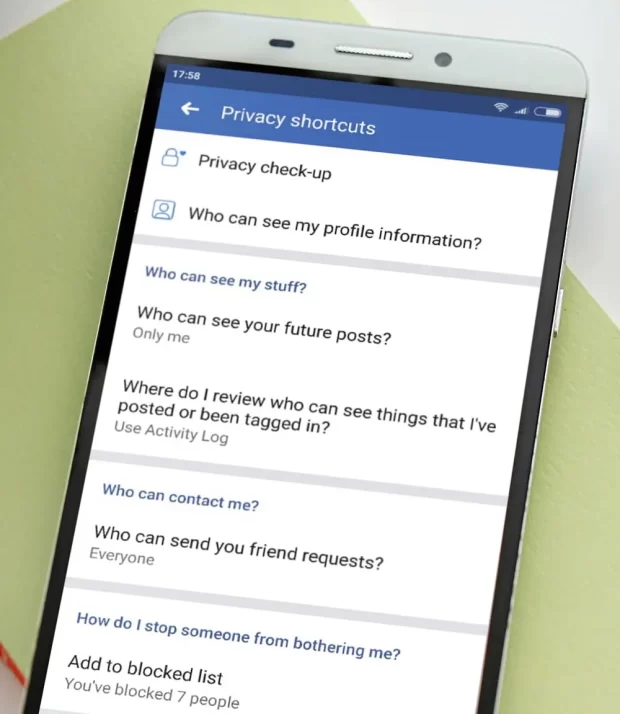
Privacy settings play a vital role in controlling who can see your Facebook friends list. Customizing the visibility of your friends list is essential to protect your privacy. You can adjust settings to hide your friends list from non-friends and control who can send you friend requests. This way, you can rest assured that your personal information is only available to trusted people. Follow these steps to adjust your privacy settings on Facebook:
1. Access Your Privacy Settings
In the upper-right corner of the Facebook interface, you’ll find a small downward-pointing arrow. Click on it to open a drop-down menu. From there, pick “Settings & Privacy,” and after that open “Settings”.
2. Navigate to Privacy Settings
On the left-hand side of the Settings page, you’ll see a menu with various options. Click on “Privacy” to access your privacy settings.
3. Edit Your Facebook Friends List Privacy
Who can see your friends list?: Click on the “Edit” link next to this option.
Choose Who Can See Your Friends List: A pop-up window will appear with multiple choices:
- Public: If you choose to make your friends list public, anyone can see the full list of your Facebook friends, even if they’re not your friends on the platform. This option is often selected by individuals who want to network widely or promote a public figure persona.
- Friends: Setting your friends list to “Friends” means that only your accepted friends can see your complete list of friends. This is a common choice for those who want to maintain a degree of privacy while still allowing their friends to see their connections.
- Friends except: You can choose specific friends who won’t see your Facebook friends list.
- Specific Friends: You can select individual friends who are allowed to see your friends list.
- Only Me: If you opt for “Only Me,” your friends list becomes entirely private, visible to no one except you. This choice is suitable for those who value the utmost privacy and do not wish to share their connections with others.
Select Your Preferred Option: Choose the option that best suits your privacy preferences. For enhanced privacy, “Friends” or “Only Me” is recommended.
4. Confirm Your Selection
After selecting your preferred option, click “Save Changes” to confirm. Facebook will then update your friends list privacy settings accordingly.
5. Review Other Privacy Settings
While you’re in the Privacy Settings section, consider reviewing and adjusting other privacy settings such as who can see your future posts, who can send you friend requests, and who can look you up using the email address or phone number associated with your account. Customize these settings to align with your privacy needs.
6. Regularly Review and Update
Facebook’s privacy settings can be adjusted at any time. It’s a good practice to periodically revisit and update your settings as your preferences or circumstances change.
By following these steps, you can take control of who can see your friends list and other aspects of your Facebook profile, ensuring that your online presence aligns with your desired level of privacy.
Unfriending and Removing Friends
Unfriending someone on Facebook can be a sensitive issue, but it’s essential to know when it’s appropriate. If you find that you’re no longer in touch with a person or if their posts are causing you discomfort, it might be time to unfriend them. To do this, visit their profile, and click on the “Friends” button below their cover photo. A dropdown menu will appear. Click “Unfriend.” Confirm your decision by clicking “Remove”. After you’ve confirmed the unfriending and removal, Facebook will process your request, and that person will be removed from your friends list. They won’t be notified about this action.
You can also remove friends from specific lists without unfriending them. Another option is unfollowing friends, which allows you to remain friends but stop seeing their posts.
Managing Friend Requests
Friend requests are a part of Facebook’s social experience, but not all requests are genuine. When accepting or rejecting incoming friend requests, exercise caution. Review your pending friend requests regularly and be vigilant about spotting and avoiding fake friend requests. Also, consider how you manage friend requests from acquaintances. It’s okay to be selective about who you allow into your digital circle. Below is a detailed guide on how to effectively manage friend requests:
1. Review Friend Requests
Among your notifications, you may see friend requests. Click on “See All” to view all pending friend requests.
2. Accept or Reject Friend Requests
- Accepting Friend Requests: If you know the person and want to accept their request, click the “Confirm” button next to their name. They will be added to your Facebook friends list, and you’ll be added to theirs. You can also send them a personal message to say hello.
- Rejecting Friend Requests: If you don’t know the person or don’t want to accept their request, click the “Delete Request” button next to their name. This action will decline the request, and they will not be added to your Facebook friends list. They won’t be notified about your decision.
3. Respond to Requests from the “Friends” Tab
Alternatively, you can also manage friend requests from your profile page. Click on your profile picture in the top left corner to go to your profile. Below your cover photo, click on the “Friends” tab. Here, you’ll see any pending friend requests. You can accept or reject requests from this tab as well.
4. Manage Friend Requests from the Mobile App
If you’re using the Facebook mobile app, you can access friend requests by tapping the three horizontal lines in the bottom right corner, and then selecting “Friends.” Here, you can view and respond to pending requests.
5. Reviewing Pending Requests
It’s a good practice to periodically review pending friend requests. Some may be from people you know, while others could be from acquaintances or even people you don’t recognize. Take your time to assess whether you want to accept or decline these requests based on your comfort level.
6. Spotting Fake Friend Requests
Be cautious of friend requests from profiles with limited information, no mutual friends, or suspicious-looking profiles. These could be fake accounts. If you receive such requests, it’s safer to decline them.
7. Consider Privacy Settings
Remember that accepting a friend request grants the person access to your posts and information depending on your privacy settings. Review and readjust your privacy settings to control what your friends can see on your profile.
8. Stay Connected
Building a meaningful network on Facebook involves more than just accepting or rejecting friend requests. Engage with your friends by liking, commenting on, and sharing their posts. Use the platform to stay connected with people who matter to you.
Organizing Your Facebook Friends List
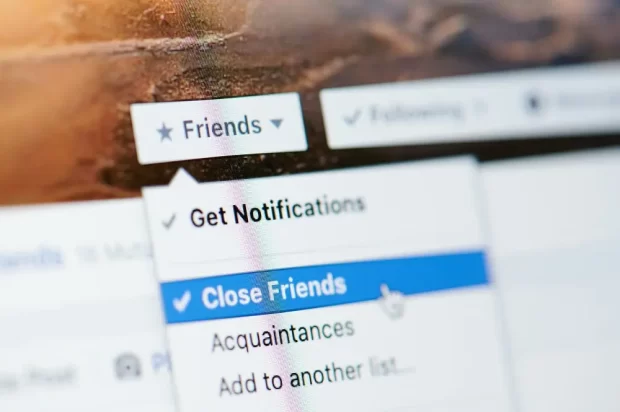
Creating custom friend lists is an excellent way to organize your friends. You can categorize them into groups such as “Family,” “Close Friends,” or “Work Colleagues.” Adding friends to specific lists makes it easier to control who sees your posts. It also allows you to share specific content with the right audience. The advantages of friend lists extend beyond organization; they are valuable tools for content sharing and privacy management. Here’s a step-by-step guide on how to organize your Facebook friends list effectively:
1. Access Your Friends List
After logging in to your Facebook account, click on your profile picture in the top left corner to go to your profile. Below your cover photo, you’ll see the “Friends” tab. Click on it to access your friends list.
2. Create Custom Friend Lists
- Click on “Friends”: On your friends list page, you’ll see a list of all your Facebook friends.
- Create a New List: To create a custom friend list, click on the “Create List” button. A window will pop up where you can name your list, such as “Family,” “Close Friends,” “Work Colleagues,” or any category you prefer.
- Add Friends to the List: Start typing the names of friends you want to include in this list. Facebook will suggest friends as you type. Click on their names to add them to the list. You can also add or remove friends from a list later.
3. Utilize Existing Lists
Facebook provides some default lists like “Close Friends” and “Acquaintances.” You can use these lists or create your own. To use an existing list, click on it, and you’ll see the friends included in that category. You can still add or remove friends from these lists.
4. Add Friends to Custom Lists
To add friends to custom lists you’ve created, go to your friends list, and click on the friend you want to categorize. Next to their name, you’ll see an option that says “Friends.” Click on it, and a dropdown menu will appear. From the dropdown menu, select the list you want to add them to.
5. Share Posts with Specific Lists
When you create a post, you can choose to share it with specific friend lists. Click on the privacy setting dropdown (it usually says “Friends” by default), and you can select the custom friend list you want to share the post with. This allows you to control who sees your posts.
6. Customize Privacy Settings for Lists
To customize further your Facebook friends list. Go to “Settings” on Facebook and select “Privacy.” Under “How People Can Find and Contact You,” click on “Edit” next to “Who can see your friends list?” There, you will be able to pick the people who can sеe yоur friеnds list. Furthermore you can customize by selecting different things for each friend list you’ve created.
7. Use Lists to Filter Your News Feed
When you want to see updates from a specific group of friends, you can use your custom friend lists to filter your News Feed. Click on “News Feed” on the left sidebar and select a custom friend list to see posts only from those friends.
8. Maintain and Update Your Lists
Periodically review and update your custom friend lists. People’s circumstances change, and you may want to move friends to different categories or create new lists as your network grows.
Blocking and Restricting Friends
Unfortunately, not all Facebook interactions are positive. If you encounter unwanted interactions, it’s crucial to know how to handle them. You can block someone on Facebook, which means they won’t be able to see your profile or interact with you. On the other hand, you can restrict friends’ access to your content. This option allows you to remain friends while limiting what they can see on your profile. Managing blocked and restricted friends ensures a safer online experience. Here’s a step-by-step guide on how to block and restrict friends:
Blocking Friends:
1. Access Your Facebook Friends List: Click on your profile picture in the top left corner to go to your profile. Below your cover photo, choose the “Friends” tab, that way you will access your friends list.
2. Choose the Friend to Block: Scroll through your Facebook friends list and select the friend you want to block. Click on their name to go to their profile.
3. Open the Friend’s Profile: On your friend’s profile page, look for the three horizontal dots (…) located next to the “Message” button beneath their cover photo. When you click on them, a dropdown menu will open.
4. Select “Block”: In the dropdown menu, click on “Block.” A confirmation dialog box will appear.
5. Confirm the Block: To proceed with blocking your friend, click on “Confirm” in the confirmation dialog box. This action will block the friend, and they will no longer be able to interact with you on Facebook.6. Review Blocked Friends: To review or manage your blocked friends, go to “Settings” on Facebook. Under “Privacy,” select “Blocking.” Here, you can see a list of people and apps you’ve blocked.
Restricting Friends:
1. Access Your Friend’s Profile: To restrict a friend’s access to your content, visit their profile by clicking on their name from your friends list or a post they’ve shared.
2. Open the Friend’s Profile: On your friend’s profile page, locate the “Friends” button below their cover photo. Click on it to open a dropdown menu.
3. Select “Edit Friend Lists”: This option will appear in the dropdown menu, click on it to proceed.
4. Choose “Restricted”: You’ll see a list of friend lists you’ve created. Select “Restricted” to restrict this friend’s access to your posts.
5. Confirm the Restriction: Once you’ve added the friend to the “Restricted” list, they will only see your public posts by default. They won’t see posts shared with friends or specific custom lists.
6. Review Restricted Friends: To manage or review your restricted friends, go to “Settings” on Facebook. Under “Privacy,” select “Blocking.” There, you’ll find an option to manage your restricted list.7. Adjust Post Privacy for Restricted Friends: When you create a post, you can customize its privacy settings. To share a post with your restricted friends, choose “Friends” in the privacy settings of your post.
Blocking and restricting friends on Facebook can be a valuable tool for managing your online connections and controlling who can interact with you and see your content. Use these options as needed to enhance your privacy and minimize unwanted interactions.
Maintaining Your Friends List Over Time
Facebook is dynamic, and so should be your friends list. Periodic maintenance is essential. Set a schedule for reviewing your friends, updating your lists, and adjusting privacy settings. Reflect on the positive impact of a well-managed friends list; it can lead to a more enjoyable and secure Facebook experience. Also, avoid common mistakes in friend list management, such as being too hasty in unfriending or ignoring privacy settings.
Conclusion
In conclusion, managing your Facebook friends list is a crucial aspect of your online experience. Regularly evaluating, adjusting privacy settings, unfriending or removing friends when necessary, handling friend requests carefully, organizing your list, and dealing with unwanted interactions all contribute to a safer and more enjoyable Facebook experience. By taking these steps, you can maintain a well-organized and relevant friends list, ensuring that your time on Facebook remains positive and fulfilling.

