
Hello, I hope you are having a great time reading this article? I believe so because I am going be sharing a very interesting topic on how to change Facebook video quality. Have you encountered difficulty in playing videos on Facebook or perhaps these videos come in very poor quality? Most people have encountered this challenge and some others have also complained that playing videos on Facebook consumes too much of their data. Well, I have a solution for you.
According to Oxford dictionary, videos can be defined as a recording of moving visual images made digitally. Videos come in different qualities depending on the device that was used to capture, if you use a high-resolution video device you get a sharp and very clear video quality known as HD (High definition) and if you use a normal standard video resolution device the quality you would get is known as SD (Standard quality), the quality of video you get is as a result of your device and settings.
Facebook has two types of video quality which is the HD (high-quality videos) and the SD (standard quality), Facebook being so user-friendly and flexible provides an option for users to toggle between these options on other words, users can choose which quality they want videos to display.
Facebook according to records has about 8 million video views on daily basis. To enjoy your video display as some people love good quality videos you would have to change Facebook video quality because Facebook by default sets your video quality as default just to soothe everyone, so, if you are not satisfied with the quality at which your videos displays then, you would have to change Facebook video quality and I am going to show you the steps in a jiffy.
Let’s move straight to the topic of today.
Please read and follow carefully.
How to change Facebook video quality
1. Login your Facebook
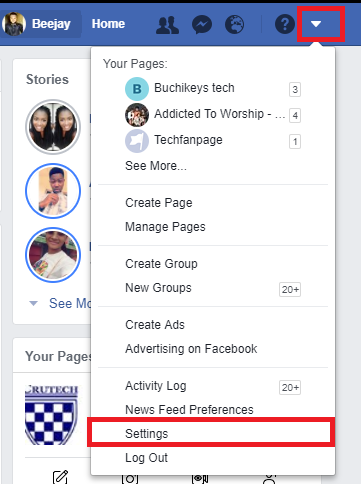
2. Click on the option icon on your dashboard and Click on settings.
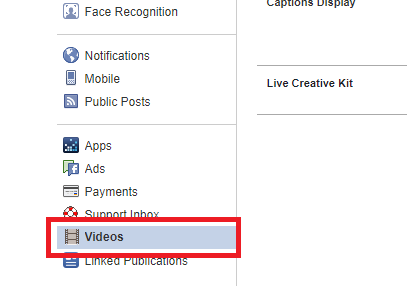
3. Click on videos.
4. Click on the drop-down button beside video default quality

5. Select your preferred video display quality either HD or SD.
When this is done, Facebook will automatically save your setting and HD videos with the resolution of about 1080p will display good quality at high internet speed if that’s your preferred option. However, if a video was uploaded in low quality, you can tap/click on the video depending on your device you’ll see an option at the right top on your screen to change the video resolution to HD if it is in SD or vice versa.
Some persons may still want to allow their settings to default, it is also okay but if you leave it that way then Facebook determines the quality your videos will appear in according to your internet speed. If your data connection speed is high your videos will play in HD (high quality) and if its low your videos will play in low quality.
Here are some related links that you may like;
How to Contact Facebook Support
How To Change Facebook Language
How To Add Legacy Contact On Facebook
How To Add Legacy Contact On Facebook

