
We are not saying it to scare you but if you don’t back up your Mac, sooner or later you may lose something that is crucial and irreplaceable. So that you don’t blame past you, it is advisable to create back up for your Mac.
Why Do You Need to Backup Your Mac
From irreplaceable personal pictures to important office presentation, any data available on your Mac needs protection. In the absence of a good back up system, you can lose all your digital data in a blink of an eye. Therefore, it is crucial that you set up a robust backup system on your Mac.
If you’re wondering how to back up your Mac in the simplest way, continue reading this “How to” guide. In this post, you will learn backing up your Mac with the help of Time Machine software. But before you proceed with the backing up process we would like you to know what is Time Machine first.
What is Time Machine?
It is a popular backup software from Apple itself. It is a built-in backup feature and one of the easiest ways to initiate with local backups. Since it is available straight into your macOs, you don’t require to install any 3rd party or additional software. You just need only an external drive to start with the backup procedure.
The good thing is that the Time Machine can easily work with any kind of external drive connected to your Mac computer. In addition to this, it also supports Apple’s Time Capsule.
Once you have set up Time Machine, it starts working automatically in the background and continuously saves copies of all the applications and files available on your computer. In case, you don’t have sufficient disk space, this software starts erasing the oldest version of the files automatically.
Backing up Your Mac with Time Machine Software
1. Connect an External drive to your Mac Computer.
As we said above, you will require to connect an external drive to your Mac for backing up your files, make sure it has at least the same size your Mac’s internal drive has. As storage devices are quite cheap nowadays, you can easily get the storage device that is at least 2 to 4 times the size of the drive you are backing up. You can use any of the followings as an external drive.
-
- USB
- FireWire
- Thunderbolt
- AirPort Time Capsule network device
2. Turn on Time Machine & Choose Backup Destination
Once you have chosen your preferred external drive and plugged it into your system your next step will be navigating to System Preferences->Time Machine. Next, turn on Time Machine button available on the right side as you can see in the picture below.
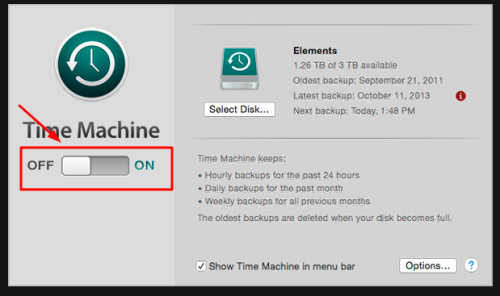
Next, click on the Select Disk button in order to choose the drive you want to use. Now you will see an option – whether you want to use the disk as your back up destination.
Remember that the drive should be formatted as Mac OS X Extended (Journaled). In case it is not formatted, the Time Machine will alert you to reformat the drive.
3. Exclude Items
If you click on the Options button available at the bottom, you will see options to eliminate volumes from your backups. The Time Machine software also allows you to enable notification for if any old backup gets deleted from your Mac system.
4. Leave Everything on Time Machine
Once you are done with the above steps now you should let the Time Machine do its work. The software will create backup automatically after every hour. With Time Machine you can create:
- Hourly backups
- Everyday backups
- Weekly basis backups
Restoring of Files From Time Machine Backups
It is as simple as creating the backup. In order to see and restore files/folders from Time Machine, you will need to go to the Spotlight, it is a search feature in macOS that helps you find apps and documents available on your Mac. On Spotlight search, enter Time Machine. It will take you to the Time Machine view.
Here you can scroll through the timeline and go back to a certain point in time and search for a particular file. Highlight the file that you want to store, press Space-bar to take a quick look at it and then click on the Restore button to copy that file. In case you encounter filename conflicts, you will be asked which file you want to keep out of the two versions.
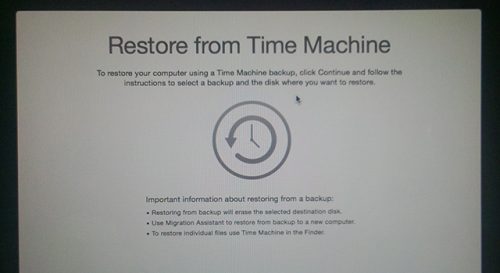
You can restore all the file at once by using the latest copies of all your files. When your Mac is restarting, hold down the Command (⌘) and R keys until the Apple logo appears. After that, select “Restore from Time Machine Backup“.
Conclusion
In this “How to” guide we covered how to back up a Mac using Time Machine software. If you have any query, feel free to ask in the following comment section.

