
Does it irritate you to type your user account and password every time you turn on your desktop/laptop? If yes, then why not skip it?
Login screen in Windows 10 has been repeatedly called troublesome by several Microsoft users. If you’re one of those, you have come to the right place.
In our today’s “How to” guide, we will make you learn how to enable Windows 10 auto login.
If you think there is nothing confidential or sensitive stored on your desktop/laptop, you may consider setting up the auto login in your operating system. You should enable auto login only when you are confident that you are the sole user of your PC.
In case if multiple users use your system, others may peek into your account and steal your confidential records or data.
There are three ways you can set up the autologin in Windows 10. Let’s know about them one by one.
Method 1: Automatically Login Without any Password
If you’re in search of one of the easiest methods to automatically log into Windows 10 without any need to enter your password, you may go for this method.
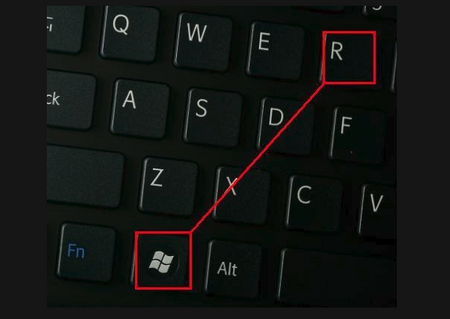
1. Your first step will be opening Run command box by pressing the keys Windows logs and R keys (Windows +R).
2. Next, type Netplwiz in the Run dialog box and then hit the Enter key.

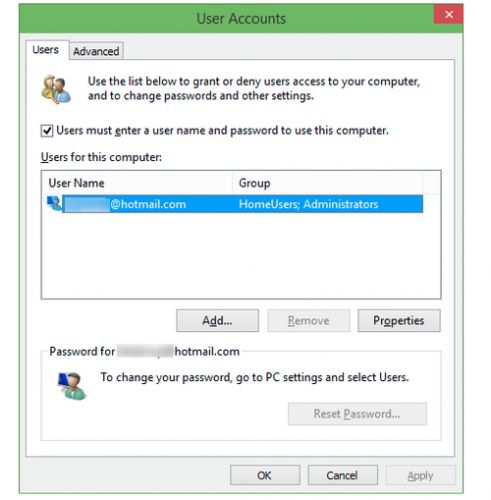
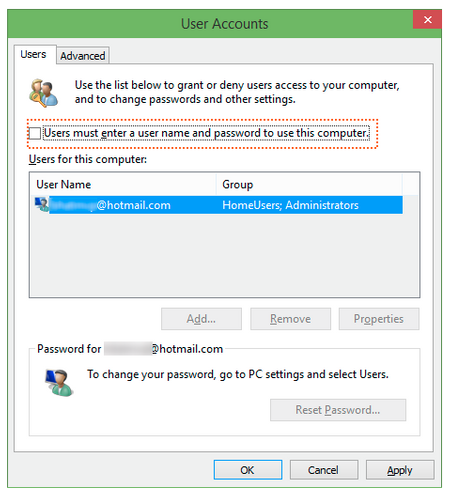
3. Now you will see a User Accounts dialog box where first you have to click on your users tab. Next, uncheck the box available in front of option: Users must enter a username and password to use this computer. Next, click Apply button to find the Automatically sign in a box.
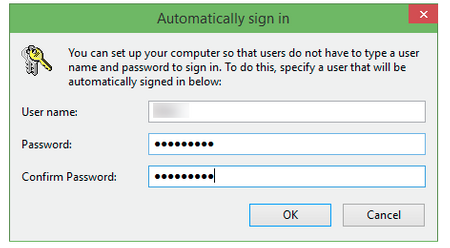
4. Now in the Automatically sign in dialog, enter your password and then re-enter it to confirm the password. Now click on the OK button to complete this method.
Now you will be able to automatically login your Windows without any password.
Method 2: Automatic Sign-in with Registry
If the above-mentioned method isn’t working you may try this one.
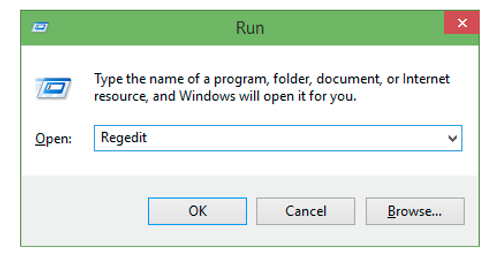
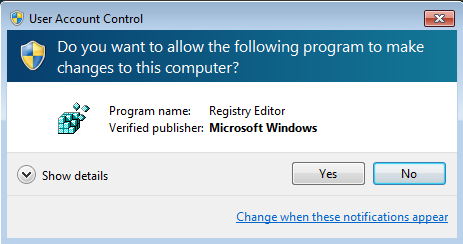
1. Open Registry Editor. In order to do so, you will have to type Regedit in the Run command box or you can type it in the Start menu as well. Now you will see the User Account Control box, click on Yes button.
2. Next, in the Registry Editor Window, go to the key i.e. HKEY_LOCAL_MACHINE\SOFTWARE\Microsoft\Windows NT\CurrentVersion\Win
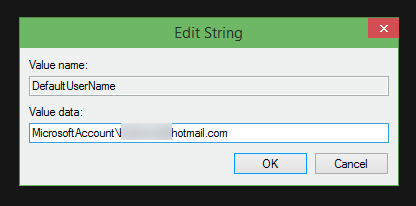
3. Do the right click and search for entry i.e. DefaultUserName. Do double-click on it and ensure that your local user or Microsoft account username is showing under Value data box.
4. Again on the right side, search for entry i.e. DefaultPassword. If you are unable to find it, you can create one by making the right click on the empty space and clicking on the option New and then clicking String Value. Next, click on DefaultPassword and enter your password in the Value data box. Hit the OK button.

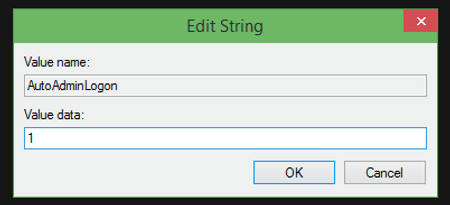
5. Now you need to set up an automatic login. For the same, one time more you will have to search for the entry labeled AutoAdminLogon on the right side and change its value from 0 to 1.
Congratulations! You have done it. In order to check it, start your PC again and see if you’re able to automatically login or not without entering the password.
Even if this method is not working for you go for our 3rd method.
Method 3: Make Use of Autologon to Automatically Login (Windows 10)
1. Access the Microsoft TechNet page, and download the Autologon utility. Get the executable file by extracting the zip file.

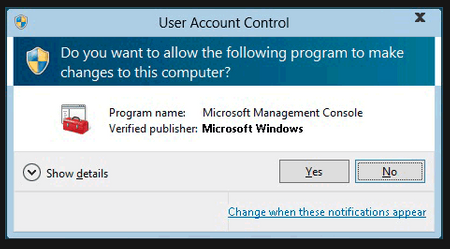
2. Run the tool. As soon as you see the User Account Control prompt. Click on Yes option to see the license agreement dialog. Next, click on the Agree button to accept this license agreement.
3. This tool will automatically fill out the domain and the username field. The only thing that you need to type is your password. Type your password and hit the Enable button available on the right side.
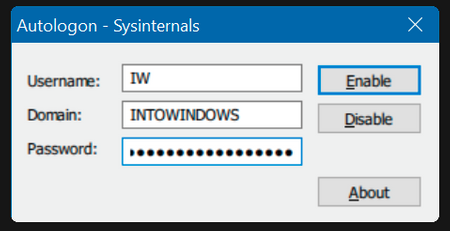
Note: In case you use a Microsoft account to sign in enter your complete email in the username section and then enter your password.
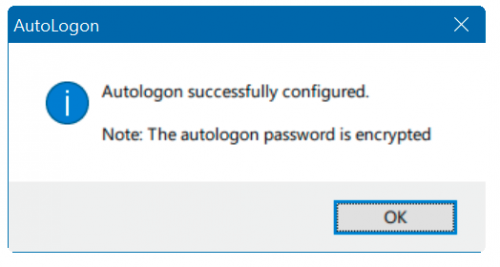
4. Now you will see the following dialog box saying “Autologon successfully configured”. Click on OK button.
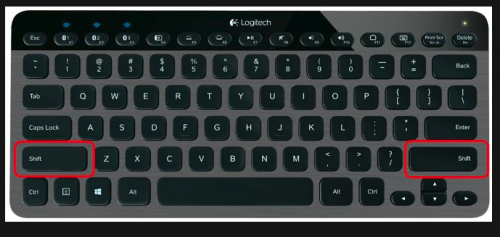
Note: To turn off auto-logon feature, you will need to hold down the shift key when turning on your PC. However, if you want to permanently disable autologon run this tool again, put your account & password and then click on Disable button.
That’s all! You are done now.
Conclusion
One of the major advantages of configuring automatically sign in Windows 10 is that you don’t need to remember the password. It helps you save your couple of seconds during the boot. We hope this “How To” guide perfectly explains how to auto log in to Windows 10. Still, if you have any doubt, feel free to contact us. You may ask your query in the following comment section.

