
In today’s era, laptops play an essential role in our daily lives. They are basically a desktop PC with a built in monitor and it runs on batteries. Which is basically the reason for this tutorial.
In time and with usage batteries lose their capacity. There is nothing that you can do about it, you can only prolong the inevitable. The only difference that you can make is how long before you need to replace your battery. Each manufacturer rates each battery model with a different number of charge cycles. A battery’s charge cycle is when you charge your device’s battery to 100% and then discharge it until it turns off. This doesn’t mean that once you past the, let’s say 500 charge cycles mark, you battery will instantly die. It will just start degrading and lose its capacity. This may happen even sooner if you do not take care of your battery. A good way to extend the life of your battery is not to charge it to 100% and discharge it until the device powers off. Some people call this partial charging.
In the area of batteries people often mention the word “calibrate”. A battery calibration is something like “resetting” the battery’s memory, so it starts fresh and that way Windows will give you a more accurate estimate as to how long will have power. Even the manufacturers recommend to do a calibration every 2 or 3 months. In some situations users have reported Windows showing a broken battery after a few months of usage. A calibration may be able to fix this, unless it’s a hardware issue.
The procedure for calibrating the battery is simple. Charge your battery to 100%, leave it on the charger for at least another hour so that it cools down and then use your device until it powers off. Even though it sounds simple enough there are a few steps that you need to do before you can start with the calibration process. This procedure can be carried out on any device running a battery: any laptop with any operating system, tablet, mobile phone etc.
How to calibrate a battery on a laptop
The are two types of calibration, automatic one and a manual one. The automatic calibration is done either through the BIOS or some kind of a software that the manufacturer provides. You can google this to find out if you can calibrate the battery automatically.
The manual calibration is the one where there are a few extra steps, depending on which way you intend on calibrating the battery.
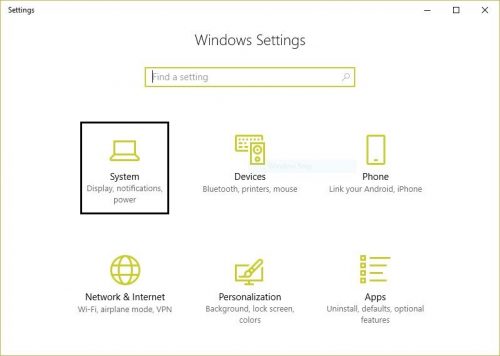
1.Open settings. You can do this by hitting the Windows key on the lower left part of the keyboard or click on the Windows icon on the far left on the taskbar and click on the gear icon
2.Go to “System”
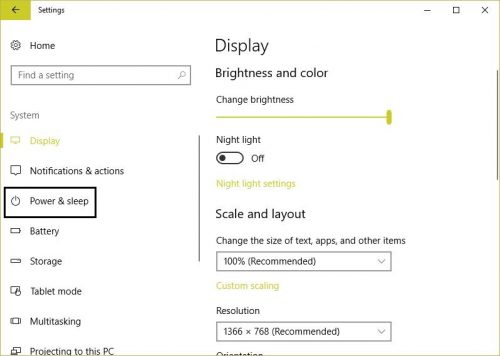
3.On the left navigation panel go to “Power & sleep”
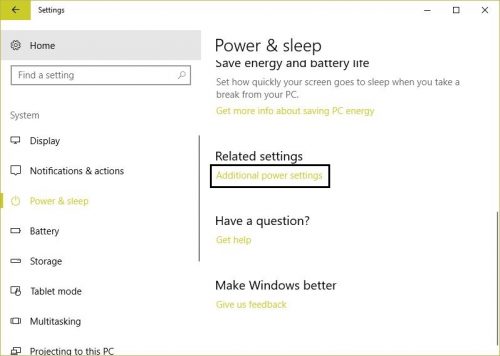
4.Navigate to “Additional power settings”
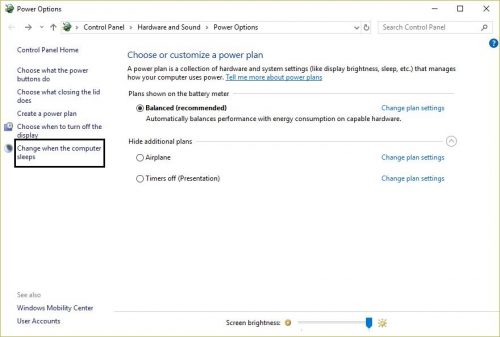
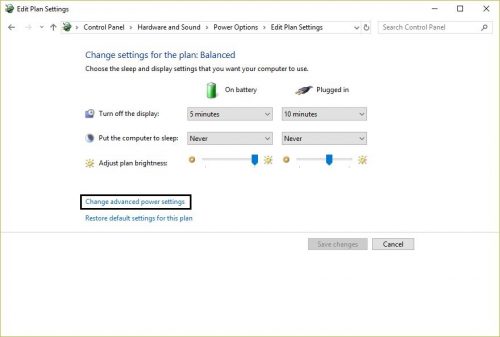
5.On the left click on “Change when the computer sleeps”. Note: If you intend to leave the computer idle overnight, make sure that you set the “Turn off the display” and “Put the computer to sleep” to “Never”. If you plan on using your device during the calibration process you can set your settings as they are.
6.In the new window click on “Change advanced power settings”
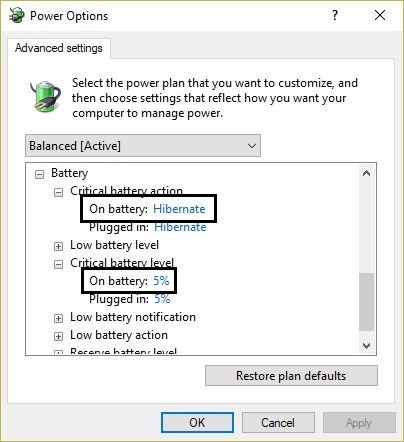
7.Open the “Battery” branch. Click on the plus sign (+)
8.Open the “Critical battery action” branch. Click on the plus sign (+)
9.Under “Critical battery action” set the “On battery” value to be “Hibernate”. Note: it is recommended to set this value to Hibernate in case you are working and if your device shuts down’ in the middle of your work it will go into hibernate and you will not lose any of your progress.
10.Next, open the “Critical battery level” branch. Click on the plus sign (+)
11.Under “Critical battery level” set the “On battery” value to 5%
12.Click “Apply”
Once you complete the above steps you can start the calibration process. In order to do that you will need to charge your device to 100% and leave it plugged in for a few more hours until the battery is cold. Once this is done you can unplug your device and start using it until it goes into hibernate or leave it overnight. The final step, once your device goes into hibernate is to recharge it and continue using it as you would normally do. As mentioned previously, it is recommended to do this procedure every 2 or 3 months in order to get accurate reading of your estimated times in Windows.
Frequently Asked Questions and Answers
Q: Will this hurt my battery?
A: No, this procedure will not hurt your battery. Instead you will get only more accurate reading of the battery’s health and estimated remaining time.
Q: Is it better to leave the laptop idle or use it?
A: Both should be the same, the laptop that we are using has a big battery and holds a charge for 9 to 10 hours, so we never really calibrated the battery while using the laptop.
Q: I have disabled hibernate on my laptop, can I calibrate the battery?
A: You will need to enable it when you calibrate your battery. Open Command Prompt as an administrator and type in “powercfg.exe /hibernate on”. Once the calibration process is completed you can enable the hibernation by running Command Prompt as an administrator and typing in “powercfg.exe /hibernate off”

