In the ever-evolving landscape of online casinos, Unibet Casino has emerged as a prominent player in the New Jersey market. With a reputation for its extensive game library, attractive promotions, and fast website performance, Unibet Casino has piqued the interest of gamblers seeking an exceptional gaming experience. In this in-depth review, we delve into the pros and cons of Unibet Casino in New Jersey, backed by comprehensive data and analysis. Whether you’re a seasoned player or a newcomer to the world of online casinos, join us on a journey to uncover what Unibet Casino has to offer and whether it lives up to its reputation as a top contender in the Garden State’s iGaming scene.
Unibet Casino New Jersey Pros And Cons
Pros
- Vast Game Selection: Unibet Casino NJ boasts an impressive array of over 691 games, significantly higher than the state average, offering players a wide variety of choices.
- Fast Website Speed: With an average page load speed of 0.92 seconds, Unibet Casino NJ ensures a smooth and efficient user experience, standing out as one of the fastest in the state.
- Generous Promotions: Ranked 5th in promotions tests, Unibet Casino NJ offers a 100% match bonus up to $500 with 25x wagering, and a $10 no deposit casino credit, providing great value to players.
- High Welcome Bonus Value: The Actual Bonus Value (ABV) of their welcome offer is $70.15, surpassing the New Jersey average, making it an attractive option for new players.
- Reliable Customer Support: Although not top-ranked, Unibet Casino NJ provides decent customer support, with email responses averaging 6.3 hours and live chat queries answered in about 8.11 minutes.
Cons
- Average Customer Service Ranking: Despite reliable support, Unibet Casino NJ ranks 13th in support tests, indicating there is room for improvement in customer service efficiency and responsiveness.
- Limited No Deposit Bonus Value: While offering a no deposit bonus, Unibet’s $9.80 ABV for this bonus falls below the more accurate state average of $14.21, making it less competitive compared to other NJ online casinos in this aspect.
Casino Features
| Casino Games | Roulette, Blackjack, Baccarat, Video Poker, Slots, Progressive Jackpots, and Tournaments. |
| Support | Live Chat, Phone, and Email |
| License | New Jersey Division of Gaming Enforcement |
| Sports Betting | Available for more than 20 sports including online football betting, basketball betting, soccer betting, tennis betting, golf betting and many others. |
| Countries | New Jersey, United States |
| Languages | English |
| Currencies | CAD, USD, and EUR |
| Trustworthiness | Highly trustworthy |
| Types of Bonuses | Offers include a 100% match bonus up to $500 with 25x wagering and $10 no deposit casino credits. |
| Mobile App | Android and iOS |
| Security | Advanced encryption technology |
| Payment Methods | Multiple payment methods |
| Minimum Deposit | $5 |
| Withdrawal Time | Offers instant withdrawal with MuchBetter and InstaDebit. Withdrawals with Visa, Interac, and eCheck take 1-3 business days. |
| Support Contacts | Email: [email protected]; Phone: 1-855-485-8804 |
Step-by-Step Guide To Creating An Account At Unibet Casino New Jersey
1. Visit the Unibet NJ Website
To begin, access the Unibet New Jersey website using the device of your choice.
2. Locate the Registration Section
Search for a conspicuous button labeled “Register,” situated prominently on the homepage.
3. Begin the Registration Process
Upon selecting the registration button, you will be directed to a form prompting you to input your personal information.
4. Fill in Your Personal Details
You will be required to furnish details including your name, date of birth, and email address. Additionally, you must generate a username and password to establish your account.
5. Provide Additional Information
Fill in your address, phone number, and any other required information in the provided fields.
Select security questions and provide answers to enhance the security of your account.
6. Accept Terms and Conditions
Review and consent to Unibet’s terms and conditions, confirming that you meet the legal age requirements for gambling.
7. Complete Identity Verification
To comply with regulatory standards, you’ll be required to verify your identity, which may entail submitting official identification documents as per the regulatory guidelines.
8. Submit Your Registration
Once you’ve filled in all the required fields and finished the verification process, proceed to submit your registration.
9. Account Confirmation
You will receive a confirmation, via email, once your account is successfully set up.
10. Make Your First Deposit
Sign in to your newly created account, access the banking section, and initiate your initial deposit.
Keep in mind that the lowest deposit amount accepted at Unibet NJ is $5.
11. Start Playing
Once your deposit is processed, you can start exploring and playing various casino games.
Brief History Of The Casino
Unibet, as a brand, has a long-standing history in the online gaming industry, primarily known for its strong presence in the European sports betting market. It expanded into the United States market following the relaxation of sports betting and online gambling laws. In New Jersey, Unibet Casino was launched in 2019, bringing its rich gaming heritage and experience to the state, offering both casino gaming and sports betting options.

Licensing And Regulation
Unibet Casino in New Jersey is a legitimate and licensed online gaming establishment. It has successfully undergone the necessary licensing procedures to legally operate and accept bets from individuals who meet the age requirements within New Jersey. The casino adheres to various regulatory standards aimed at safeguarding customers and providing a secure gaming experience. As such, there are no issues regarding the legality and authenticity of Unibet as an online casino operating within New Jersey.
Unibet Casino New Jersey Bonuses and Promotions
Welcome Bonuses For New Users
100% Match Bonus:
Unibet NJ offers a 100% match bonus up to $500 for new users.
This requires a minimum deposit, which is set at $10.
To meet the conditions of this bonus, players must fulfill a 25x wagering requirement, indicating they must wager the bonus amount 25 times before being eligible to withdraw any winnings.
No Deposit Bonus:
In addition to the match bonus, Unibet NJ provides a $10 no deposit bonus.
This bonus is credited upon registration and entering the promo code.
The wagering requirement for this bonus is quite modest, usually set at 1x.
Pennsylvania (PA) Welcome Bonus:
Offers a 100% deposit bonus up to $1,000 for new players.
Includes 10 bonus spins on the slot game “Jin Ji Bao Xi: Endless Treasures.”
This combination of deposit boost and bonus spins is particularly noteworthy.
New Jersey Welcome Bonus:
New players can enjoy a 50% deposit match up to $1,000.
While there are no bonus spins in NJ, the deposit match is a substantial offer for boosting the bankroll.
Regular Promotions And Special Events
- Ongoing Offers: Unibet NJ regularly updates its promotions, offering various bonuses and special deals for existing users. These may comprise reload bonuses, complimentary spins, and cashback incentives.
- Special Events: The casino regularly hosts special events associated with holidays, sporting events, or the debut of new games. These events might come with unique bonuses, enhanced odds, or special prizes.
- Features a ‘Game of .the Week’ providing 20 bonus spins each week.
- Offers a weekly live casino bonus.
- Includes various sportsbook promotions worth exploring.
- Opportunity to win tickets to live concerts, such as Dua Lipa in New Jersey.
- Entry into these events typically involves playing selected games and meeting certain wagering requirements.
- These promotions are a unique aspect of Unibet, differentiating it from typical online casino offerings.
Unibet Casino New Jersey Game Selection
Slots
Variety: Unibet NJ offers a large selection of slot games, with over 500 options available.
Themes & Features: These slot machines encompass a wide range of themes and attributes, spanning classic slot designs, contemporary video slot features, and branded adaptations inspired by well-known films, television series, and characters.
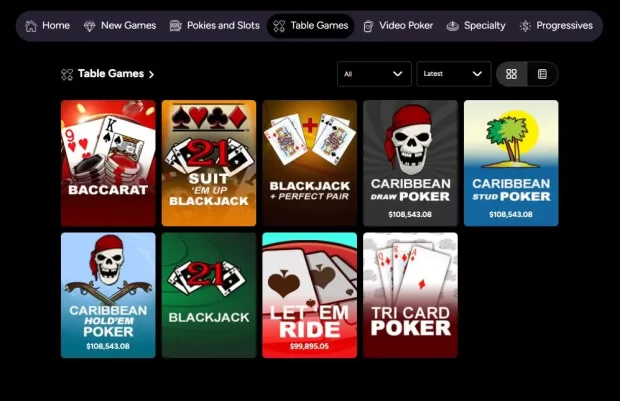
Table Games
Selection: The casino provides a range of classic table games.
Varieties: This encompasses well-known titles such as Live Blackjack, Live Roulette, and Live Baccarat, delivering an engaging casino atmosphere.
Live Casino
Real-Time Gaming: Unibet NJ features a live casino section where players can enjoy games with live dealers in real-time.
Games Offered: This includes popular games like Live Blackjack, Live Roulette, and Live Baccarat, offering an immersive casino experience.
Video Poker
Options Available: A decent selection of video poker games is available.
Popular Titles: This includes classics like Jacks or Better and Deuces Wild, appealing to both new and experienced players.
Progressive Jackpot & Mustwin Jackpots
Progressive Jackpots: Unibet NJ provides progressive jackpot slots, where the jackpot grows progressively with every wager until it’s hit.
Mustwin Jackpots: Must-win jackpots are unique jackpot types that must be won before reaching a predetermined amount, adding an additional level of excitement to gameplay.
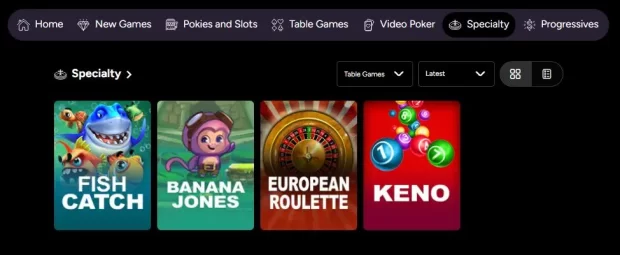
Speciality Games
Unique Offerings: Unibet NJ includes a variety of speciality games.
Game Types: This includes titles like Keno, Bingo, and scratch cards, providing a break from the traditional casino game lineup.

Unibet Sportsbook Review
Unibet New Jersey Sportsbook presents a wide array of options for online sports betting enthusiasts. Covering popular leagues like NFL, MLB, NHL, NBA, and global soccer, it caters to diverse interests. The platform sees high engagement in hockey, football, basketball, and baseball betting, reflecting New Jersey’s sports preferences. Offering over 4000 fixtures with competitive odds, Unibet prioritizes user experience, providing live betting and streaming options. Its Cash Out feature allows users to secure winnings mid-game. The platform extends attractive sportsbook bonuses, including Odds Boost and free bets, enhancing the excitement for users.
Banking And Payments At Unibet Casino New Jersey
Deposit Methods
1. Credit Cards:
Commonly accepted credit cards, such as Visa and MasterCard, are usually processed immediately for deposits.
2. E-Wallets:
Options like PayPal, Neteller, and Skrill are available for deposits.
These methods offer instant deposit times.
3. Bank Transfers:
Processing times may vary, usually within 1-3 business days.
Direct bank transfer options are available.
4. eCheck:
Players can deposit funds via electronic checks (eCheck).
The time it takes to process eCheck deposits may vary.
6. Prepaid Cards/Vouchers:
Prepaid options like Play+ are accepted.
Deposits with prepaid cards are generally instant.
Withdrawal Methods And Processing Times
1. Credit Card Withdrawals:
Withdrawals to credit cards such as Visa may require 1 to 3 business days for processing.
2. E-Wallet Withdrawals:
E-wallets like PayPal and Skrill offer relatively faster withdrawal times, often within 12 hours.
3. Bank Transfers:
Withdrawals via bank transfer can take 3-5 business days.
4. eCheck:
Withdrawal times for eCheck (Play+) are typically 1-3 business days.
Transaction Fees
Deposit Fees: Unibet NJ typically does not impose fees for deposits, regardless of the chosen payment method.
Withdrawal Fees: There are usually no transaction fees for withdrawals, but it’s always wise to check for any potential fees depending on the chosen method and amount.
Unibet Casino New Jersey Website Layout And Mobile Responsiveness Review
Website Design And Mobile Responsiveness
Overall Design:
Unibet NJ’s website features a user-friendly design that is both modern and intuitive.
The color scheme and arrangement are visually attractive and align with the Unibet brand.
Mobile Responsiveness:
The website is completely optimized for mobile devices, providing a smooth experience on smartphones and tablets. Its responsive design adapts to various screen sizes, preserving both functionality and visual attractiveness.
Ease Of Navigation And Search Functions
User Interface
Unibet NJ’s website boasts an intuitive design, facilitating effortless navigation with its clear and straightforward interface. Users can readily access key features such as account login, game categories, and customer support without hassle.
Search Functionality
The site includes efficient search functions, allowing players to quickly find games, information, or specific sections.
Users have the option to filter and categorize games based on their type, popularity, or the provider of the software.
Quality Of Graphics And Sound
Graphics
The graphics on Unibet NJ’s website are high-quality, enhancing the visual appeal of games and the overall site.
Game graphics are crisp and clear, contributing to an immersive gaming experience.
Sound Quality
Sound quality is an integral part of the gaming experience, and Unibet NJ ensures high-quality audio in its games.
This attention to audio detail enhances the realism and engagement of both standard and live casino games.
Mobile App Availability
Unibet NJ provides exclusive mobile applications tailored for Android and iOS devices. These apps provide a tailored mobile gaming experience with full functionality.
Software Providers At Unibet Casino New Jersey
1. NetEnt
- Reputation: NetEnt is renowned for its innovative and high-quality casino games, particularly slots.
- Popular Games: Players will find popular titles like “Starburst,” “Gonzo’s Quest,” and progressive jackpot games like “Mega Fortune.”
- Features: NetEnt games are renowned for their outstanding graphics, captivating soundtracks, and inventive gameplay characteristics.
2. Microgaming
- Industry Pioneer: As one of the pioneers in online casino gaming, Microgaming boasts a vast catalog of games.
- Diverse Range: Their offerings at Unibet NJ include classic slots, video slots, and progressive jackpots like the famous “Mega Moolah.”
- Quality: Microgaming is known for its reliable software, engaging themes, and quality graphics.
3. IGT (International Game Technology)
- Extensive Experience: IGT has a long history in creating casino games, both for brick-and-mortar and online casinos.
- Game Variety: They offer a range of games at Unibet NJ, including popular slots like “Cleopatra” and “Wheel of Fortune.”
- Innovation: Renowned for their creativity, IGT games frequently showcase distinctive themes and bonus rounds.
4. Evolution Gaming
- Live Casino Specialist: Evolution Gaming is a leader in the live dealer casino space.
- Live Games: At Unibet NJ, they provide a variety of live casino games, including Live Blackjack, Roulette, and Baccarat.
- Interactive Experience: Their games are known for high-quality streaming, professional dealers, and interactive features that create a real casino atmosphere.

User Experience At Unibet Casino New Jersey
Mobile Experience
1. Dedicated Mobile Apps:
Unibet NJ offers dedicated mobile applications for both Android and iOS devices, ensuring a tailored experience for mobile users.
The apps are designed to provide full functionality, mirroring the desktop experience in a mobile-friendly format.
2. Mobile Website:
For individuals who opt against downloading an application, Unibet NJ’s website is fully tailored for optimal performance on mobile browsers.
The mobile website is responsive, ensuring a seamless transition and consistent usability across different screen sizes.
Game Selection On Mobile Vs. Desktop
1. Consistency Across Platforms:
Unibet NJ strives to maintain a consistent game selection across both its mobile and desktop platforms.
Most of the popular games available on the desktop version are also accessible on mobile devices.
2. Variety and Accessibility:
Users have access to a diverse array of games on mobile devices, encompassing slots, table games, and live dealer choices. Although the mobile edition may feature a slightly streamlined game collection in contrast to the desktop version, it presents a broad and varied array of options.
User Experience On Various Devices
Smartphones:
On smartphones, Unibet NJ’s app and mobile website are designed for ease of use with a user-friendly interface and easy navigation.
The games are tailored for smaller screens, guaranteeing that both graphics and gameplay maintain their high quality and fluidity.
Tablets:
The tablet experience is similar to that on smartphones but benefits from a larger screen size, offering enhanced visuals and easier interaction.
The layout and functionality adapt well to the tablet format, making the most of the increased screen real estate.
Security And Fair Play
Encryption Methods
1. Advanced Encryption Technology:
Unibet Casino New Jersey utilizes cutting-edge encryption technology to safeguard player information and financial transactions.
This typically includes the use of SSL (Secure Socket Layer) encryption, which is a standard security protocol used to establish encrypted links between a web server and a browser.
2. Data Protection:
Personal and financial information of players is securely encrypted, making it inaccessible to unauthorized parties.
Ensuring this level of security is crucial for preserving the confidentiality and integrity of user data.
Random Number Generator (RNG) Certification And Fairness Audits
RNG Certification
Unibet NJ guarantees fair and random game outcomes through the use of Random Number Generators (RNGs), which are rigorously tested and certified by independent agencies to verify their proper and equitable operation.
Fairness Audits
The casino undergoes regular audits by independent bodies like eCOGRA, which is a leading independent and internationally approved testing agency.
These audits assess the fairness and reliability of the games offered, ensuring that they comply with industry standards and regulations.
Regulatory Compliance
As a licensed operator in New Jersey, Unibet must adhere to the regulatory standards set by the New Jersey Division of Gaming Enforcement (NJDGE).
This includes compliance with fair play and RNG requirements, further ensuring a trustworthy gaming environment.
Licensed and Regulated
Unibet Casino operates legally in both Pennsylvania (PA) and New Jersey (NJ), holding valid gaming licenses from the respective state regulatory authorities.
Security Measures
- Protected Transactions: The website guarantees the secure protection of all transactions.
- Game Fairness: Games at Unibet are independently audited to confirm their randomness and fairness, ensuring a trustworthy gaming environment.
- Data Encryption: Utilizes Trustwave SSL encryption to safeguard player data and prevent unauthorized sharing with third parties.
Responsible Gambling Measures at Unibet Casino New Jersey
Proactive Approach:
Unibet NJ is committed to promoting responsible gambling and provides several tools and resources to assist players in controlling their gaming activities.
Self-Exclusion and Limits:
Players can choose to impose limits on their deposits, wagering amounts, and gaming duration, while also having access to a self-exclusion feature, enabling them to temporarily abstain from gambling activities.
Access to Resources:
Unibet NJ provides information and links to external organizations specializing in helping with problem gambling.
Awareness and Prevention:
The site promotes awareness about problem gambling and offers tips on how to gamble responsibly.
Unibet Casino New Jersey Customer Support
Contact Methods
- Email: Unibet NJ offers support via email. Players can reach out with their queries and concerns – [email protected]
- Phone: A designated phone line is available for customer support, providing a direct means to communicate with a representative – 1-855-485-8804.
- Live Chat: The live chat function offers immediate assistance and is widely favored for swift issue resolution.
Response Time And Quality Of Support
- Email Response: Unibet NJ typically responds to emails within an average of 6.3 hours.
- Live Chat Response: The live chat support usually has an average response time of about 8.11 minutes.
- Quality: The support team is known for being knowledgeable and helpful, providing quality assistance to users’ inquiries.
Availability
Customer support at Unibet NJ is available during specified hours, ensuring that players can get help when they need it – Monday-Sunday; 9am-11pm Eastern Time
User Testimonials And Feedback For Unibet Casino New Jersey
Testimonial 1: Jack, avid sports bettor
“I’ve been using Unibet NJ for my sports betting needs for over a year now, and I’m really impressed. The range of markets and the odds they offer are top-notch. I particularly enjoy the live betting feature – it adds an extra thrill to game days. Their mobile app is seamless, which is great for placing bets on the go.”
Testimonial 2: Sarah, casual slot player
“As someone who enjoys playing slots casually, I find Unibet Casino NJ perfect for my needs. They have a huge selection of slots, and I’ve discovered some really fun ones with great themes. The website is super easy to navigate, and I’ve never had any issues with deposits or withdrawals.”
Testimonial 3: Alex, table game enthusiast
“I’m really into table games, and Unibet NJ has become my go-to online casino. Their live dealer games are fantastic it feels like being in a real casino. I was also pleasantly surprised by the quality of customer service when I had a query about a withdrawal. They were prompt and very helpful.”
Testimonial 4: Emma, new online casino player
“I was new to online casinos, and starting with Unibet NJ was a great decision. Their welcome bonus gave me a nice start, and I found the site very user-friendly. I appreciate the responsible gambling tools they provide, as they helped me set limits and play within my means. Highly recommend for beginners!”
Now, get ready for the jackpot!
In conclusion, Unibet Casino in New Jersey offers a dynamic gaming experience with a plethora of games and enticing promotions. The user-friendly interface and seamless mobile compatibility enhance accessibility for players on the go. However, it is important to acknowledge the downside, particularly the limited banking options and occasional customer service issues reported by some users. Despite these drawbacks, Unibet Casino remains a solid choice for those seeking diverse gaming options and immersive entertainment. As with any online platform, prospective players are encouraged to weigh both the positive and negative aspects to make an informed decision based on their preferences and priorities.
Check out these interesting alternatives in New Jersey:
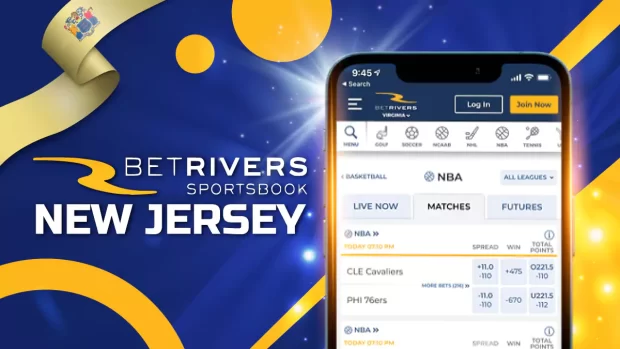
Betrivers Casino New Jersey: Find Your Fortune
PlayStar Casino New Jersey: Win Big and Live Large
FAQ
Withdrawal times vary based on the method used. E-wallets like PayPal may process within 12 hours, while credit cards and bank transfers can take 1-3 business days.
Unibet Casino New Jersey is owned by the Kindred Group, a major online gambling operator.
To play, register for an account on the Unibet NJ website, make a deposit, and choose from the variety of games available.
To delete your account, contact customer support via email, phone, or live chat and request account closure.
Unibet Casino NJ is an online casino offering a variety of gambling games, including slots, table games, and sports betting, legally operating in New Jersey.
Yes, Unibet NJ offers a demo mode for many of its games, allowing you to play for free.