
One of the most common uses of a bootable USB flash drive is to use it to boot into Windows. Later, you can use that USB drive to deploy Windows server essentials or perform diagnostics on a computer that is getting trouble while booting from the hard drive. In addition to this, it can also be used as an alternative to a Windows installation CD.
Our ‘How to’ guide will outline how to make a bootable USB flash drive with Windows 7/Vista step by step. So, without any further delay, let’s get started!
Note: Before you start, don’t forget to check if your computer system is able to use a USB flash drive as a boot device or not. Usually, all the latest computer systems are capable to do it.
How to Create a Bootable Windows 7/Vista USB
In order to make a bootable USB drive for Windows 7 or Windows Vista, you must have Windows 7 or Vista installed on your system. In addition to this, you also need a flash drive of at least 4 GB so that all the necessary files can be stored easily on it.
Tip: Before you start with the procedure, it is recommended to take the back up of all the files you have stored on your USB drive.
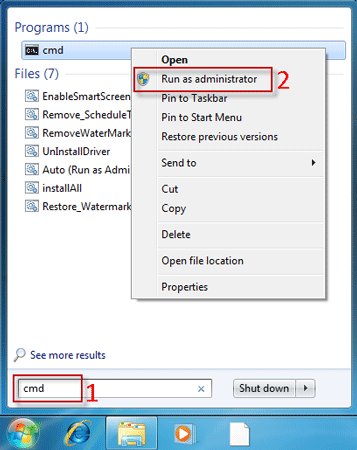
1. Open Windows command line by navigating to options Start-> All Programs->Acessories-> right click with the mouse on the Command prompt menu and then choose Run as Administrators option. You can directly access it by clicking on Start and typing in cmd in the search text field and then pressing Ctrl+shift+Enter.
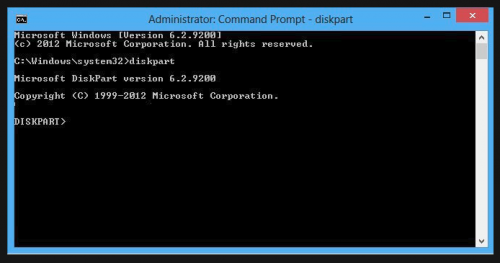
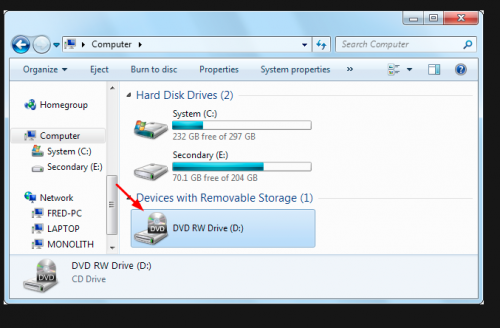
2. Now type cd c:\windows\system32 at the Command prompt. It will change the directory to the Windows system32 directory. Make sure your USB drive is plugged in. Next, type DISKPART and press Enter. Then again type LIST Disk and press Enter.
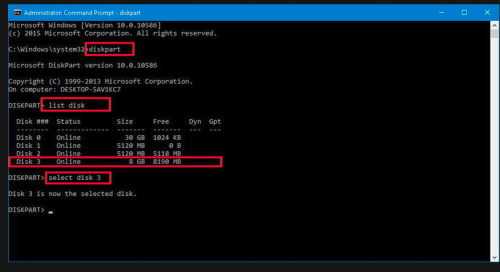
3. Now you will be able to see the list of the disk drives attached to your PC. Now look for the disk no. of your USB drive. Type SELECT DISK [USB disk#1] where “[USB disk #]” is the disk#. Now you will see a message saying your USB drive is the selected. In case you’re not sure which disk is the USB disk, eject the drive, and execute the step 2 again. Next, connect the USB drive again and compare the results. In most cases, the USB drive is the last drive. See the following screenshot for example.
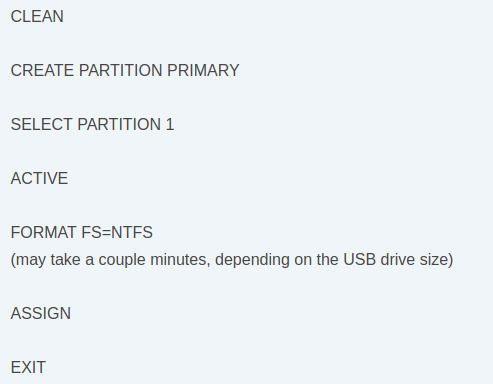
4. Next, type the following commands one by one. Don’t forget to hit Enter after each command.
5. Now you have to put your Windows 7 or Vista Installation DVD in your computer’s DVD drive. You should remember which drive letter is assigned to your USD flash drive and your DVD drive.
6. Again go back to your command prompt window and type in D: CD BOOT and press Enter. Again type CD Boot and press Enter. Finally, type BOOTSECT.EXE /NT60H: and press Enter.
7. Your last step will be copying the entire content available in the Windows DVD and paste it to your USD flash drive. In order to do it, go to My Computer window you opened in Step 5. Do the right click on the DVD drive, select Open to see all the available content of DVD. Copy all the files and folders and paste in your USB flash drive. It may take a few seconds.
Congratulations! Your USB flash drive has now turned into a bootable USB drive for Windows 7 or Vista.
Conclusion
Making a bootable USB drive doesn’t take much time if you have the right guide to support you. We hope this guide will help you with creating a bootable USB quite easily. If you have any query, feel free to ask us in comments.

