
WhatsApp features a two-step verification process to enable users to verify before accessing WhatsApp account. WhatsApp is an app that was originally created for communication purposes, these communications can be through text or media (audio, pictures, video). In recent times fraudulent activities have been perpetuated through this medium. WhatsApp records about 1 billion users in over 180 countries and some personal moments are shared on WhatsApp, which is why they built end-to-end encryption into the latest versions of the app.
When end-to-end encrypted, your messages and calls are secured so only you and the person you’re communicating with can read or listen to them, and nobody in between, not even WhatsApp. Fully aware that your communications stay between you and whoever you are conversing with, you may wanna try out all security measures to protect your account assuming you are a business person and you do lots of business transactions on WhatsApp platform, you may lose your phone someday and someone else may try to verify your WhatsApp account.
If you enable two-step verification on Whatsapp you will periodically be asked to enter your PIN so if the phone is not in your possession, the person would not be able to access your account. There is no option to disable this without disabling the two-step verification feature.
What is two-step verification on Whatsapp?
From WhatsApp FAQ we gathered that the two-step verification is an optional feature that adds more security to your account. When you have two-step verification enabled, any attempt to verify your phone number on WhatsApp must be accompanied by the six-digit PIN that you created using this feature.
WhatsApp has highly recommended that you provide an accurate email address so that you’re not locked out of your account if you forget your PIN. Also, If you receive an email to disable two-step verification, but you did not request this, do not click on the link. Someone could be attempting to verify your phone number on WhatsApp to have access to your account. Now that you fully understand what two-step verification on Whatsapp is, and how it functions, let us proceed on how to enable two-step verification on WhatsApp.
How To Enable Two-Step Verification on WhatsApp
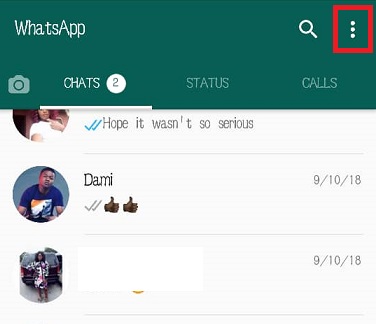
1. Log in to your WhatsApp.
2. Tap on the three horizontal dots at the top right of your screen.
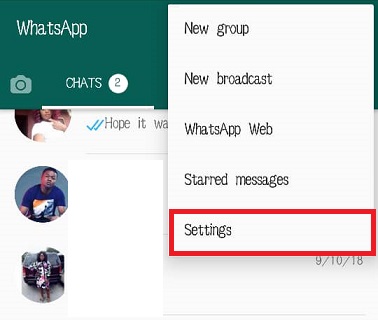
3. Tap on settings.
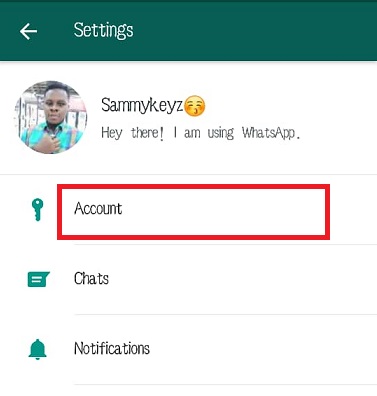
4. Tap on ‘account’.
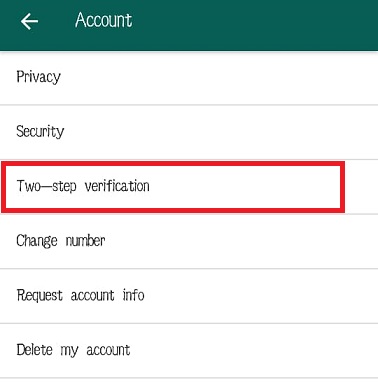
5. Tap on ‘Two-step verification’.
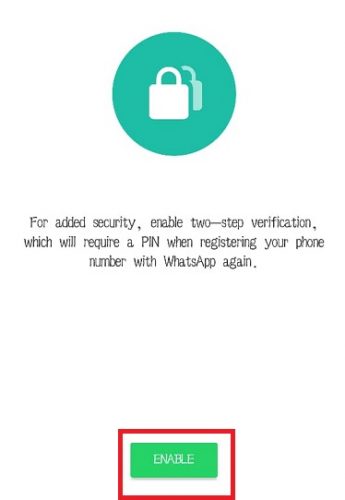
6. Tap ‘Enable’.
7. Input PIN of your choice.
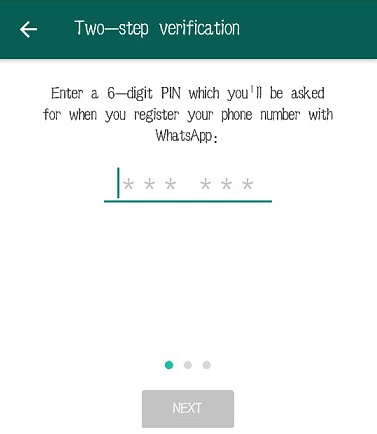
8. Confirm PIN.
9. Add a valid Email address which will be used to reset your pin if forgotten.
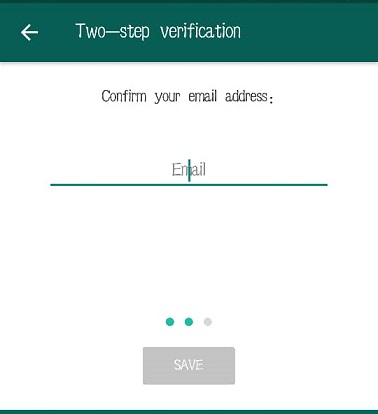
10. Confirm Email.
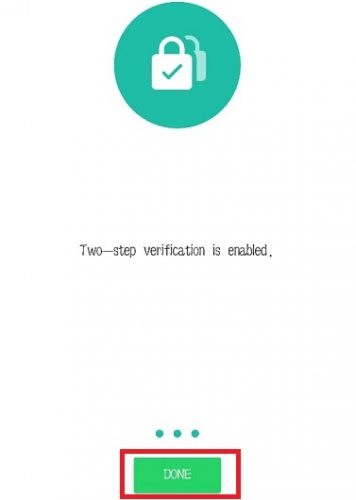
11. Tap ‘Done’.
This feature is very important and useful. you may want to give it a shot and protect your account.
NOTE: If you have two-step verification enabled, your number will not be permitted to reverify on WhatsApp within 7 days of last using WhatsApp without your PIN. Thus, if you forget your own PIN, but did not provide an email to disable two-step verification, even you will not be permitted to reverify on WhatsApp within 7 days of last using WhatsApp. After these 7 days, your number will be permitted to reverify on WhatsApp without your PIN, but you will lose all pending messages upon reverifying (they will be deleted). If your number is reverified on WhatsApp after 30 days of last using WhatsApp, and without your PIN, your account will be deleted and a new one will be created upon successfully reverifying.
Frequently Asked Questions and Answers
Q: Can I undo this feature after I enable two-step verification on WhatsApp?
A: Yes, you can deactivate it by following steps 1-5 and then tap ‘disable’.

