Google Drawings is one of the lesser known Google Docs. It is used not only to create diagrams and charts but also drawings. Google Drawings is the Google Docs version of the only slightly better known Visio from Microsoft Office.
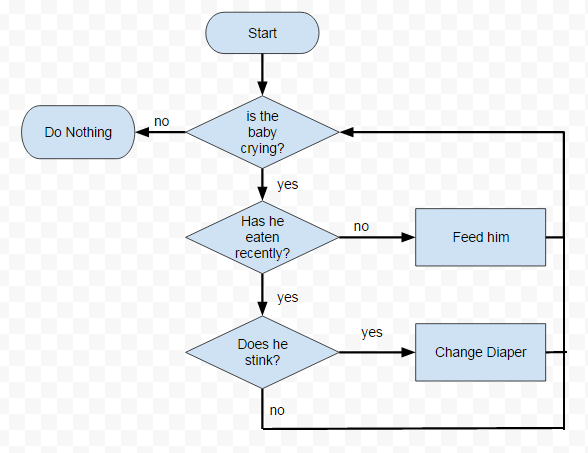
Flow charts are very effective tools for describing processes. There is a standardized convention for shapes within flow charts. For example, a diamond signifies a decision while a rectangle signifies a process. Google Drawings has all the shapes and tools you need to professionally create flow charts online. Let’s get started.
1.Go to docs.google.com/drawings. Click on the Shape icon in the toolbar. The bottom section is filled with shapes used in flow charts. Hover your mouse over them to see their meaning in standard flow chart conventions. Start by clicking the Terminator, which is the fourth option from the right. 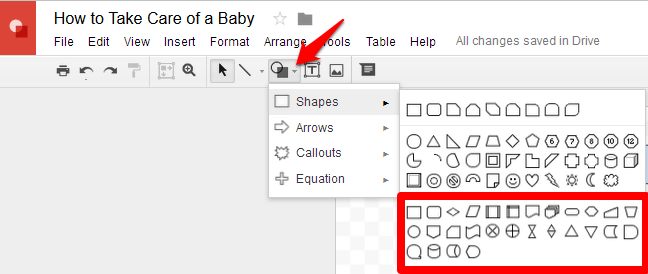
2.Click and drag your mouse anywhere on the page to draw out the shape you selected. Double-click on it to add text. For whatever reason, the default is for the text to be left aligned, so you will want to center it using the alignment settings in the toolbar. 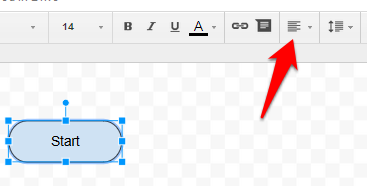
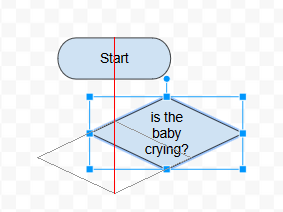
3.Draw some more shapes (the most common are the rectangle process and the diamond decision), and draw them out. I like to copy/paste shapes instead of drawing them multiple times to ensure that the size stays consistent. This also saves you from having to center the text every time. You can align the shapes by clicking and dragging them. A red line appears when the shape you are moving lines up with the center or edge of another shape.
4.Now you need to add some connectors. Select Arrow from the drop down menu to the left of shapes. When you hover over a shape with the arrow tool selected, purple points will appear on the edges of your shapes. Click and drag from one point to a point on a neighboring shape. If you need the connector to move around, choose the Elbow Connector. After you draw an elbow connector, you can add an arrow point to the end by changing the line end option in the controls that appear in the toolbox when a connector is selected. You can also change the line and arrow thickness, color, and style from these added controls.![]()
5.Label your connectors by clicking the text box icon to the right of shapes. Draw out a text box next to a connector line. Usually, your connectors will be labeled with a “yes” or a “no” so that users of the flow chart know which way to go at a decision. Note that when a text box is selected, a series of text formatting options appear in the toolbar.
6.When you are done, you can print your flow chart or download it as a .pdf, .png, .svg, or .jpg by going to File>Download as.