
As we’ve been saying here for the past several weeks, the Aprils 2018 update for Windows 10 brought some very nice features that we get to play around with. Today’s feature that we are going to talk about is choosing which GPU should an app use.
Most gaming laptops and desktops come equipped with two GPUs: an integrated one, that is actually a part of the CPU but is enough some basic browsing and office work, and a dedicated GPU that’s mostly used for gaming or video rendering.
If you are one of those users then you are aware that having the dedicated GPU always on, especially on a laptop will consume more power and will reduce the battery life. This is where Windows’ feature comes in handy. You can set specific rules for which app to use which GPU. So if you are browsing the internet or typing something then you wouldn’t need to use your dedicated GPU. On the other hand if you are playing a graphic intense game or doing some video rendering then you will need to use the dedicated GPU for the best possible performance.
In general, up until this point, this was something that the operating system was doing itself. Windows determines if the app that you are using need more GPU power and runs it through the dedicated one, otherwise it goes through the integrated. These settings will override the operating system’s “decision” and you will be able to set them based on your needs.
How to select which GPU your apps are using
Even though this feature is designed for computers that have both integrated and dedicated GPU it is also available for those that only have an integrated one. Certain users have reported that it does make slight difference, so if you have a PC only with an integrated GPU test it out and let us know.
1.Click on the Windows icon on the left on the taskbar or hit the Windows key on your keyboard
2.Open Settings by clicking on the gear icon
3.Open “System”
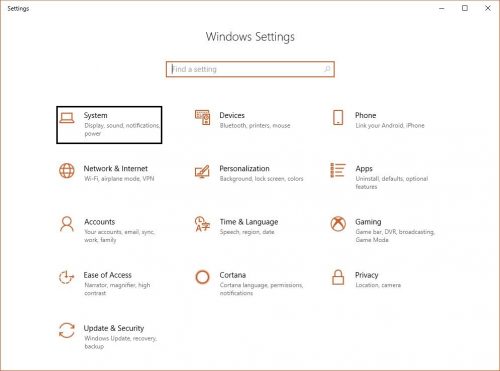
4.In the Display section scroll to the bottom and click on “Graphics settings”

5.Now you will need to select the app. First you will need to choose between Classic or Universal app. Select the one that you need
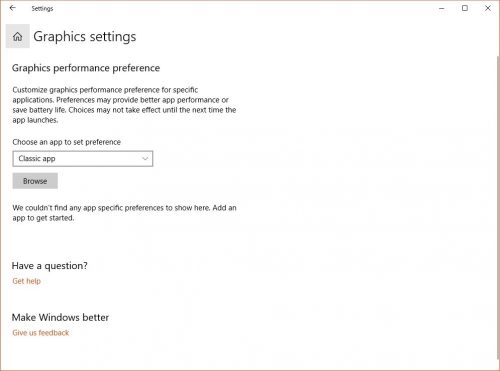
6.If you have selected a Universal app then right below that setting you will have a dropdown menu with all of your installed Universal apps. If you have selected a Classic app then you will need to click on “Browse” and navigate to where the app is installed and select the .exe file of the app. Note: make sure to select the correct executable (.exe) file for the settings to work as you set them
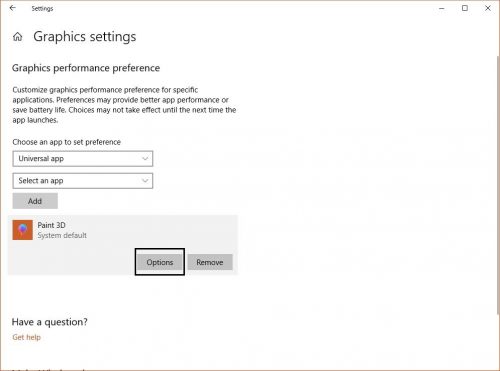
7.Once selected, click “Add”
8.Immediately you will see the application in the list, so you need to click on it and click “Options”
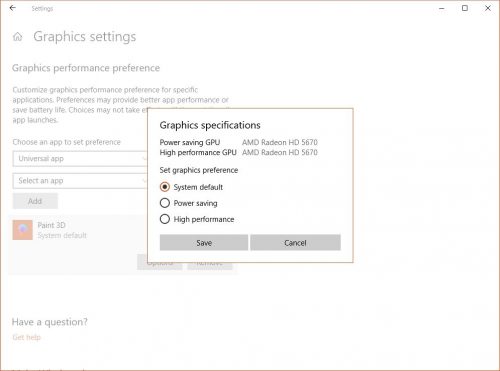
9.A small window will open with 3 settings: System default, Power saving and High performance. Select the one that you want. Note: The PC that we are working on doesn’t have an integrated GPU so that is why it has the same GPU under both Power saving GPU and High performance GPU. If this PC were to have an integrated GPU then under Power saving GPU it would have “Intel Graphics”
10.Once selected click “Save”
You will need to repeat the process for every app that you want to set a custom rule for. Also, note that if you are setting custom rules for which GPU should a specific app use then any other setting that you have set in your nVidia or AMD control panel will be overwritten.
If you wish to remove a rule that you set for a certain app, you will need to find it in the list in the Graphics settings, click on it and click “Remove”
Frequently Asked Questions and Answers
Q: Can I set these rules on Windows 7?
A: No, this feature is only available on Windows 10 running the latest 1803 version.
Q: I tried to set custom rules for my apps, but I don’t have the option. I’m running Windows 10 home.
A: At the moment, it seems that this feature is only available for Windows 10 Pro