
Apple’s iOS 11 has packed a whole lot of new features. One of the noticeable features of iOS 11 is the Instant Markup. Instant Markup allows users to quickly edit screenshots on iPhone iOS 11 right after taking them. This article will guide you how to save and share an edited screenshot on your Apple device running iOS 11.
Method 1: Edit a Single Screenshot on iPhone iOS 11
You can use Instant Markup to edit a single screenshot on iPhone iOS 11. Here’s how to do it:
1.From any screen on your iPhone, take a screenshot. For iPhones 8 and earlier devices, take a screenshot by simultaneously pressing the Home and the Power button together. For iPhone X, a screen can be captured by pressing the Power and the Volume Up button simultaneously.
2.Once a screenshot is captured, a PIP (Picture in a Picture) will show on the lower-left part of the screen. Tap the PIP to open the screenshot that was recently taken.
3.Use the editing tools to edit your screenshot. The third section in this article will discuss the editing tools in Instant Markup.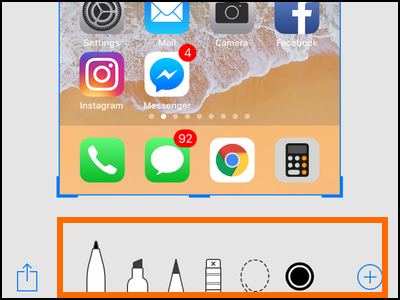
4.Once you are done editing the screenshot, tap on the Done button in the upper-right part of the screen.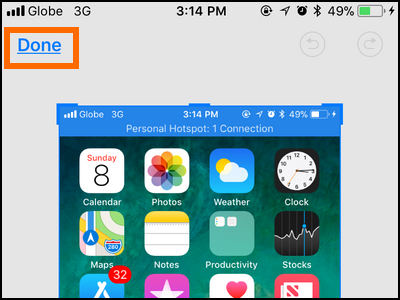
5.Press the Save to Photos option to save your edited screenshot. Alternatively, you can delete the screenshot by tapping on the Delete Screenshot option or continue with editing without saving or deleting anything by tapping on the Cancel button.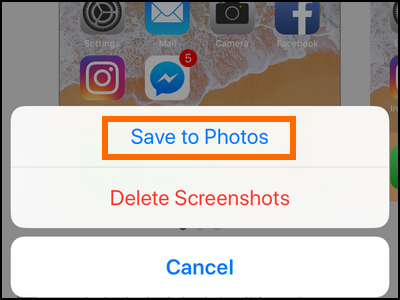
6.You are done.
Method 2: Edit Multiple Screenshots on iPhone iOS 11
You can edit multiple screenshots on your iPhone iOS 11 by following these procedures
1.From any screen on your iPhone, take a screenshot. For iPhones 8 and earlier devices, take a screenshot by simultaneously pressing the Home and the Power button together. For iPhone X, a screen can be captured by pressing the Power and the Volume Up button simultaneously.
2.Once a screenshot is captured, a PIP (Picture in a Picture) will show on the lower-left part of the screen. Do not tap the PIP yet.
3.Continue with taking screenshots consecutively. Screenshots taken within five seconds of each other are considered as a set. You can edit a set of screenshots together. Tap on the PIP set once you are done with the screenshots.
4.Use the editing tools to edit your screenshot. The third section in this article will discuss the editing tools in Instant Markup.
5.Once you are done editing the screenshot, tap on the Done button in the upper-right part of the screen.
6.Press the Save to Photos option to save your edited screenshot. Alternatively, you can delete the screenshot by tapping on the Delete Screenshot option or continue with editing without saving or deleting anything by tapping on the Cancel button.
7.You are done.
Instant Markup Available Editing Tools
The following are the editing tools in the Instant Markup feature that help you edit screenshots on iPhone iOS 11:
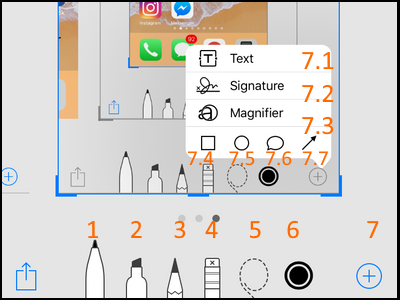
● 1. Pen tool – uses a pen effect to mark anything on the screenshot.
● 2. Highlighter tool – highlight any part of the screenshot simulating a highlighter effect.
● 3. Pencil tool – make a screenshot using a pencil effect.
● 4. Eraser tool – tap on any previous edit to delete it from the screenshot.
● 5. Lasso tool – selects an edit action. You can reposition any mark or object using this tool.
● 6. Color tool – allows you to select the color of your preferred tools.
● 7. More tools button – shows a list of additional editing tools. These are the following:
● 7.1 Text – adds a text on your screenshot.
● 7.2 Signature – add a signature on your screenshot.
● 7.3 Magnifier – enlarges a selected portion of the screenshot.
● 7.4 Square Shape – adds a square shape on your screenshot.
● 7.5 Circle Shape – adds a circle shape on your screenshot.
● 7.6 Message Bubble – adds a message bubble shape on your screenshot.
● 7.7 Arrow Lines – adds arrow lines on your screenshot.
Share Edited Screenshots on iPhone iOS 11 Using Instant Markup
To share your edited screenshots, do these:
1.From any screen on your iPhone, take a screenshot. For iPhones 8 and earlier devices, take a screenshot by simultaneously pressing the Home and the Power button together. For iPhone X, a screen can be captured by pressing the Power and the Volume Up button simultaneously.
2.Once a screenshot is captured, a PIP (Picture in a Picture) will show on the lower-left part of the screen. You can continue with taking more screenshots. Once you are ready to edit, tap the PIP.
3.Edit your screenshots using the tools listed in the previous section.
4.When you are done editing, tap the Share button on the lower-left part of the screen.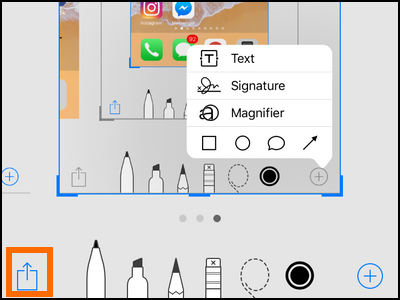
5.Select the screenshots that you want to share by tapping on them. A screenshot with a blue check icon on the lower-right part of it means that it is selected.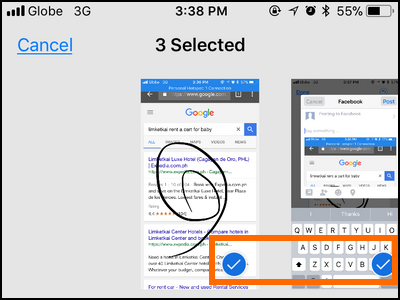
6.Choose your preferred method of sharing. Tap on any of the icons. For this example, tap on the Facebook option.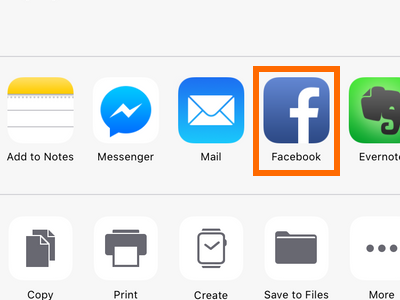
7.Depending on the method or app chosen, proceed with sharing by doing the appropriate actions. For this example, tap on the Facebook’s Post button.
8.The selected screenshots are now shared. You are done.
Frequently Asked Questions
Q: I do not have the Instant Markup feature on my iPhone. How do I get the feature on my iPhone?
A: Instant Markup is only available for iPhone running on iOS 11. If your device is not yet on iOS 11, update the iOS software on your iPhone. Take note that not all Apple devices support iOS 11. Here are the devices compatible with iOS 11:
| ● iPhone 8 | ● iPhone 6 Plus | ● iPad Air 2 |
| ● iPhone 8 Plus | ● iPhone SE | ● iPad Air |
| ● iPhone 7 | ● iPhone 5s | ● iPad (5th generation) |
| ● iPhone 7 Plus | ● 12.9-inch iPad Pro (2nd generation) | ● iPad mini 4 |
| ● iPhone 6s | ● 12.9-inch iPad Pro (1st generation) | ● iPad mini 3 |
| ● iPhone 6s Plus | ● iPad Pro (10.5-inch) | ● iPad mini 2 |
| ● iPhone 6 | ● iPad Pro (9.7-inch) | ● iPod touch (6th generation) |
Q: Instant Markup is not working. I have upgraded my iPhone 7 to iOS 11. I find the Instant Markup feature as a quick and convenient way of editing screenshots – I love it! However, I noticed yesterday that Instant Markup, for some reasons, was disabled on my phone. I’ve checked the Settings to no avail. How can I activate Instant Markup again?
A: Instant Markup is enabled by default, and a PIP (Picture in Picture) will always show everytime you take a screenshot on your iPhone. If you are using a device running on iOS 11 and a PIP does not show taking a screenshot then restart your device. An error in Instant Markup can be fixed by rebooting your Apple device. Also, make sure that you update your phone to the latest available iOS software to ensure that your phone is up-to-date with the latest features and bug fixes.
Q: How to disable Instant Markup? Instant Markup is great and all, but I find the picture-in-picture to be distracting. I have no plans of editing screenshots from my phone. If there is a need to edit screenshots, I prefer doing the process on my computer. How do I disable the Instant Markup feature on my iPhone? I’ve gone through the Settings menu but have not found any lead.
A: Currently, there is no way to disable the Instant Markup on iPhone. Unless the feature malfunctions, you will always get the PIP (picture in picture) after taking screenshots. We will update you once the ability to turn off the feature is available. Check our page time to time so you can get the latest update.
Q: How to take screenshots on iPhone X? The phone does not have a Home button. How do I capture a screenshot using my iPhone X?
A: You can take a screenshot on iPhone X using the Assistive Touch button. Enable the Assistive Touch on your iPhone X by going to Settings -> General -> Accessibility -> Assistive Touch. Alternatively, you can simultaneously press the Home and the Power Up button to take a screenshot on your iPhone X.
You just learned how to quickly edit screenshots on iPhone iOS 11 using the Instant Markup feature. If you have questions with any of the steps outlined above, let us know in the comments section.
This article may have interest you since you’ve reached to the last part of it. These related handpicked articles may interest you, too:
How to Enable Assistive Touch on iPhone
How to Update the iOS Software on iPhone
iPhone: How to Take a Screenshot
Automatically Save Screenshots on iPhone to Computer