This recipe is a much more advanced one. We will outline how to take your recorded TV shows from Windows 7 Media Center (.wtv files), convert them to an iTunes compatible MP4, re-tag the IDTAGS for iTunes and then have iTunes import the shows automatically. This recipe requires intermediate command line knowledge and 2 free utilities. In the end, we should have a solution that will let us convert our tv we record in Win7 MCE and then watch it on our iPod/iPad/iPhone AND stream it via iTunes to iTV 🙂
Required Software:
-Windows 7 Home / Ultimate / Professional Edition (retail) these versions contain Media Center
–TV Tuner (to record tv in media center)
–iTunes (free)
–AtomicParsley (freeware) this app will let us modify metadata
–MCEBuddy (freeware) this app runs as a service to convert our wtv to mp4
–My Batch File (TV2iTunes Batch File) this will pull all the pieces together, calls our apps and moves our files.
Prepping/Introduction:
This recipe will assume that you have already setup your Windows 7 computer to record TV. This requires you to have a QAM/HD/Analog TV Tuner. Intermediate command line / batch file knowledge will also make things easier however I will try to explain as best as I can for beginners.
Video Tutorial:
Guide:
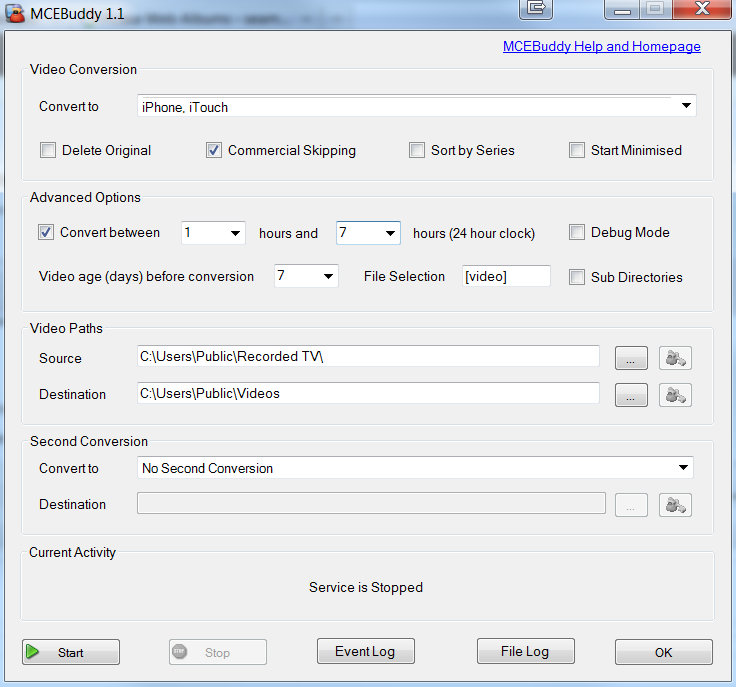
1. Download and install MCEBuddy. After it opens, be sure to configure it so your using the iPhone/iTouch profile and remember where you are saving the mp4 files too.
You can also choose more advanced options for when encoding will take place; lets set our conversion time between 1am to 7am and convert items older than 7 days and also remove commercials.
2. Download AtomicParsley from the Soundforge link. Extract the .exe file from the ZIP file and save it to a folder called “Atomic” on your C: drive (ie C:\Atomic\Atomicparsley.exe)
We only need the .exe file; running the file by itself will not do anything since its designed to be called from the command line.
3. Download and extract the TV2iTunes batch file I’ve written into the same C:\Atomic folder (ie C:\Atomic\TV2iTunes.bat)
4. We will need to edit this file to work on your system. I have setup the batch file to use SET parameters in which we will modify.
Right-Click on the AutoTV2iTunes.bat and choose Edit or Open With > Notepad.
go down to the @REM folder locations section, you will see these 5 lines to your setup:
SET mcebuddydir=C:\Users\Public\Videos
SET tvdir=C:\Users\Public\Recorded TV
SET itunesAuto=C:\Users\Userid\My Music\iTunes\Automatically Add to iTunes
SET itunesTV=C:\Users\Userid\My Music\iTunes\TV Shows
SET tokenNo=5-12
mcebuddydir = this is the location where MCE Buddy will save converted files to, i use my C:\Users\Public\Videos folder
tvdir = this is the location where you save your recorded tv to in MCE (default is C:\Users\Public\Recorded TV), you can leave this alone unless you have changed this location in MCE
itunesAuto = this is the location where your iTunes “Automatically Add to Itunes” folder is located, by default in Windows 7 its: C:\Users\Userid\My Music\iTunes\Automatically Add to iTunes (example setting would be: SET itunesAuto=C:\Users\John\My Music\iTunes\Automatically Add to iTunes )
itunesTV = this is the location where iTunes will save your TV Shows to when they are imported (using above example would be, SET itunesTV=C:\Users\John\My Music\iTunes\TV Shows )
tokenNo = this s probably the trickiest part; making sure the tokens match up with your mcebuddydir path. We”ll quickly explain.
In our example, we have MCEBuddy saving converted files to C:\Users\Public\Videos
My batch file uses the following symbols: _\ to parse data from the full path of the mp4 file, as an example: C:\Users\Public\Vidoes\Family Guy_WFTCDT_2010_08_18_23_55_00.mp4
using the _\ as parsing brackets, we will count the dir to be the 5th in and using my table below, the tokenNo=5-12
Another example, I encode my files to a folder D:\Test and my files full path is D:\Test\Family Guy_WFTCDT_2010_08_18_23_55_00.mp4 the dir would be the 3rd, so tokenNo=3-10
dir – tokens
6 – tokenNo=6-13
5 – tokenNo=5-12
4 – tokenNo=4-11
3 – tokenNo=3-10
2 – tokenNo=2-9
Once you’ve modified that last SET variable, we are done with editing the .bat file.
Finally, we will want to create a folder called “covers” in the C:\Atomic folder (ie C:\Atomic\Covers\). In here, we will put our Cover Art / Artwork for our TV Shows (the thumbnails we will see in iTunes). The main thing we need to do is name the .jpg file just like the Title name shows in the .wtv file we recorded. I use google images to find cover art; you can create .jpg files for each of your shows you record; if you do not have a jpg in the folder, a generic screenshot from the video file will be used. Here’s an example of naming your jpgs:
“The Simpsons_WFTC_2010_08_25_22_00_00.mp4”
Cover art file name we will want to use is: “The Simpsons.jpg”
Another example, “Married … With Children_WFTC_2010_09_02_02_00_00.mp4”
cover art file name we will use: “Married … With Children.jpg”
HINT: I always recommend testing on a sample directory and files before unleashing it. For testing purposes, be sure to turn add a PAUSE at the very end of the file to let you look at the batch file once it runs to see if variables parse properly and to see any errors. You may see an error about AtomicParsley but this is caused by the –overWrite tag and does not affect the process. Once you have confirmed the batch file works as you had planned.
5. We will lastly setup a Windows Scheduled Task to run the batch file each night after our conversions with MCEBuddy are done. In our example, we have MCEBuddy run between 1am and 7am, so ideally we would want the batch file to run around 7:15am or 7:30am.
To setup a Scheduled Task in Windows 7, do the following:
Go to Start Menu > All Programs > Accessories > System Tools > Task Scheduler

On the Right Action Pane, choose “Create Task…”
A new Create Task window will pop-up.
Give it a name such as “Run TV2iTunes Batch”
Check the “Run whether user is logged on or not” option

Next, click on the Triggers tab.
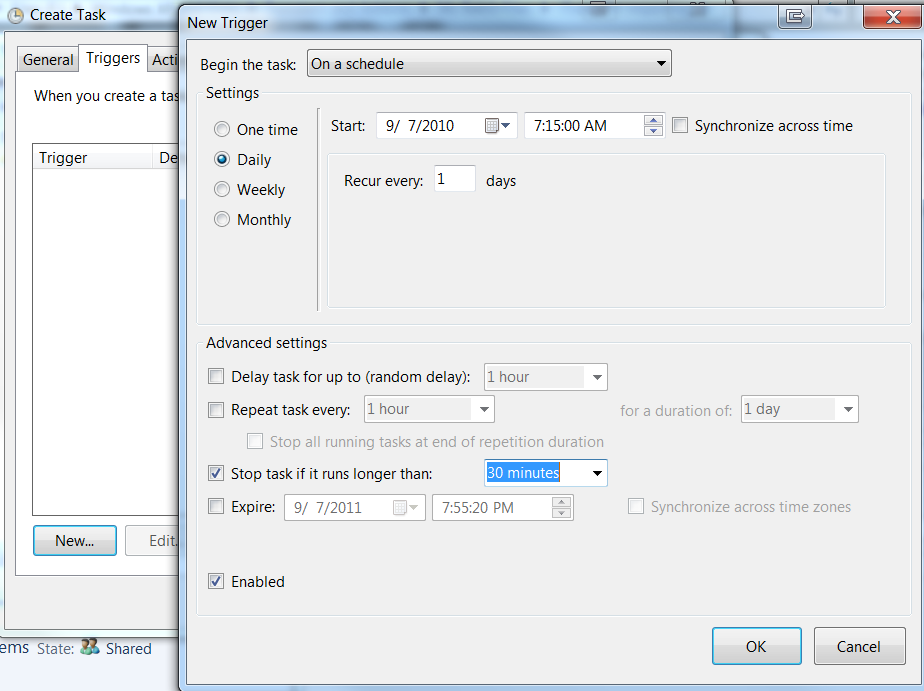
Click on the “New…” button and a New Trigger window will pop-up. We will want to set it to run Daily at 7:15:00AM and have it run each day, Recur every 1 days. I also would check the “Stop task it runs longer than: 30 Minutes” and also be sure to click the Enabled at the bottom.
Next, click on the Action tab.
Choose the Action: Start a program and then click on the Browse button.
We will browse to the C:\Atomic folder and choose the TV2iTunes.bat and hit Open. Once you click on OK, it will bring up a Login window, just enter in your password and hit OK.
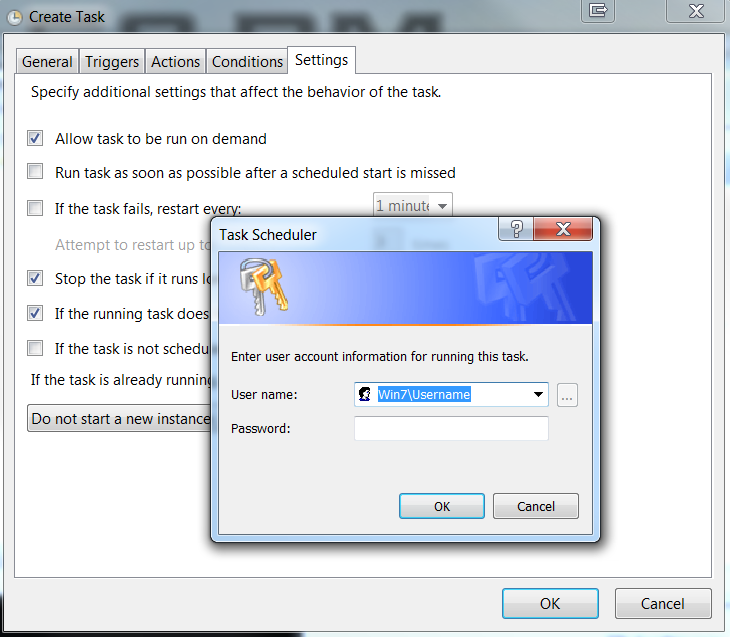
Finally, click on the Settings tab.
We will want to make sure we check the “Allow task to be run on demand”, “Stop the task if it runs longer than: 1 hour”, and also check the “If running task does not end when requested, force it to stop” and then click on OK.

That should complete the setup of our automated conversion of our recorded WTV files to mp4 and then importing of mp4 into iTunes library. These TV Shows WILL SHOW UP UNDER YOUR TV Shows section in iTunes; the main purpose of AtomicParsley is to added a “Media Kind” metatag to the file to mark it as a “TV Show” and in turn when iTunes auto imports it, it knows what to file it as in your iTunes library!!
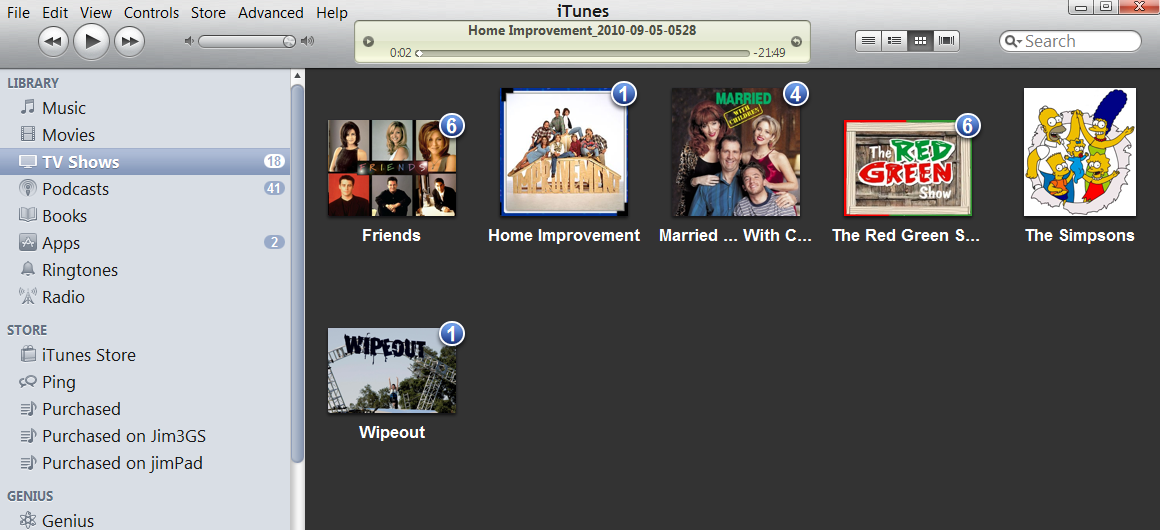
7. Open iTunes, once you do this, this will process the files we moved to the auto folder. After a few seconds, the TV Shows should show up in the appropriate area in your iTunes library. You can now setup your iPod/iPhone/iPad to sync the last 10 or all tv shows and have it autosync each day after our processes run.
If you have Home Sharing setup, you can easily now stream those TV shows to other iTunes libraries or even your iTV device! Just be sure to login to your iTunes account on the other pcs/laptops/macs/iTV and enable Home sharing.
If you made it here, hopefully you have a working automated solution to get your TV to your iPod/iPhone/iPad and iTunes. 🙂
NOTES:
–TEST, TEST, TEST! Always run in a temporary or test folder structure.
–This will work with all Windows 7 32bit or 64bit versions that have Media Center.
–Drop any questions you may have in the Comments section and I’ll try to reply as quickly as possible!
–I’ve noticed on rare occasions Audio / Video sync errors with the mp4s MCEBuddy creates. it seems to be caused by having two instances of MCEBuddy running.
–Also, you can add filetypes or even show names into MCEBuddy under the “File Selection” box. just be sure to use a * for wild card and use a comma to separate entries
–iTunes has to either be open or opened to process files in the “Automatically Add to iTunes”, once its opened it will process the TV Shows and parse them appropriately and also sort them.
–MCEBuddy does have a log and does know which files its already converted so you can avoid any duplicates hopefully.
—lastly, mad props to both the creators/community behind MCEBuddy and AtomicParsley!
version history on batch file
-9/10/2010 – corrected issues w/tv shows with periods in file name; no longer uses . as delimiter. reuploaded zip.

