This is my super duper easy appendum guide to Guicide’s Navigation Hack. His original guide can be found here: http://guicide.com/cars/2006civic/nav/hacks/ Thanks and props to go to Guicide and Bysin for their work on these hacks.
Basically, my recipe is the same thing you would find at Guicide’s site however its geared more toward the not-so-computer-savy types and newbies (like myself in regards to navi hacking.. hehe..) The video shows what you need to do after you have the dvd with your custom welcome screen on it. Hopefully you’ll get through without any problems! Here’s my first welcome screen!
Intro/Requirements:
Well, first things first. Here are the required items before we can start our mini-hack.
-Paint Shop Pro X software: for converting/creating 8bit bmp file
-bysin.exe, CECompressv4.dll, and 8to16.exe
-Original Navigatoin DVD
-Blank CD-R/CD-RW/DVD-R/DVD+R/DVD+RW (i used a Memorex DVD+RW, 2.4x w/success)

——————————————————————————–
How-To Guide:
Step 1. Make things easy, lets create a folder structure to work with. Just create a new navi folder on your main harddrive (C: drive).
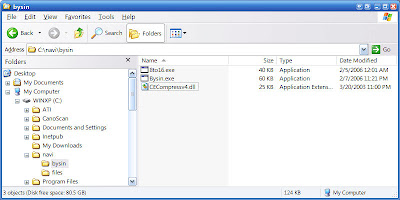
Then create a new folder in the navi folder called files, we will put the files we need from the navigation dvd into here. Also you can create a folder called bysin and put the 3 files listed above in here (bysin.exe, CECompressv4.dll, and 8to16.exe).
Now we got a workable environment! (creating such a folder structure for most hacks will make your life so much easier, hopefully it lets you keep from getting files confused with others, etc)
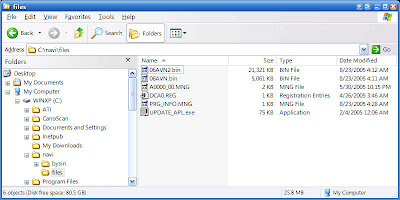
Step 2. Remove your Navigation DVD from your 2006 Civic and put it in your pc drive. In the root folder of the DVD, copy these six files to the files folder we created (c:\navi\files )
06AVN.bin
06AVN2.bin
A0000_00.MNG
DCA0.REG
PRG_INFO.MNG
UPDATE_APL.exe
So your folder will prob look like this:
Then copy the 06AVN2.bin file to the bysin folder.
Step 3. Next we will want to create or convert our custom welcome image to 8bit using Paint Shop Pro X.
We will want the image to have these dimensions: 480×234
Also note, that image will be stretched vertically 30% so you can also account for that by shrinking the original image to 70% or original size.
Once we have the image the way we want it, go to File > Save As.
We will want to change the file type to BMP and also click the advanced button to make sure your settings are like mine below::
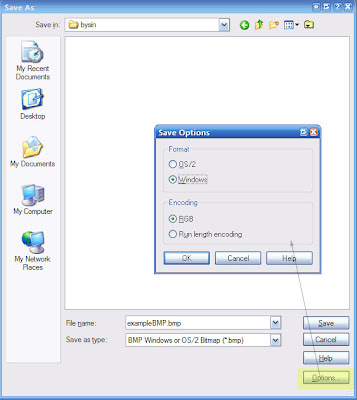
Then just save the new bmp to the bysin folder (c:\navi\bysin) with an easy file name, i will use exampleBMP.bmp in this guide.
Step 4. Now that we have an 8-bit bmp image w/the proper dimensions; we need to use guicide’s 8to16.exe to convert our image to the navigation bmp type. This is probably the most confusing part for most users since it requires using the command prompt.
First open up a command prompt. Do this by going to your Start Menu > Run.
Then type “cmd” in the run window and hit Ok. A new black command prompt window will appear.
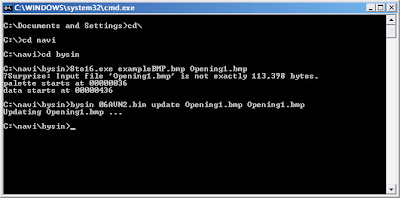
First type: “cd\” this will bring you to the root directory of your c: drive.
Then type: “cd navi” to change directory to our navi folder
Then type: “cd bysin” to again change directory to our bysin folder.
Now we need to run 8to16.exe on our exampleBMP.bmp to convert it to 16bit, navi format.
Type: “8to16.exe exampleBMP.bmp Opening1.bmp” and hit enter. It may say the file size is not exactly, thats ok. If you get errors, then there’s a problem with your custom bmp. I had problems with bmps that i created in Photoshop!
Once its done you should have a new Opening1.bmp file, you can view it in Internet Explorer to be sure it worked.
After you verify its working, we will now run the bysin.exe update command to update our 06AVN2.bin w/our custom image.
bysin 06AVN2.bin update Opening1.bmp Opening1.bmp” and hit enter. You will see a “Updating Opening1.bmp…” message. Once you get your command prompt back, it is done and we are off to burning our files to a cd/dvd!
(full command line process screenshot)
Step 5. Burning files to a cd/dvd is our final software/pc part of this guide. I use Nero 6 as my burning program, just choose a new data disc and make its a DVD-ROM (ISO) or CD-ROM (ISO) and then just burn these five files from the original dvd (we put in the c:\navi\files folder)
06AVN.bin
A0000_00.MNG
DCA0.REG06
PRG_INFO.MNG
and the
06AVN2.bin that we updated (located in the c:\navi\bysin folder)
Then just burn it!
The remaining of this guide is in video form, watch the youtube.com video i’ve uploaded for the final steps!