
Lately we have been talking a lot about security and encryption, mostly because we live in “dangerous” times where your digital files are vulnerable regardless if it from someone remove or someone that has physical access to your computer. Today’s topic covers a way in which you can protect your data from people that have physical access to your computer, regardless if your computer is stolen or someone managed to gain access to it.
BitLocker is a feature implemented in Windows that enables you easy an secure way of encrypting your computer in a way that anyone that tries to gain access to your sensitive data will not be able to. One important thing to bear in mind is that if you intend of fully utilizing BitLocker you must have a Trusted Platform Chip or TPM.
How to turn BitLocker on
Turning the BitLocker and setting up is easy and can be completed in a few simple steps
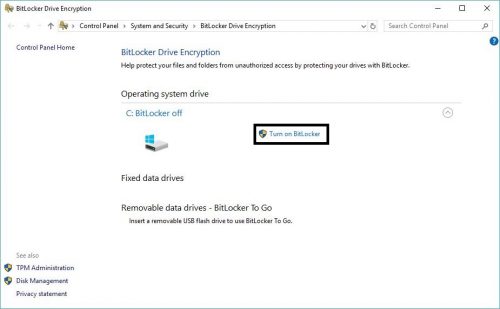
1.Open the start menu by clicking on the Windows icon on the left on the taskbar or by hitting the Windows key on your keyboard
2.Type in “bitlocker”
3.Click on “Manage BitLocker”
4.A window will open where you will need to click on “Turn on BitLocker”
Another window will open where Windows will check if your computer meets the requirements. This process takes a few seconds after which Windows will inform you if your computer doesn’t meet some of requirements for using BitLocker
5.One the system check process is complete you will need to select how you want your key backed up. You can back it up on your Microsoft account, save it to a file or print it. It is recommended to have it on your Microsoft account because there is no way of loosing it and you can always gain access to it by navigating to the recovery key section on your Microsoft account
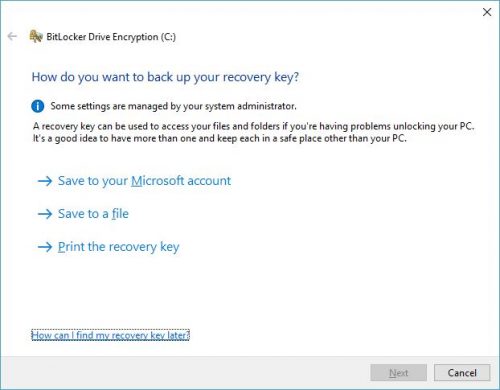
6.It will take a second for Windows to save your recovery key on your Microsoft account after which you can click on “Next” to continue
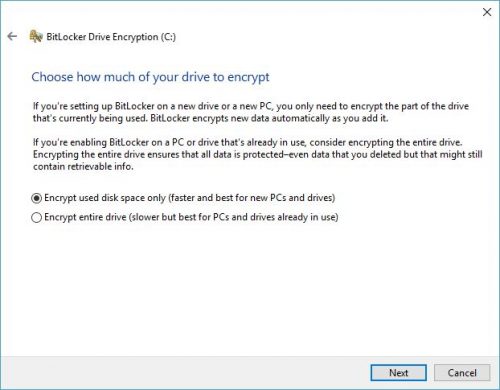
7.In this step you will need to select what you want to encrypt: only the used space on your drive or the entire drive. If you are doing this for a computer that you have used for a while then it is recommended to encrypt the entire drive. If you are setting up the BitLocker on a new computer then you can go with the first option. Note: if you encrypt only the used space Windows will automatically encrypt any new file saved on your computer. Click “Next” to continue
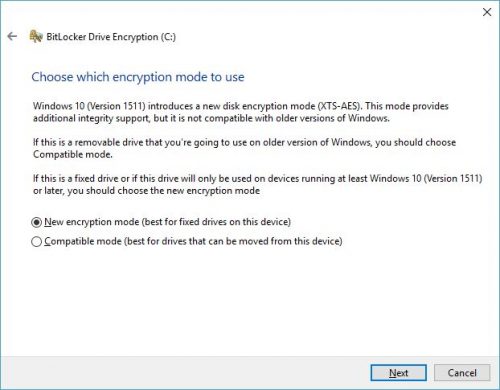
8.Next step is to select the encryption mode. The new encryption mode is compatible with fixed drives (SSD or HDD) with Windows 10 installed and the compatible mode is for removable devices with older versions of Windows. Select this option according to your requirements. Click “Next” to proceed
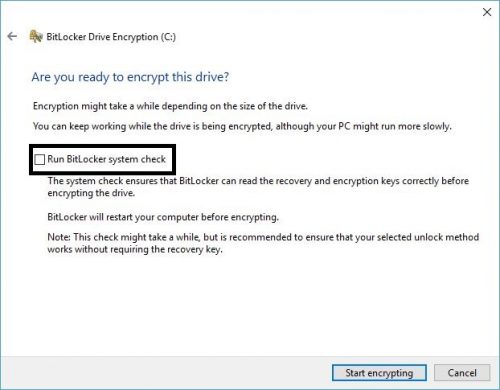
9.The final step before the encryption process begins is to make sure that you have “Run BitLocker system check” ticked. Enabling this process makes the encryption process longer, but it is important so that Windows can check if the recovery and encryption key work correctly before starting the encryption process. Click on “Start encrypting”
Windows will restart in order to start the encryption process. Once it’s completed you can check by opening This PC and navigating to the local drives. If you see a small padlock on the icon of your drive, then the encryption process is completed. Note: Do a full back up before this process.
Frequently Asked Questions and Answers
Q: Can I set this up without TPM?
A: Yes, but in order to encrypt your drive with BitLocker you will need to make changes to the Local Group Policy editor. Open up the Run dialog by using the Windows + R command on your keyboard, type in “gpedit.msc” and click “OK”. From the left navigation panel expand “Computer configuration” then “Administrative templates” then “Windows components” then “BitLocker drive encryption” and finally click on “Operating system drives”. On the right side, double click on “Require additional authentication on startup”. On the new window, make sure that the option is se to “Enabled” and to have “Allow BitLocker without a compatible TPM” ticked. Once completed, click “OK” and proceed to the steps above to encrypt your drive.