")
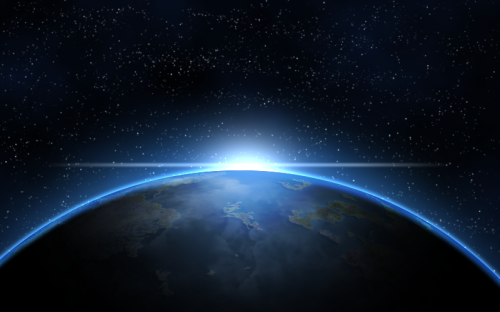
As much as most of us would love to visit outer space, we can bring the cosmos to us instead by using Photoshop. In this tech-recipes experiment we will recreate some of the famous photographs of the sun starting to peek out from the Earth’s shadow.
This is directed at intermediate Photoshop users with at least a little bit of experience. This tutorial will show you a cool take on creating your own realistic planet. This tutorial was preformed on Photoshop CS6, but it will also apply to users running CS5. You will need some sort of earth-like texture.
1.First, we need to create a new rectangular document. The dimensions are up to you. Using the paint bucket tool, fill the background to a solid black. 
2.Create a new layer above the black layer, and select the Brush tool from the tools palette on the left-hand side. 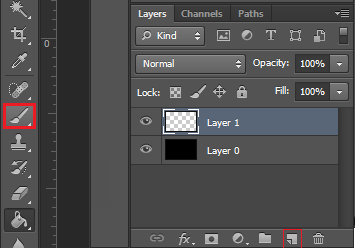
3.Now, bring up brush settings. This can be done by clicking Window and then Brush or by simply hitting the F5 key on your keyboard. We want to create a brush that will aid us in drawing in our star field. 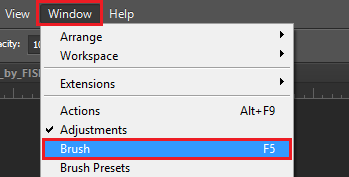
4.First, select Brush Tip Shape. Change the size to 3 pixels, and change the Spacing to 260 percent. Then click on the Shape Dynamics option below. 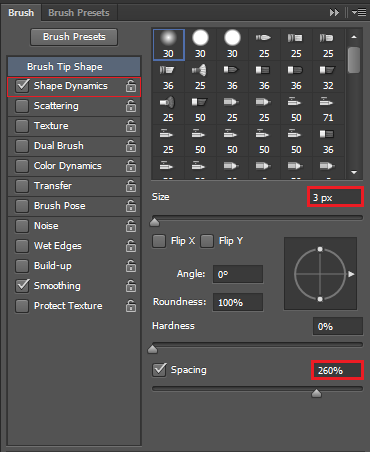
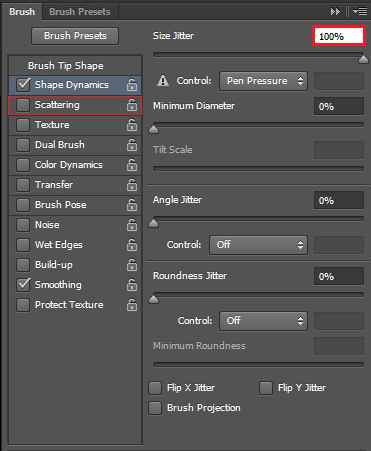
5.Under Shape Dynamics, change the Size Jitter to 100%. Then move on to the Scattering option.
6.Make sure that the check box next to Both Axes is selected, and change the Scatter to 1000%. Then set the Count to 1. Now, move on to the Transfer option below. 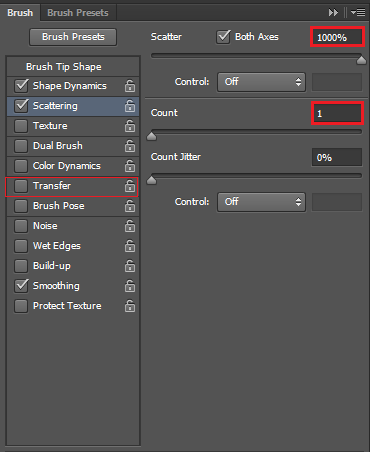
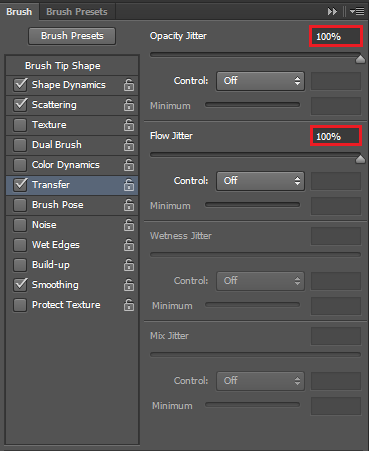
7.Under Transfer, change both the Opacity Jitter and the Flow Jitter to 100%.
Finally our “star” brush is finished and ready for use. If you want to save it for a later occasion, click on the drop-down arrow in the top right corner, and select New Brush Preset….

8.Using the brush, simply paint over your background until you are happy with the density of the “stars.”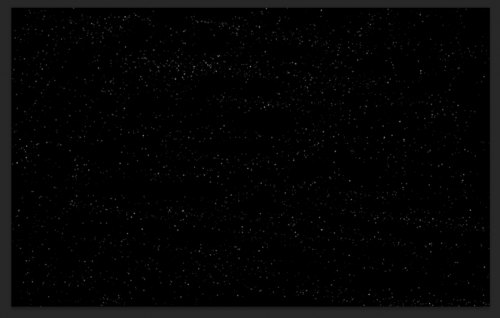
9.We are now getting to the exciting part. This is where we will begin to draw in your planet. From the tool palette on the left-hand side, select the Ellipse tool. If it is hidden away from view, it is located under the rectangle tool. 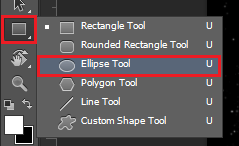
10.Now, zoom out of your document, and draw in a gigantic circle. This can be done by holding the Shift key and clicking and dragging. Once you are happy with the size of your circle, position it the way you would like your planet to look.
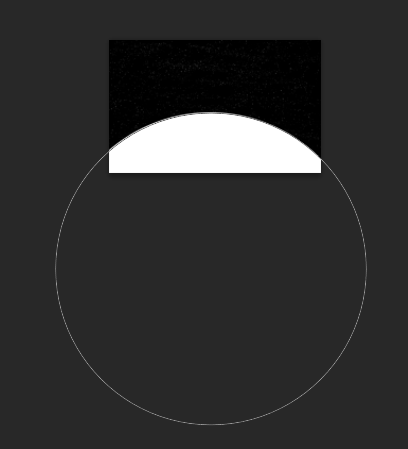
11.Now, double-click on the Ellipse 1 layer, and change the color of the circle to black. 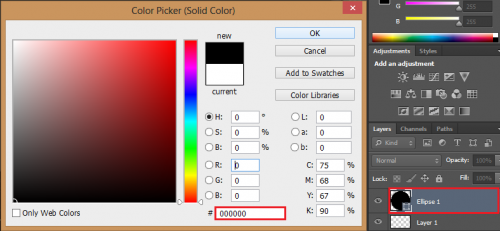
12.Now, we want to start making out “planet” realistic. First, add some Layer Styles, starting with Inner Glow…. This can be brought up by selecting the fx option at the bottom of the layers palette. 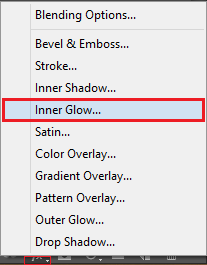
13.Under Inner Glow, adjust the blend mode to Linear Dodge, and then select a baby blue color from the color picker. Now, change the size to 20 pixels and the range to 60 percent. When you have adjusted your settings accordingly, move on to the Outer Glow. 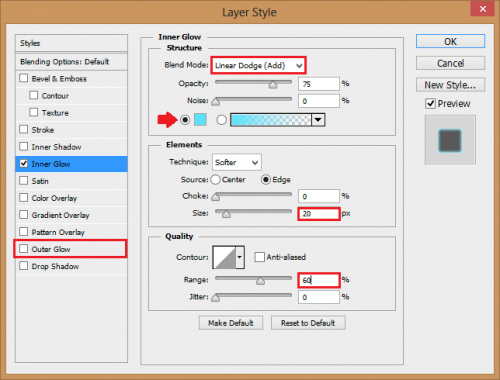
14.Under Outer Glow, change the blend mode to Linear Dodge, and then choose a deeper blue than the one you previously chose for the inner glow. Now, adjust the size to 10 pixels. When you are happy with these settings, move on to the Inner Shadow option. 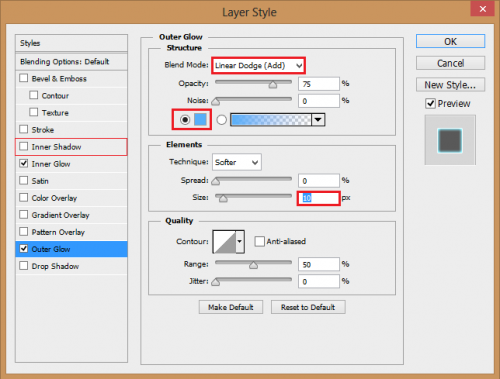
15.Under Inner Shadow, change the blend mode to Linear Dodge, and select a blue similar or identical as the one for outer glow. Now, un-check the box next to Use global light and set the angle to 90 degrees. Change the distance to 10 pixels and the size to 7, and click OK. 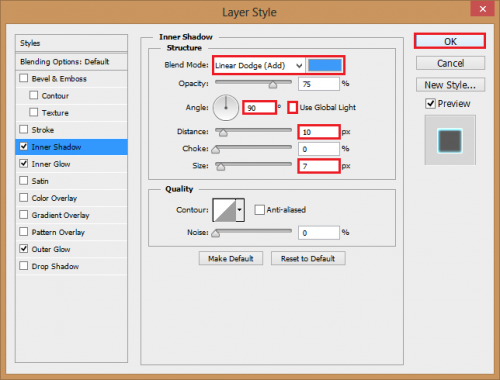
16.Now, this is where the texture comes in. Open it up in Photoshop, and drag it onto your planet. 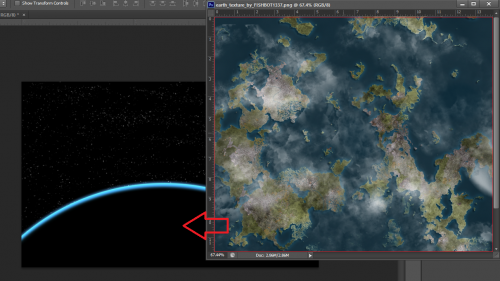
17.Move the texture to the desired location. Make sure that it overlaps that semicircle. 
18.Now, we want to cut out all of the unnecessary texture. This can be done by Ctrl + Click on the Ellipse shape, and then selecting the Add layer mask option.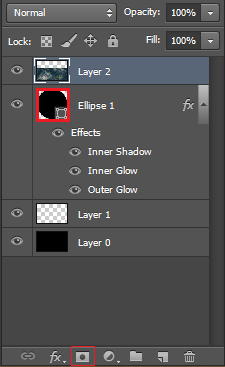
19.Now, we want to make the texture a bit more realistic. This can be done by go to Filter > Distort > Spherize….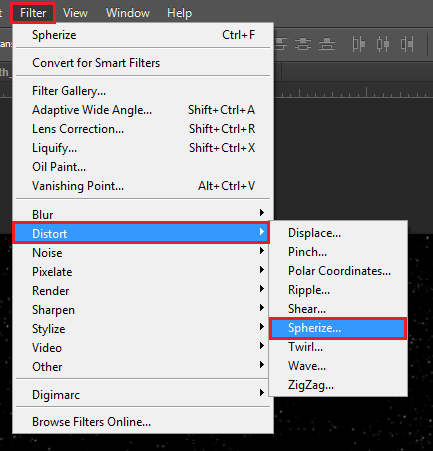
20.Under the Spherize screen, make sure the Amount is set to 100% and hit OK. 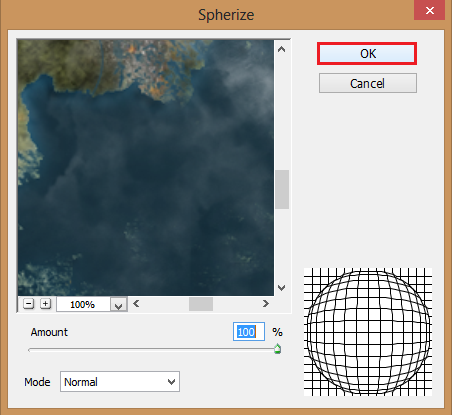
21.This is what you should be looking at by now. It looks good, but it is not realistic enough. 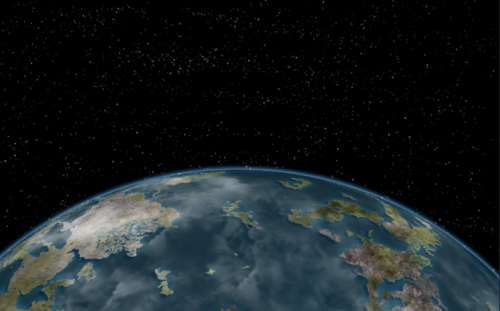
22.Select the texture layer, and change the blending mode to Overlay. 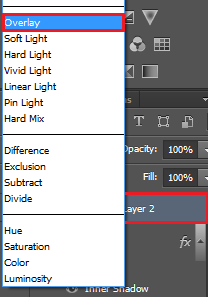
23.Now, change the layer opacity to 70%. 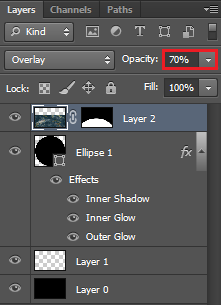
24.Select the layer that holds your “planet,” and click the Create new layer icon. 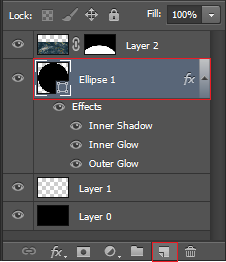
25.Ctrl + Click on the circle in the ellipse layer. 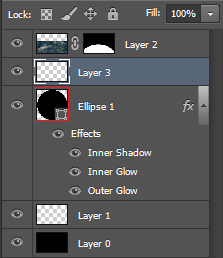
26.Select the brush tool. Then right-click to bring up brush options. Change the brush size to around 475 pixels. 
27.Now, click somewhere around the top to reveal some of your texture. 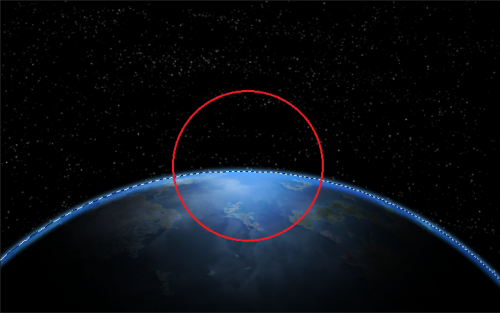
28.The planet looks much better, but we can still keep going. Right-click on the ellipse layer, and select Duplicate Layer….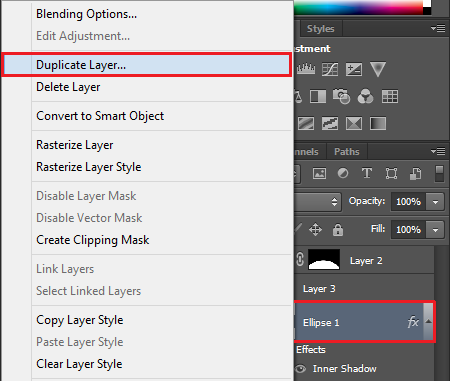
29.Right-click the ellipse layer again, and choose Clear Layer Style. 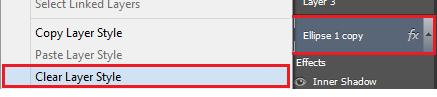
30.On the duplicated layer, select Outer Glow from the fx options. 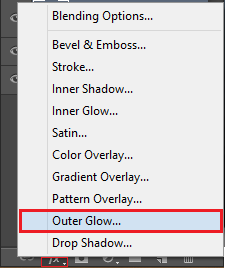
31.Set the blend mode to Linear Dodge and the opacity to 100%. Then select a baby blue color. Now change the size to 155 pixels and the range to 60%, and then hit OK. 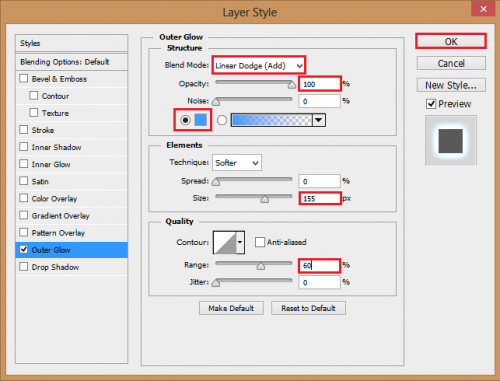
32.Now we want to “squish” this new layer. Go to Edit > Free Transform Path, or simply hit Ctrl + T. 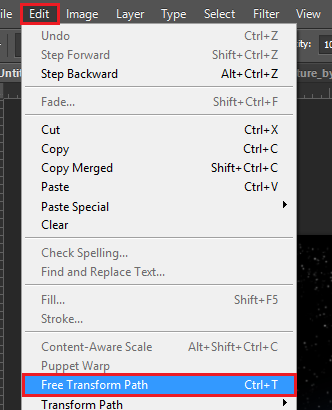
33.Now, hold the Alt key as you decrease the width of the layer. This will make the top have more of a glow than the sides. 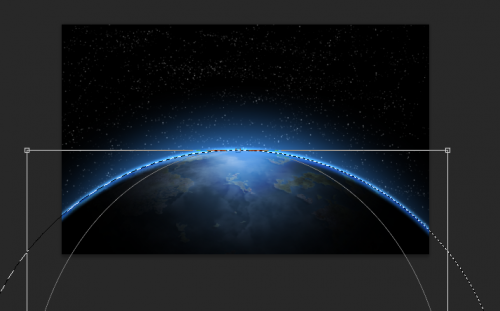
34.Now, we will create a New Layer above our star field. 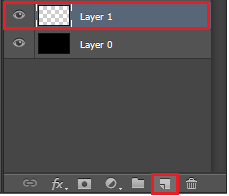
35.Select the brush tool again, and change the size of the brush to 200 pixels. 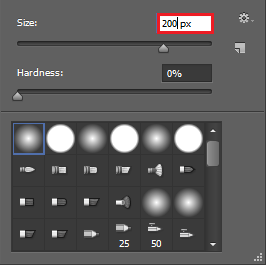
36.Now, click at the tip of your planet. This will create a white glow that will resemble a light source. 
37.Now, create another New Layer above the star field. 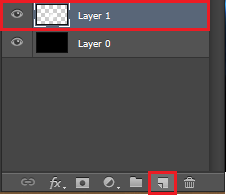
38.This time set the brush to 7 pixels in width. 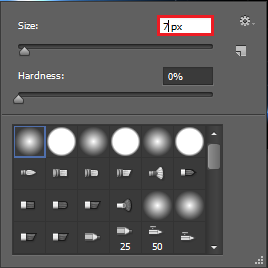
39.Now, draw a straight line by holding the Shift key and dragging your mouse. This line should only be a little bit longer than your light source. 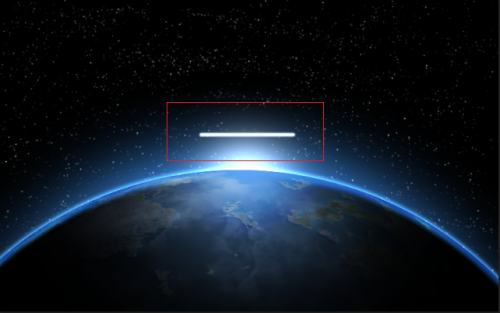
40.This line will be our lens flare. To make it realistic, you have to add a Motion Blur. The Motion Blur can be found by going to Filter > Blur > and then selecting the Motion Blur….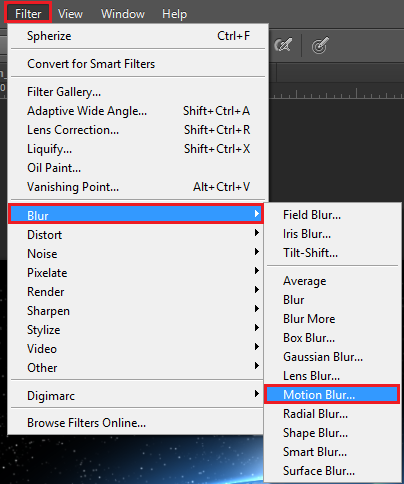
41.Under the Motion Blur options, set the Distance to 500 pixels and hit OK. 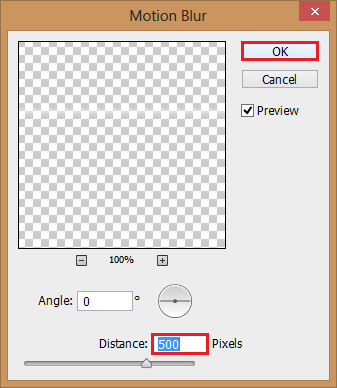
42.Now, drag this lens flare into the proper position You should place it a little bit above the surface, and make it go through the light source, similar to what I have here. 
43.We will create another New Layer above the star field. 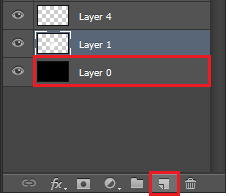
44.Change the Foreground color to baby blue. I used #3e78cf. When you have found a good blue, hit OK. 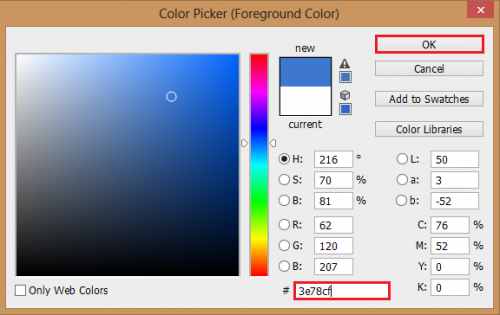
45.Our planet is looking good, but we still want to add a few more details. Go to Filter > Render > Clouds. 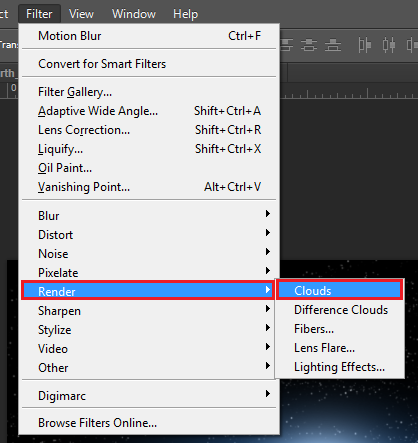
46.With the cloud layer selected, open up Levels under the Adjustments tab. Then set the levels to 0.7.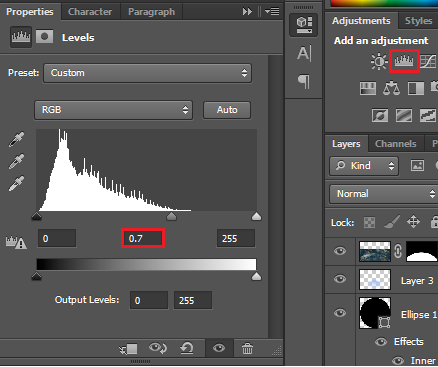
47.Right-click on the cloud layer, and choose Duplicate layer…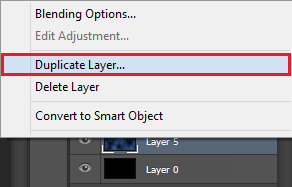
48.You should now have two identical cloud layers. Select the bottom one first, and change the blending mode to Soft Light. 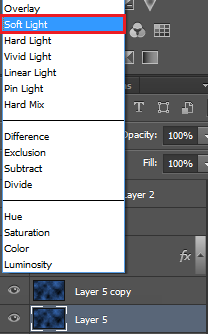
49.Now, select the top cloud layer, and change the Opacity to 35%. You are done!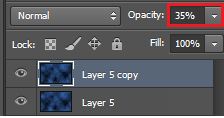
Below is the finished product. It looks very good. You can use the same methods to create other planets in the image or maybe add a moon if you choose. Play around, and find what strategy renders the best results for you.

